The kanzashi technique is a unique way to create unique hair decorations, flowers and spikelets for decorating brooches, belts, festive dresses and accessories.
It is generally accepted that the basis of the technique is an unusual pointed petal made of satin ribbons. But kanzashi jewelry options can be different and complex. In this master class you will learn the secrets of making a kanzashi hairpin, which is based on an original pink flower, consisting of two layers. You can learn other techniques using our other step-by-step instructions.
Preparation for the master class
To create one kanzashi hairpin, the following materials were used:
- squares of white (16 pcs.) and pink (8 pcs.) satin ribbon with a side of 5 cm;
- glue gun;
- lighter;
- scissors;
- golden hug bead and pink mother-of-pearl half bead;
- thread and needle;
- felt circle with a diameter of 2 cm;
- click-clack hairpin or elastic band.
If this is your first time trying to create jewelry from ribbons, read our article about. All master classes on manufacturing.
Stages of making hairpins with kanzashi flowers
Use half the white and all the pink satin squares to create the bottom tier of the flower. The remaining half of the white blanks will go to the plain top layer.
Start by making double pointed petals. First, run the flame of a lighter along the edges of the cut pieces of tape. Take the prepared square.

Fold it in half twice, forming a triangle the size of which is a quarter of the previous piece.

Glue the ends together to form an oblong kanzashi petal. Cut the bottom part evenly to 0.5 cm.

The white petal for the upper tier is ready; there should be 8 such blanks for hairpins made from kanzashi ribbons.

To create the bottom layer of two-color petals, prepare the remaining details. Fold the white and pink squares twice separately.

Place the pink piece on the white one, slightly moving the top piece relative to the bottom (by 1 mm).

In the resulting isosceles triangle, glue two opposite corners.

Also cut off the lower part of the petal.

Two-color and one-color flowers can be created from prepared parts using a strong thread and a needle. Place each petal on a thread, tighten the knot and distribute the parts around the circumference.

Collect a beautiful flower for a kanzashi pin.

Do the same with the eight white petals.

Prepare a suitable hairpin and a felt circle.

Cut a strip in the circle, slightly moving it from the center. This method will allow you to secure the clip-clack hairpin.

Unfasten the clip and insert the tab into the slit.

When both flowers and the blank for attaching the clip are ready, take the hugger and half bead.

Glue the golden-pink arrangement onto the top white flower.

Glue the top tier onto the bottom flower.

Glue a felt circle with a hairpin on the back of the flower to turn the product into a hair decoration.


This use of a delicate flower is not the only one. If you attach a pin to the back, you will get a wonderful brooch. The flower can also be glued to a headband or hair band.
Barrettes are still in fashion today, so make several accessories using ribbons of different colors.
Good day to all!
The Kanzashi technique is not new and there are quite a few master classes presented at YaM. But! These stilettos have one special twist. About her in progress.
So, we cut squares from fabric and ribbon. I have 4x4 cm. The key point is that the fabric must melt.
Chopped. We make a regular sharp petal. Fold the square diagonally, again and again.

We trimmed the tip a little, clamped it, and melted it. And this is where the fun begins. The melted tip must be “flattened” as quickly as possible, but not as usual, but by inserting tweezers with one side inside the petal. Clamped, the “welding seam” became flat. So after melting, throw the lighter as quickly as possible (not very far), intercept the petal and ivy the seam.

3. We cut the lower part of the petal parallel to the top, you can cut it a little harder closer to the middle, then the petals will seem to be recessed inward, also beautiful. After this, we flattened the petal so that nothing would bulge anywhere and LIGHTLY melt the cut area. I specially made an ordinary melted petal so that I could feel the difference. So, let's burn. We made a sufficient number of petals. Due to the resulting “roundness” of the petal, we make 5 petals per flower.

4. Arm yourself with glue. Yes, yes, no sewing yet. Although this is not entirely environmentally friendly and is contraindicated for allergy sufferers. YES! We don’t bring the product close to our face when gluing it, otherwise you’ll smell it and get poisoned. We open the windows and don’t let children in. Spread a little around the seam and glue the petals (as already mentioned: 5 petals per flower). We help ourselves with tweezers where necessary. We align the top part of the flower, because the middle will stick there. If the bottom is a little uneven, that's okay. As you can see, everything comes out quite aesthetically, including the reverse side, which sometimes frightens inexperienced needlework lovers.
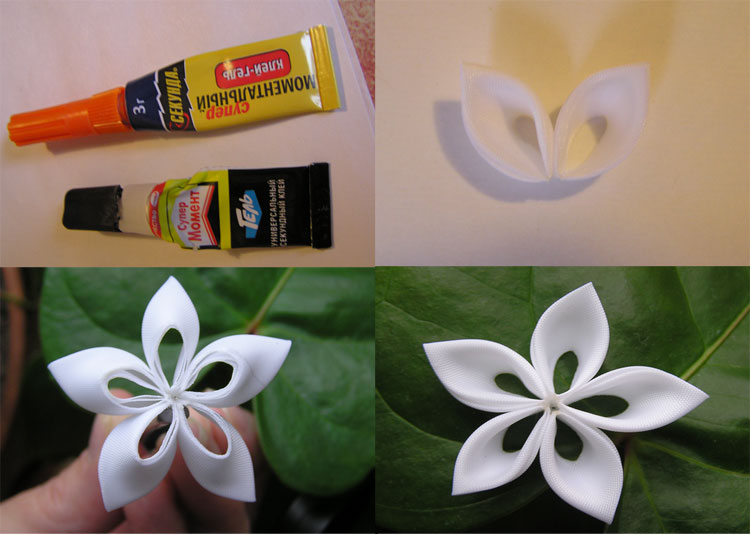
5. Now we glue the beads in the middle. I have imitation pearls. I glued the truth onto a simple Moment-crystal. Speed is not needed here. Accuracy is our main credo! Here the daughter missed her mother and brought a bunch of bugs with her. Let it dry for half an hour. And now we sew. We take monofilament and tediously sew the pin to the flower. Usually they make a base. But if we make it, we will hide all the beauty, the flower will not be carved, then why did we need to flatten the seam
Hairstyle occupies a special place in the image of every beauty. When creating it, much attention is paid to accessories: ribbons, bows, hairpins. The main condition is that the hair decoration must be of high quality, chosen tastefully and please the owner.
It often happens that finished products that are sold in stores do not suit the chosen image. Then there is only one way out - to make a hairpin yourself.
It's always nice to wear jewelry that you made yourself. They differ from those purchased in a store because... the craftswoman puts her imagination into them. A woman of any age can complement her look with an original accessory.
In addition, homemade jewelry can be a good gift for a loved one.
Ribbon hair clips for beginners
Let's figure out how easy it is to make hairpins from ribbons, and how a detailed master class for this work will help us. We suggest discussing this in this useful lesson. Let's try together to build and glue bright, cute and beautiful decorations for the ponytails of little fashionistas.
You can make many useful things from satin and high-quality grosgrain ribbons, but they are most often used to make elastic bands or hairpins. The only thing is that this creative material is easy to work with, practical and, not least important, available to craftswomen in any color and quantity.
By choosing bright ribbons and beads of delicate colors, we will get an original couple of useful things for a girl. These hairpins can be a stylish gift for a holiday or birthday.

Let's start making hairpins from combined ribbons and figure out how simple the master class is.
To make hairpins (elastic bands) from satin ribbons with your own hands, you need the following material:
- 1. Rep tape width 2.5 cm – 62 cm,
- 2. Organza ribbon width 2.5 cm - 60 cm,
- 3. Satin ribbon thin width 0.5 cm - 32 cm orange and 16 cm yellow,
- 4. White bobbin thread and a sewing needle with a small eye,
- 5. Silicone hot glue,
- 6. White plastic center – 2 pcs.,
- 7. Scissors,
- 8. Fastening – clamps 2 pcs.,
- 9. Matches or candle.

A strong base for making hairpins will be two rep ribbons. They need to be cut into two sections for each hairpin, 8 cm long, as shown in the photo.

To make the ribbon more attractive and beautiful, we will cut its edges diagonally into a triangle. To do this, fold the ribbon at the edge with the front side facing inward and make cuts on both sides.

Rep ribbon, like satin ribbon, tends to crumble at the edges and unravel. To avoid this, we just need to take matches or a candle, with the help of which the cut edges need to be slightly scorched.

To combine two tapes, you need to apply glue to the bottom one in its center and cover it with a second tape.

For the central center of the ribbon hairpin, we will prepare pieces of rep and organza. The edges of the organza are also singed, but very quickly and carefully. This material burns easily.

We fold the grosgrain piece of ribbon for the middle in half and sew it with a simple seam.


Since the thread is not torn off, we use it to tighten the part from the rep, securing the thread to a knot.

We also tighten the organza ribbon, singed at the edges, using a thread and a needle.

By pulling the thread through the center of the bows, they need to be fastened together.

We fasten it.

We also sew the second organza bow to the ribbons. We sew all three bows well again and tighten them to fix them in the center.

For two handmade hairpins we will make two blanks.

Cut a thin orange satin ribbon into pieces of the length indicated in the photo.
We will need only 4 of these blanks.

Lightly grease the central part of the rep with glue and attach thin satin ribbons there. Before attaching these additional ribbons, their edges also need to be trimmed and singed.

We will prepare a thin yellow satin ribbon in the form of 7.5 cm segments, the edges of which we cut and singe.

We fasten these segments in the center of the hairpin.

We generously fill the ribbons collected together - the middle ones, which we made from three bows (rep and organza) on the wrong side with hot glue and combine them with the main part made of rep to create hairpins.

To hide the threads in the middle of the hairpin, you can sew a decorative element (button) or place a half-bead or plastic round center there to suit your taste. It is attached using hot or super glue. It is best to use hot glue, since super glue has a specific smell.

To securely attach the hairpin to your hair, you can use a metal clip. It is attached to the base of the hairpins with glue. The finished hairpins are allowed to dry, and they are completely ready.

In this lesson we suggested making these hairpins from ribbons and a master class for them with your own hands. Happy crafting and creative success.


Kanzashi hairpins
Kanzashi is a technique for making flowers from ribbons and fabric. This is a traditional art form of Japan and China. Kanzashi jewelry is quite popular there. They are worn by brides and decorated with traditional kimonos.
The kanzashi technique came to our country not so long ago. Rapidly gained popularity among women of all ages. But schoolgirls especially loved it.
Similar decorations in the form of hairpins, elastic bands, hairpins can be found in stores specializing in hand-made products or you can make them yourself.


Bow hair clip for a schoolgirl
Every mother wants her schoolgirl to look beautiful. A large selection of ready-made hairpins in the store does not guarantee that it will look original and unique. And the advantage of a self-made accessory is that it is made with love and only in a single copy.
To make bows you do not need to have any special skills or abilities. The whole job will take no more than 10-15 minutes.


Hairpins made from grosgrain ribbons
Hairpins made from several types of ribbons can be an excellent addition to the outfit of little fashionistas. Ribbons made of rep and satin go well together.
Rep tape is made from polyester thread. It is a narrow strip with characteristic transverse scars. It is easy to work with, it is highly rigid and retains its shape well.
Satin ribbons are a widely used material for needlework. They are made from viscose or acetate silk.
You can decorate a ribbon hairpin with various decorative elements that will serve as the center of the flower.
If it is not possible to purchase a ribbon, you can make a similar hairpin from small leftover fabric.
The process of creating jewelry is quite exciting and does not require much skill. Making the accessory is easy, just follow the instructions.


Read more about how to make hairpins with mushrooms in the master class ""
Elastic band "Ladybug"
Ladybugs are considered the most beloved insects among children. Therefore, hair accessories that contain the image of the “sun” look funny, cause affection, and most importantly, children like them.
These decorations are quite easy to make yourself. And you can involve your child in the manufacturing process, then the accessory will be even more beloved and valuable to him.


Good afternoon, my friends!
Kanzashi - invisible flowers.
This flower is collected from double sharp petals of kanzashi. The petals themselves are made from two years, of different colors. For this work, I chose pink and milky white (from now on I will simply call it white) colors.
To make 5 flowers I needed:
- Pink satin ribbon: width – 2.5 cm, length – 2.5 meters.
- White satin ribbon: width – 2.5 cm, length – 2.5 meters.
- Silver ribbon: width – 2.5 cm, length – 3 cm.
- Rhinestones – 5 pcs.
- Hairpins – 5 pcs.
- Hot glue gun.
I photographed the process of assembling the petals and the flower itself step by step.
And I will describe it step by step as well.
In the photo below, in the first and second steps, the tone of pink is different. Don't pay any attention to this. These two frames were photographed later, when the work was ready and the ribbon was finished. Therefore, for the master class, I had to take a ribbon of a different shade of pink.
So:
- We take two strips, pink and white - 7 cm each.
- Place the pink stripe on top of the white stripe. Both strips are face up. We move the pink stripe down a little, slightly opening the white stripe. The result is a thin white border. I personally like this border to be 2-3mm wide.
- We take strips as in the photo. We clamp it with tweezers and melt the edge of the candle. Let me remind you that it is better to melt at the wick. Here the candle smokes less.
- When the edges of the ribbons have melted slightly, remove them from the candle and pinch with tweezers. In the same way, solder the other edge.

We fold the ribbons and solder them
5. Now fold this double tape in half, back to back. And press lightly. This is done in order to find out where the middle is. In the future, with experience, this will no longer be necessary.
6. Fold the right edge as in the photo.
7. Then, wrap the left edge. I do it so that the corner is not quite sharp. That is, so that the center is slightly open. This can be seen in the photo.
8. Now, turn the resulting corner over.

9. Fold our corner.
10. You should get an “airplane”, as in the photo.

Fold the ribbon and form a petal
11. Turning our “airplane” over
12. First bend one side, pressing it towards the center.
13. Then, bend the other side.
14. You should get a petal like this.
Important In the photo, I marked the fold with a blue dotted line. This is the middle of the petal. While folding the petal, it is advisable to keep it so that the petal turns out neat.

Fold the ribbon and form a petal
15. This is what the petal looks like from the side.
16. Take the petal by the front part, as in the photo.
17. Cut off the edge of the ribbon, as in the photo.
18. We clamp the cut edge with tweezers and melt the edges over the candle. In this case, hold it a little longer. So that all layers of the petal melt.

Trim off the excess and seal the edge
This is the final petal.
1. Top view.
2. Bottom view.
We begin to collect the flower.
3. Apply glue to the side of the petal. Apply the second petal and press firmly. Hold for a few seconds until the glue sets completely.
4. Glue the remaining petals in the same way.
It takes me 7 petals to make one flower.

Collecting a flower
It turns out to be a flower like this.

It should look like a flower
All that remains is to decorate the core of the flower.
Glue together the white and silver ribbons. And cut out a small circle. Approximately 5-7 mm in diameter.

Glue two ribbons for the flower core
Glue the circles to the middle of the flower. And on top, we also glue rhinestone.

Decorating the core of the flower
All that remains is to glue the invisible ones.
1. Turned the flower over. And glued a small felt mug. Diameter – 2.2 cm.
2. From pink ribbon, I cut out circles with a diameter of 2.5 cm. And with a hot needle I made two slits, as in the photo below.
3. Threaded a bobby pin through the slot.
4. Apply glue to the underside of the pink circle. I placed it on the felt and smoothed it out. The edges of the pink circle were folded over, covering the felt.
I also want to add that I used light and small bobby pins for my hair, since I made these flowers for a 9-year-old fair-haired girl.

Glue a bobby pin to the flower
These flowers are kanzashi, I first made 5 of them.
Attaching flowers to bobby pins is convenient because you can come up with whatever hairstyles you want. Whatever your imagination inspires you to do.
For example, this hairstyle.

Or this hairstyle.
True, especially for this hairstyle, I made another flower of the same kind. But I glued it not to an invisible one, but to an elastic band. But, sorry, I didn’t photograph this moment.
In total, I got 6 of these flowers, for different hairstyles.

Hair jewelry – Kanzashi
Or this hairstyle option.

Hair jewelry – Kanzashi on invisible
I've been so lucky with the models.

Hair jewelry – Kanzashi on invisible

Hair jewelry – Kanzashi on invisible
By the way, a year ago I made exactly the same flowers - kanzashi. But she attached them not to invisible ones, but to stilettos. And she made them not for a girl, but for a young girl.
Kanzashi - flowers on stiletto heels
These are the flowers.
And they differ from the previous ones only in that one of the ribbons is pure white. And there are stamens, but they are glued not in the center of the flower, as is usually done, but between the petals.
Well, the pins themselves are attached to the flower, according to the same principle as invisible ones.

And this is how these flowers look in a hairstyle.

Hair jewelry – Kanzashi with stiletto heels

Hair jewelry – Kanzashi with stiletto heels
And one moment! The petals for these flowers can be made from ribbons 6 cm long. For flowers with stiletto heels, I used exactly this length of ribbons. The petals are a little smaller.
P.S. I want to add. I really like this technique - kanzashi. It’s a pleasure to work with her, a pleasure. And the products look great. By the way, not only jewelry turns out beautiful.
I personally really like curtain tiebacks decorated using this technique. I have already published two master classes on tackling:
Every holiday hairstyle needs decorations. Flowers created to match the color look unsurpassedly beautiful. kanzashi technique. If you find among the satin ribbons a color that matches your dress or eye shade, we are ready to introduce you to a master class on creating pointed little flowers.
To create small flowers, prepare:
Satin ribbon 2–2.5 cm wide. If you want to combine colors, then each flower can be made in a different color or a pair can be highlighted in a different tone petals in a flower. The coloring depends entirely on your imagination and wishes. Ribbon length - approximately 10 cm is spent on one flower.
- Cautery on wood. Many flowers using kanzashi technique can be created using a lighter, but miniature petals require precision in work, so it is more convenient to draw cut lines with a heated device.
- Glue. Use any transparent and quick-drying glue. But the best is hot glue.
- Hairpins.
- Small rhinestones to decorate the center of the flower.
Let's start with the petals. To do this, cut the ribbon into squares, the size of which is 2×2 or 2.5×2.5, depending on the width of your ribbon.
We bend each square from the corner to the opposite corner so that a triangle emerges.
Once again we bend the triangle, try to evenly overlap the edges.
Now we bend it inside the triangle and get a small petal blank.

At the next stage, you need to attach the workpiece to the glass, press the work with a metal ruler (which does not melt from the action of the burner). The ruler should lie along the line connecting the base point of the petal (the place from which the petal “grows”) and the point marking the middle of the back of the petal. If you draw a line parallel to the bottom of the workpiece, you will not be able to turn the petal out.
Turn out the petals.
If the base turns out to be elongated, then trim 1–2 mm, otherwise the flower will be ugly.

Having created 6 petals, you can begin gluing them. First, cut out a 5-6 mm base from satin and singe its edges. Then start gluing on the petals.
The result is a flower of 5–6 petals. Be sure to cover the middle with a small rhinestone; its color should stand out a little against the background of the flower.

Make another circle with a diameter of 7–8 mm. Make two holes in it with a hot awl at a distance slightly less than the ends of the pins. Now carefully insert the pin.

Apply glue to one of the satin circles and connect the flower base to the satin base at the pin.

Holidays flowers on stiletto heels ready to decorate any hairstyle.

Flowers made using the kanzashi technique for hairpins! A floral decoration that no representative of the fairer sex can do without!
Once upon a time, these devices decorated the hair of the favorites of kings and queens, but the peak of popularity came at the beginning of the 20th century, when New Zealander Ernest Godward invented spiral stud. One of the most ancient inventions on earth, as excavations have shown, was made from stones, precious metals and ivory. Today they are almost no different, simple invisible pins decorated with flowers made of leather and ribbons, lush kanzashi, patterns of rhinestones, semi-precious stones and imitating them.


