Various weaves are a sign of good taste and allow you to give long strands a neat and well-groomed look. That is why DIY braids for long hair are a huge success not only among young teenagers, but also among young women. Do you want to learn how to braid beautiful braids? Read our master class more carefully and perform weaving for all occasions!
Classic fishtail
To create this hairstyle, you will need a massage brush with natural bristles, a hair clip or elastic band, and water or a hair smoother.
- Comb your hair and lightly moisten it with water or a special product.
- Divide the hair into two equal parts.
- Separate a thin strand of hair from the right side and throw it to the left.
- On the left side we take a strand of the same thickness and throw it to the right.
- We continue weaving to the edge of the braid.
- Secure the tip of the tail with an elastic band or a hairpin.

A fishtail can be neat and sleek or tousled and loose. If you wish, you can decorate it with flowers, ribbons or beautiful hairpins.
Snake all over my head
This long braided look is a stylish combination of thin braids and a loose bun.
1. Divide the hair near the face into a clear side parting.

2. Make another parting from one ear to the other.
3. We collect the back of the head into a tight ponytail.

4. We divide the strands to the right of the parting into three identical parts and weave them into a regular three-row braid.
5. After a couple of centimeters, we begin to add thin strands to the braid. You only need to take them from the left. The weaving should be quite tight and dense.


7. We continue weaving, periodically adding strands to the left. We reach the end of the parting.

8. We make a loop again and return to the face.

9. You need to create three twists - you will get a retro style hairstyle.

10. Fix the tip of the braid with an elastic band and connect it to the tail.
11. On the left side of the parting, we separate three equal strands and weave according to the same pattern. We also fix the tip with an elastic band and connect it to the tail.

12. We divide the tail itself into two parts and twist each of them into a fluffy rope.

13. We lay out the finished strands in a circle around the base of the tail and secure it with bobby pins or hairpins.

Crown braid for long strands
Do you want to feel like a real queen? A crown made from your own strands will help you with this, as well as the following set of tools:
- Comb;
- Clip, hairpin or bobby pin;
- Rubber;
- Hairpins.
1. Comb your hair, separate a part from the temple to the ear and pin it with a clip.

2. Immediately behind the ear, separate three thin strands and begin to weave them into a French braid in reverse, but add only the top strands.

3. We move to the back of the head and carefully ensure that the braid goes straight and does not creep down or up. We weave our crown to the place indicated by the hairpin, and continue weaving above the forehead.

4. Having reached the place indicated by the invisible thread, we continue the usual weaving of three strands.

5. Tie the end of the braid with an elastic band and connect it to its base.
6. For reliability, we fix the crown with hairpins. And we decorate the junction with a flower.

Feminine braids for long hair
Airy, feminine braids look best on long hair. If you have the desire and time, try this option for yourself.
Step 1. Comb your hair with a straight or slightly angled parting.
Step 2. Separate three not very thick strands near the face (on the right side).

3. We begin to weave a classic three-row braid from them, adding thin curls at the top and at the bottom. The weaving should not be tight. Make it airy and light. Only in this case the hairstyle will turn out with a bang.

4. We do the same on the left side. You will end up with two soft braids.

5. Carefully add even more volume to the braiding - we separate both braids with our fingers along their entire length and pull out individual curls.

6. Cross the braids over each other and secure them with hairpins. We hide the ends inside and also secure them with a hairpin.

Pigtail around the edge of long hair
With this simple but original hairstyle, you can quickly tidy up even very long strands.

- Separate a strand at the back of the head and divide it into three equal sections.
- We intertwine the strands with each other as for a regular three-row braid.
- Now we begin to add individual curls on the right. The hair on the left should not get caught in the braid.
- We reach the end of the braid and tie the end with an elastic band.
- To give the braid some airiness, gently stretch it with your hands.
Greek braid hairstyle
This romantic and very beautiful braid for long hair will take literally minutes, but the result will exceed all your expectations.
1. Gather your hair into a ponytail (tight), leaving only a few thin curls near your face.

2. The tail itself must be divided into four equal sections.

3. Take the first one and divide it in half. We braid a fishtail braid.

4. We do the same with the three remaining sections.

5. We separate each braid with our fingers - this will make it lacy and free.

6. Place the first braid from left to right around the head. You will get a headband of hair. We fix it with invisible ones.

7. Place the second braid under the first from right to left and also secure it with hairpins or bobby pins.

8. Now we take on the third braid. We lay it in a circle from left to right.

9. Place the fourth braid in the central part of the head in the shape of a flower. We fix everything with pins and bobby pins.

Four-row braid in folk style
Do-it-yourself braids for long hair cannot do without an original four-strand braid. This styling will make even very thin and sparse strands look voluminous.
Step 1. Gather your hair into a ponytail (tight). Its location is at your discretion.

Step 2. Divide the tail into 4 sections.

Step 3. Place 1 section over 2 and pass under 3.

 Step 4. Overlay 1 section onto 4.

Step 5. Place 4 under 1 (it should be in the center).
Step 7. Throw 2 on top of 3.
Step 8. Skip 4 over 2.

Step 9. Braid the braid to the end. Secure the tip with an elastic band. To make the styling beautiful, do not make it very tight.

Wide braid for long hair
Unusual weaving in folk style that will decorate any appearance.
1. Gather all the hair into a ponytail (tight).

2. Divide it into three sections.

3. We begin to weave a three-row braid, leaving thin strands on the sides.

4. We take apart the braid with our fingers, giving it more volume.

5. Weave an outer braid from the remaining strands and also stretch it with our fingers.

Volume braid for long hair
- First, comb the strands with a comb and divide them into three equal parts.
- We make an inverted French braid - we pass the left strand under the middle one.
- We do the same with the right strand.
- We separate a thin curl from the general part of the hair on the left, attach it to the left strand and place it under the middle strand.
- We do the same on the right side of the weave.
- We continue the braid to the end.

Step 7. Gently stretch the loops with your fingers, this will add volume to the braid.
Step 8. Curl the hair at the back of the head in the shape of a snail. We fix the bun with hairpins.

Romantic braiding for long-haired ladies
This styling is based on the same spikelet, but the side braid (one-sided) gives it originality.
- Comb your hair with a comb and part it sideways so that the left side is much larger.
- We braid the left section of hair into a spikelet.
- From the right side we braid the hair along the very edge, picking up curls from only one side.
- We tie both braids at the base with an elastic band. Decorate it with a beautiful bow or hairpin.

Elegant braid
Step 1. Comb the strands with a comb.
Step 2. Separate a thin strand of hair on the right and weave it into a one-sided French braid.

Step 3. Bring the weaving to the end and tie the end with an elastic band.

Step 4. We braid the lower part into a spikelet and also tie it with an elastic band.

Step 5. We wrap the ends of the braids under the bottom and secure the bun with hairpins.

Step 6. Decorate your hair with a bow or hair clip.
Inverted ponytail braid
Step 1. We collect the strands in a low ponytail, make a depression near the elastic band and turn all the hair through it. You can attach the bow right away, or you can leave it until last. With a bow, it is a little more difficult to twist your hair, but the result will be different.
Step 2. Form a braid from loose hair and tie its end with an elastic band.

With braids made using this tutorial, you will look absolutely amazing! Get ready to receive compliments!
A huge number of people consider beautifully braided long hair to be a feminine and attractive hairstyle.
Plus, this method of styling curls is rightfully considered not only one of the most elegant and neat, but also the most uncomplicated and practical.
In fact, no matter what tricks the fair sex comes up with when coming up with complex hairstyles, braids for long hair will, in any case, remain one of the most popular ways of styling luxurious curls in a beautiful and neat hairstyle.
If many years ago it was customary to braid long hair into one large braid in the simplest way, now there are many magnificent images with different braiding techniques.
Braids for long strands are appropriate almost anywhere. With one of these you can go to work, to friends, to the beach, to a party and even to a gala reception.
It is also worth noting that braids are perfect for any outfit, from formal office suits to evening dresses. What’s even more pleasing is that learning how to braid long hair on your own requires not only patience and perseverance, but most importantly, desire.
How to learn to braid hair
It is recommended to start with simpler options. First, you need to choose the easiest way to model styling using braids, learn how to do it perfectly, and then you can proceed to more complex options.
For example, if you manage to master the technique of weaving voluminous or tight braids for everyday styling, you can easily turn them into a beautiful evening hairstyle by adding some additional accessories and elements to it.

This technique offers many benefits.
Firstly, you can be absolutely sure that you can make yourself a real masterpiece in the shortest possible time, without having any available tools.
Secondly, in order to make a simple weave, you do not need to learn it for too long.

In order to learn how to make such braids yourself, you can purchase special video tutorials. The most important thing is not to stop at what you started. Make every effort and be patient, and then the resulting result will be able to exceed all expectations.
Braiding long hair
A beautiful braid on long hair can be styled in a variety of ways, and it is not at all necessary to leave it “as is.” Nowadays, stylists have come up with many styles with which you can create your own unique image.
Here are some weaving options:

Ukrainian braid
The “basket” or braid in the Ukrainian style has long been at the peak of popularity. The “blame” for this is not only Yulia Tymoshenko, but also the natural beauty and aesthetics of this hairstyle. Moreover, braiding your curls in Ukrainian is a very practical move when you don’t have a styler or varnish on hand to fix the strands.

Braiding it is very simple: make a regular braid, and then wrap it around your head, securing it with invisible pins. To get the hairstyle right, you need to have enough hair length to wrap the braid around, maintaining proportions and shape.

Spit waterfall
This amazing hairstyle reminds us of the ancient Slavs. In fact, there is nothing simpler and more natural than such a braid, and the image itself turns out to be gentle and feminine.
This braid can be a little tricky to make: separate three strands at your temple and start making a regular braid. However, in order for its direction to be horizontal, you need to constantly add new strands one at a time, weave them in, and then lower them down.
Another version of the “waterfall”: start weaving the curls from the temple on one side, weaving horizontally. At the same time, make a second braid from the remaining strands, then connect them at the end.

This type of hairstyle is also called a French braid. The point is to weave a thick, tight braid from thin strands.
You need to start weaving such a braid from the forehead. Continue weaving it along the entire length of the curls, constantly grabbing new strands and moving them down the weave. The effect of this hairstyle is amazing: the braid seems to lie separately from the hair, on top of your styling.

The beauty of this braiding is that the braid can be made not only in the middle of the head, but also on the side, and even braided around the head. Here everything depends only on your imagination.
Scythe dragon
It is woven in a similar way to, with the only difference being that new strands are grabbed and laid on top of the main weave. You also need to weave it from the forehead, gradually moving to the top of the head and further down along the entire length of the curls.
Depending on your preferences, you can grab not all the strands, but only in the middle, leaving the hair on the sides of your head loose. You will get a sort of “Malvina” hairstyle with a braid.
This styling is very easy to do, and you can experiment with different variations.
For example, you can make a thick braid starting from the forehead, and then bend it and secure it at the back of the head with several hairpins.
Second method: braid the braid French style on the side, leaving some of the strands loose. Twist loose curls into a bun and secure with hairpins along with the braid.

Thick braids

Typically, this hairstyle means weaving several braids at the same time, which creates the effect of a very thick braid.

Braid one side of your head. When you reach the middle, start weaving another braid from the main strands, weaving strands of both braids into each other.
Braid hairstyle: what to combine with
Various ways to create masterpieces for long hair, as well as decorating them to express your imagination, provide enormous scope. Braiding can be complemented with bright beads, ribbons, beautiful hairpins, headbands and even fresh flowers.

The only rule when creating a harmonious hairstyle is the correct selection of accessories. This means that the styling style you choose should match the style of your clothing, and the jewelry and hairstyle itself should be combined with makeup.
If you prefer a sporty style in clothes, then braid a spikelet or, for example, a tight braid, and already under an evening dress you can create an elegant hairstyle from a French braid. A classic hairstyle with a tight braid is perfect for a business office style.

And most importantly, even if you masterfully know how to braid beautiful braids on long hair, you don’t need to stop there, you should always strive for perfection.
Try to experiment, search for new models of hairstyles with braids for long hair on the Internet, create new styles, follow fashion trends.

So, gradually step by step and unnoticed by yourself, you will become a real master and expert in creating hairstyles of completely different shapes. You can always perfectly highlight the beauty of luxurious hair and your individuality and unique style.
The main rule in performing any such installation is that it be done as carefully as possible. In this case, admiring glances will always and everywhere accompany you.
(2
people already rated)
Even in ancient times it was said that a girl’s braid is her beauty!

Time passed and the fashion for long hair became a thing of the past. Women leading an active lifestyle prefer shorter haircuts, as they require less maintenance. All representatives of the fair sex want to have healthy and beautiful hair. Over the years, luxurious long locks of hair have gained a new appreciation among women of all age groups.
New types of braids have appeared that can be used for long hair: French braid, elegant braid, waterfall braid, Dutch braid, fishtail. You can also braid hair from four, five, six, seven or more strands.
Braiding - “Spikelet”
The most common and simplest hairstyle in terms of complexity can be called a spikelet. From ancient times it was believed that if a girl braids a spikelet in her hair, it means she is in a romantic mood. You can create an image for yourself that will give you a completely new, incredibly attractive appearance.
Perhaps you are already accustomed to doing braids for long hair in the usual style, without bothering too much. To braid a spikelet in your hair, you need to comb your hair quite thoroughly, and then, without parting, your hair is combed back. The hair near the forehead is taken in one strand, which is divided into three small parts.
Braiding a spikelet begins in the same way as in a regular braid. The difference is that hair is added to the braid from the total mass of curls. After you reach the back of your head and the adjacent hair ends, you can make a regular ponytail, secure it with an elastic band and then continue to weave a regular classic braid. You can also continue to weave the spikelet, picking up neighboring hairs. Both a regular braid and a spikelet will look great, decorating your hairstyle.
Braiding - “French braid on the side”
Many people don’t know how to do a French braid backwards or on its side. In order to modify the previous option, you can braid a French braid into your hair. First, you need to comb your hair thoroughly. The main tuft of hair is separated from the top and divided into three parts. The thickness of the strands is chosen arbitrarily as desired. A French braid made from thick strands will be different from thin strands of hair, you should choose your option depending on the expected result. 
The left strand of hair is placed under the right and middle, then the left strand is placed under the middle and right, respectively. In the next step, the previous steps are repeated, only side or temporal hair is added. Additional hair is applied to the main central part. Continue French braiding until the hair on your head ends. At the end of the braiding, the braid can be secured with an elastic band and decorated with various hair accessories. For clarity, if it is difficult to understand how to weave a French braid, then you should watch the whole process on video.
Braiding - “Square braid”

A “square braid” will look voluminous and beautiful from all sides. You can look at a photo of a square braid for long hair to see how attractive this hairstyle is.
At the top of the head, the main strand of hair is selected, which, as in previous versions, is divided into three parts. The left strand of hair is divided into two equal parts, after which the middle strand is threaded between the left strands, and the left strand is gathered together again. The same process occurs with the right strand of hair. When you braid a “square braid” over your head, you need to braid the neighboring hairs on your head as well. You can also braid the braid from the tail, in which case the process of braiding the braid continues until the end of the hair. There are also options for braiding five-strand braids.
Braid made of strands.
A braid made of plaits is a fairly popular and widespread hairstyle that is suitable exclusively for hair of medium or longer length.
As a variation of such a braid, you can offer a spikelet of strands.
Braiding - elegant “Snake”
Usually girls braid this type of braids if they are going to go to any holiday or special event.


Braiding a “Snake” is very simple, but if you decorate it correctly and elegantly, you can achieve a simply stunning effect.
To begin with, a small strand of hair is separated from the right side on the temporal part of the head, which is divided into three parts. Weaving a regular classic braid begins with these strands, directing it to the opposite side of the head. For each subsequent weave, a new part of hair is added. It is very important to select small sections of hair so that additional sections of curls remain for braiding the braid in the other direction. After you reach the opposite temple of the head, start braiding in the opposite direction, changing direction. This hairstyle will look elegant and beautiful on long and thick hair.
Braiding - Flowers in hair from braids
Before weaving flowers from braids, your hair must be treated with a special gel or mousse. This procedure is done to ensure that the hair does not fall apart during the braiding process.

To create an openwork braid, the weaving process begins as usual, the left strand is overlapped with the middle one, then the right one.
During the braiding process, when the left strand of hair is selected, a small part of it is pulled slightly to the side. The same process is applied to the right strands of hair. By pulling sections of hair to the side, you get beautiful braids with elegant lace edges. 
You can also give the braid more volume by stretching its sides to the sides. This will make your braid visually wider and more voluminous.
Now the so-called knot braids have become very popular. There are many options for creating them. These braids are very easy to braid. All you need is to stock up on a dozen small rubber bands, preferably silicone ones.
Also, many have heard about the most beautiful braid under the poetic name “fishtail”. This braid is woven very simply from two strands.
And you can come up with very, very many variations of hairstyles with a fishtail braid.
Elegant flowers in the hair are a wonderful decoration.
It is not always convenient and beautiful to use artificial flowers.
To create attractive flowers, you can use openwork braids. To begin with, take a small strand of hair and make a lace braid from it, but in this case the hair is pulled out only from the outside. Next, the braid is rolled up in a circle, leaving openwork edges, the so-called flower petals, around the edges. The rolled up braid is fastened crosswise with bobby pins, while the flower petals can be straightened even further. This is how we get an elegant flower, which will become the main decoration of the hairstyle.


Long hair is one of the natural decorations that is accessible to many. Some people mistakenly believe that such beauty is a thing of the past (such people prefer short or medium-length hair), but modern stylists have repeatedly proven and continue to prove the fallacy of such judgments. They invent more and more new variations and techniques for braiding. We invite you to familiarize yourself with some of them in the catalog “Hairstyles for girls with long hair, photos step by step.
Braids for long hair photo
Here are several options for a master class (step-by-step instructions, diagrams, pictures) of modern weaving from two strands with your own hands and at home:
French braid - the original way of weaving starts from the top of the head. Divides into two strands. You need to cross them together, placing the left one on top of the right one. Then, with each crossing, add a braid to each strand. You can braid it to the end in this way, or gather the remaining hair at the neck into a ponytail. A French braid, like a spikelet, can be woven not only in the center. But also diagonally, or in a circle;
Popular articles:
braid from Zhguty- just like the French braid, it originates from the crown. You also take two strands, but twist them clockwise, forming two strands. Then twist them together, but counterclockwise. Take a strand from both sides and twist it again into two strands, which you twist together in the opposite direction. Thus, braid the braid to the end;
fish tail- today this is a very popular type of braiding. It does not require much effort or absolutely straight hair (it is possible even with curls). On the contrary, loose strands add charm. Separate a strand from both temples and cross them together. Then take the next strands, connecting them with the top ones and cross them together in a mirror image. Weave like this until the end. At the end, secure with an elastic band.
At the same time, “Spikelet” remains considered the most popular; it is simple to perform, looks great and does not cause much trouble when shaping a hairstyle, moreover, it is a basic method for many variations for any occasion (holiday or every day).
The classic variation “Russian braid” does not go out of fashion, both in everyday and festive settings; it is especially beautiful if you slightly unravel each binding, making it slightly flattened (openwork). Such braids will look impressive in everyday use (for girls to school), for girls at a prom, or for women at a wedding. It can be one in the center, on the sides, or several small ones along the entire back of the head, collected in a bun. There are a lot of ideas for weaving, you just have to choose one that suits you.
A light braid of the “Waterfall” type looks very elegant (simple with one light diagonal braid, or a complicated version with several also light cascading braids, with or without bangs). The rest of the hair can be left loose or tied up in a bun. It also looks luxurious in a wedding version (another evening formal event) with or without additional flowers (other elements). You can do it yourself in 15 minutes (quick transformation), and you can easily appreciate the effectiveness and versatility of the hairstyle.
Let us add that the shape of the braid can be varied according to your taste, for example, from an ordinary Russian braid you can make unusual shapes, for example, braiding a heart, a flower or even a crown. It can be used to simply and elegantly frame hair at the frontal part with or without loose curls, and there are many more variations in its pure form and with elastic bands, ribbons, bows, veils, etc. The number of options depends only on your imagination. You can also practice techniques and learn the art of braiding with Barbie dolls (an excellent children's activity for a little girl).
Bangs Ideas for Beginners
Beautiful weaving with ribbons
Simple easy ideas for every day
Evening hairstyles for weddings
Video of braiding long hair
For those who like to see practical performance with their own eyes, we offer video lessons of simple techniques for beginners (first aid in an accessible language). This will allow you to learn the process of weaving fashionable shapes step by step, create and perform them yourself. Let's add just a few recommendations for choosing a model for different face types:
Oval - stylists call this type a “real standard”; the owner of this shape can experiment and try on a variety of hairstyles, of any type and shape, and all of them will be, as they say, “befitting”, especially in combination with thick hair;
Square – transformational types of hairstyles should be considered. For this type, the “Dragon” braiding option is very successful; such a braid starts at the top of the head, gradually moving to the standard at the base of the head, this method will visually lengthen the shape and add elegance to the image;
Rectangle - a fishtail braid is perfect for it; it will smooth out slight imperfections and add femininity and elegance;
Triangle - with this shape, variations of the spikelet will look great; it will look ideal in combination with a slightly voluminous bang (additional styling will be required).
But look in more detail at our master class from professionals with a description in the proposed video for free. Let us add that there are a lot of similar lessons on YouTube, but most of them are from amateurs.
Ladies with long hair always look luxurious. And how many amazing hairstyles can be created on their heads. As a rule, the basis of many hairdressing masterpieces are all kinds of braids. Below are several simple but beautiful hairstyles with braids for long hair that you can create yourself at home.
An excellent hairstyle with two braids for everyday wear - and the hair doesn’t get in the way, and it looks beautiful and neat, and it won’t be too difficult to do it yourself. Suitable for any age.

- Comb your hair well, divide it in half with an even parting from the middle of the forehead to the base of the neck, move one half to the side and secure it.
- Using the second half of the hair, braid, moving from the face to the neck (take three small strands, while braiding, place the outer ones under the central one, adding new hair each time).
- Braid the braid to the end of the hair length, leaving as little of the tip as possible and attach an elastic band.

- Undo the other half of your hair and do the same on it.
- Fluff each braid along its entire length, stretching each section.
- Twist the braids around each other, laying them over the head and securing each turn with a hairpin.
- Hide the ends of the braids and straighten the knot.
Very beautiful, which is braided from five strands. Can be combined with a ponytail or braided to the end. It will look great on long hair.

It is braided as if two braids are being braided at the same time. Alternately, first the right three strands, then the left three strands. Moreover, the central strand is involved in weaving both braids. Before starting, it is recommended that you familiarize yourself with the diagram presented below.

More details:
- Grab a not very small strand of hair on the top of your head and divide it into five equal parts.
- For convenience, it is better to conventionally designate the strands as two left (first and second), central (third) and two right (fourth and fifth).
- You need to take the left strands and the central one (the right ones are held in a fist).
- Place the first strand over the second, and the third under it (since the strands have swapped places, the one in the center is considered third, and the outer one is considered first).
- Now we hold the left strands into a fist and weave with the right strands and the central one.
- The fifth strand needs to be placed under the fourth, and then the third (central) one.

- It turns out to be weaving two ordinary Dutch braids simultaneously and alternately. For the first braid, the first, second and third strands are used. For the second braid, the fifth, fourth and third strands are used.
- Next, we clamp the right strands into a fist again and continue with the left and central ones.
- We place strand No. 1 under No. 2 and add an additional strand of loose hair there.
- Then we put strand number 3 under them.
- We clamp the left strands into a fist and use the right ones.
- No. 5 under No. 4, an additional one there, then No. 3 under them.
- Weave according to this pattern until you run out of free hair.
- Gather all the strands into one tight ponytail.
- Fluff the outer segments.

Amazing hairstyle. Those with long hair are lucky, as they can create such beauty on their heads on their own or with the help of a friend.

- It is necessary to separate a medium-sized strand of hair from the forehead, twist it into a knot and put it aside for a while, pinning it with a clip.
- Then, under it, you need to separate another strand of hair of approximately the same size as the first and spray it with water so that it does not frizz when braiding.
- Divide it into three parts and start weaving a regular braid.
- On the second weave, separate a thin strand from the outer strand and put it aside (it is better to secure it with a hairpin or hold it in your teeth).
- Continue braiding, also removing a strand from the opposite side.
- Make another weave, and on the next one, again separate the thin strand from the outer strand and swap places with the one that is clamped (lower the first one, and lift the second one and clamp it).

- Continue weaving and do the same on the other side.
- Then do the same actions again on both sides.
- At this stage and further, every two or three weaves, it is necessary to pull out these small strands along the edges so as to separate them from the main braid.
- You should end up with something like a half chain on both sides of the central braid.
- In the same way, reach approximately shoulder level.

- Lower the strand that remains on top.
- Braid it into a regular braid.
- During weaving, you periodically need to strongly pull out its slices, and only from one side.
- Braid to the very bottom, not forgetting to pull out the braid segments on one side.
- Twist the braid at the back of the head (from the outer circle to the inner), forming a rose.
- The extended side should remain on the edge, and the untouched side should remain on the inside.
- Place the tip of the braid in the center and secure the entire flower with several hairpins.
- Straighten your hair.

An ideal hairstyle with braids for long hair so that beauties can walk with their hair down, but at the same time the curls do not get into the face and look voluminous, beautiful and neat.

- Separate a strand of hair from the top of your head and tie it into a ponytail with a silicone rubber band.
- Gently pull out small strands of hair to create volume on the top of your head.
- Separate a thin but wide strand at the forehead to make bangs.
- Behind it, grab another strand, divide it in two and begin to weave a spikelet, throwing thin outer strands from one half to the other one by one.

- Braid the spikelet to the shoulder and tie with a transparent elastic band.
- Leave a small strand on the opposite side of your face, take the next one and braid the spikelet again (the spikelets should be equal in width).
- Wrap the spikelets back and throw them over the tail, securing them well with hairpins on both sides.
- The ends of the spikelets need to be wrapped on each side under the tail and also pinned.
- Take the tail, throw it up and hook it with a crocodile.
- Tie the ends of the spikelets together with an elastic band. You will get another tail (No. 2).
- Lower the first tail and divide it into two parts, between which draw tail No. 2 and throw it up.
- Tie the halves of the first tail together.

- Lower the second tail from above, divide it in half, draw the first one in the middle and throw it up.
- Tie the halves of the second with an elastic band.
- Do the same manipulations with the tails to the very bottom.
- Fluff the braid from the elastic bands, pulling out its segments.
- Bring your bangs behind your ear and pin them with a bobby pin.
- Correct your entire hairstyle.

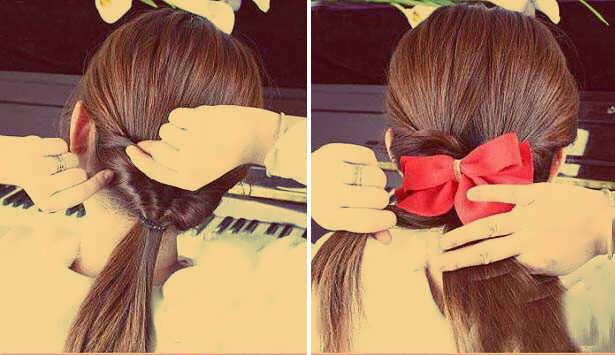
A simple, but original and incredibly beautiful hairstyle that combines a bow, a braid and a fishtail. This charming combination is best created on long hair.

- Separate a fairly thick strand at the top of your head and braid it into a regular braid approximately to ear level.
- Then finish braiding with a fishtail.
- Both the braid and the fishtail need to be fluffed up as we weave.
- On each side of the face, separate a small, but not too thin strand.
- Tie a bow from these strands, like a simple ribbon.
- Secure the bow knot with at least two hairpins.

To create this braided hairstyle, you need to have long hair. Owners of medium hair can use extensions to lengthen them. The hairstyle is quite simple to perform, but it looks great and is suitable for any celebration.

- We comb the hair so that the parting is on the side, and one part of the hair is larger than the other.
- We separate two small strands of hair near the parting and begin to weave a spikelet, constantly adding new strands of hair from the free mass into it.
- You need to weave along the face to the lower earlobe.
- As you go, stretch the spikelet for fullness.

- Having reached the ear, you need to stop adding strands to the spikelet, and braid a little more in the usual way (so that it reaches the middle of the base of the neck).
- Fasten in the center of the neck with a small strand of loose hair.
- The hairstyle can be left in this form, or you can continue weaving.

- The part of the hair that is gathered in a ponytail needs to be rolled into a rope and twisted around its axis so that you get a flower.
- Then wrap the remaining hair around in the same way.
- Insert pins around the entire circumference of the flower.

Long hair is to a hairdresser what a blank slate is to an artist. All you need is a comb, a couple of rubber bands, a little imagination and your masterpiece is ready!


