You can make beautiful bows from different materials, but the most popular are paper and various ribbons. Let's look at the most popular manufacturing methods from these materials below.
Paper technology
Anyone will like elegant and unusual “jagged” jewelry, and if you master the technique, you can make such a miracle yourself.
To make it you need to prepare:
- paper of sufficient thickness (old posters are perfect);
- scissors;
- glue or stationery stapler;
- ruler.
How to make a paper bow:
- Cut strips of paper of equal thickness.
- Using a ruler, measure out pieces of different lengths.
- Roll each piece at an angle without deforming the paper.
- Fasten two pieces together to form a kind of “figure eight”.
- In total, you need three large and medium “eights”, as well as two small ones.
- The last figure is simply made in the form of a circle.
- Starting from the longest “eights”, arrange three pieces in the form of a circle, then fasten them in the middle.
- The medium length “eight” is also secured in the form of a circle.
- Place the middle “circle” on the large figure so that the teeth fall in a checkerboard pattern.
- Fasten the remaining two small “eights” crosswise and place them on top of the resulting figure.
- The “top” of our bow will be a paper circle placed on its side.
To illustrate the process of assembling a paper bow, there is a photograph that clearly illustrates the process.

An original and very delicate bow is obtained using another option. To do this, just cut out shaped parts from colored paper (it’s better to do this using a template) and fasten them together, as shown in the photo. For variety, you can use several colors, as well as paper with designs. Having shown the proper ingenuity, you can independently come up with new figures for an exclusive model.

Ribbon manufacturing technology
The most suitable material for creating such decor are ready-made ribbons, the range of which is constantly increasing.
There are many types, the most common of them: satin, guipure, silk and translucent organza.
In this case, you should also take into account the huge selection of colors, shiny varieties and the ability to choose stripes with a pattern. In general, there is room for your imagination to run wild, the choice of suitable products will depend solely on your aesthetic taste, but we will tell you how to make a bow from a ribbon with your own hands.
Manufacturing technology can be divided into stages of complexity. Having successfully mastered one option, you can complicate the task a little and move on to the next one.
Simple DIY satin ribbon bow
To do this, take a strip of sufficient length, and the principle of the knot itself is shown in the photo.

To make a neater knot, you can use the master class below on how to tie a bow from a satin ribbon. At first, this method will seem too complicated, but with due diligence and training, everything will work out purely mechanically.

Several options for ribbon bows
To create such a decor, it will be enough to select strips of different thicknesses and colors. A monochromatic bow will be significantly inferior in aesthetic terms, so it is better to choose a more interesting option.
To make such a bow, you should cut three strips of different lengths, combine them with each other and tighten them with a smaller piece. The edges can be made jagged, or simply tucked in - this will give the product volume.

The second option will be no less cute and also easy to implement. To do this, circles are formed from suitable strips of different widths, but of the same diameter. Having attached the tapes to each other, the middle is fixed with another piece. The resulting decor can be used not only to create hair decorations, but also all kinds of ideas, a list of which you will find below.

How to tie a bow on a fork
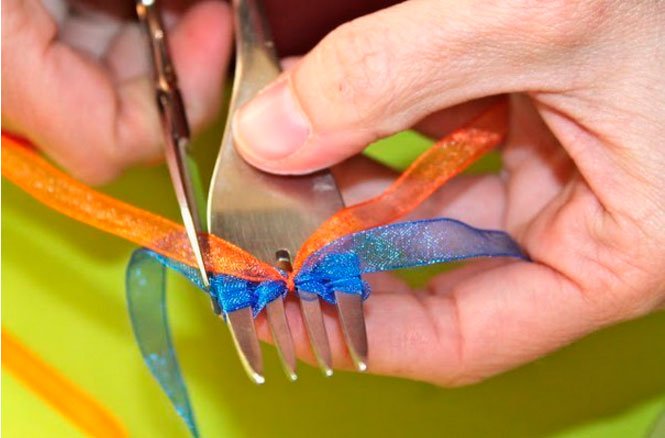
You can try using improvised means. A simple and very attractive way to beautifully tie a bow from a ribbon, presented in an original way, using an ordinary table fork.
The step-by-step instructions in the picture will help you master this technique; for convenience, the ends of the tape are labeled with letters.

Such decorations are extremely attractive and are suitable, for example, for decorating clothes. With their help, you can add new colors to even a plain turtleneck.
You can complicate the process a little and make two-tier bows from ribbons with your own hands. Decorate the central part with a bead, and additionally make an organza base at the bottom. An example of such creativity is presented in the photo as a sample, so get inspired for your own projects.

Step-by-step manufacturing instructions
The simple technique of making bows on a fork can be slightly modified. To do this, we present step-by-step instructions for a DIY ribbon bow and corresponding illustrations.
How to tie a ribbon bow on a fork:
- Insert the tape and fasteners between the middle teeth of the fork.
- Pass the main tape alternately between the teeth in a checkerboard pattern.
- Fix the beginning of the strip in your hand, the rows alternate until the very top. The more there are, the more magnificent the product will be.
- Tie the resulting loops with fasteners using ribbon, trim the ends and scorch them a little with fire so that they do not unravel.
- Alternating stripes of different colors, sizes and surface textures.
- Using patterned ribbons.
- Fastening with thread will make the figure more voluminous.

Variations:
The main improvement may concern the size of the product. Large bows from satin ribbons can be made using a cardboard template of a suitable size or your own fingers.
Options for decorating flower bouquets
Bouquets are held together with similar decorations, and bows can be made from paper and fabric ribbon. Both options are quite nice, and brief diagrams will show how you can create this decor as quickly as possible.
Want something interesting?
Option #1:
- Wrap the tape around your palm or any suitable object.
- Trim the ends of the edges for easier fixation.
- Align the cut pieces to each other (they will now be in the middle of the tape).
- Secure and straighten the “petals”.
- The more turns there are, the more magnificent the bow will be.
- Fix in the middle.
- “Fluff” the turns of the tape.

Option #2:
- Fold the tape several times in a figure eight.
- Fix in the middle.
- “Fluff” the turns of the tape.
- Carefully trim the ends and the bow is ready.

Option #3:
- Fold the bow according to the principle of the first option.
- Make cuts along the edges of the fixed tape.
- A fluffy bow will have a more voluminous and interesting look.

Option #4:
- The tape twists at the attachment points.
- “Petals” are formed directly in the hand. This way you can control the volume of the bow, which is very convenient for decoration. You can make the ends of different sizes.
- After the desired size and type of product have been achieved, secure in the middle with the end of the tape.

You can make original bows from satin ribbons with your own hands using the following technology:
- Wind a satin ribbon between two fixed knitting needles.
- Place a line in the middle.
- Remove the ribbons and gather the thread.
- Secure the thread, trim the ends - the bow is ready.

American design options
American bows got their name not entirely deservedly, because similar patterns can be found in various countries. The main requirement when designing such decor is to show imagination. The creation of such decor is based on the use of several types of products at once, so there will be a lot of options. This type can be called a traditional option; our master class will describe its creation in detail.
How to make a bow from a satin ribbon in the American style:
- “Eights” are formed from a thin ribbon.
- Individual parts of two or three pieces are fastened together.
- From below you can make a base from several straight strips fastened in the middle.
- For additional decoration, you can make the edges jagged.
- Secure the two parts together; you can glue a bead or a simple bow of a smaller size to the top.
Individual elements can be seen in the photo.

The end result should be something like this.

For children's hairpins, it is better to take a stronger rep ribbon. Nowadays they sell products with interesting designs, for example, favorite cartoon characters.

What can be decorated with homemade bows:
- Decoration of clothes, belts and shoes.
- Sofa cushions.
- Cutlery before serving to guests.
- Napkins, towels and kitchen curtains.
- Newborn envelope.
- Covers for champagne bottles.
- Wedding glasses, cars, witness ribbons and other festive attributes.
- Hair ornaments.
Decorating the New Year tree with bows is becoming increasingly popular. You can buy ready-made ones without any problems at any suitable store, but it will be much more interesting to make such a decoration yourself, especially if children help you with this. This would also be a great idea for a gift for loved ones for the New Year holidays.
New Year's bows on the Christmas tree
Simple and incredibly attractive decor can be obtained from the tips below. To make bows for the Christmas tree you will need a variety of materials: paper, felt, organza and even lace. Several successful examples are given in our article; they can be used as a model for independent inventions.

DIY Christmas tree bows made from felt
This unique material is in great demand in needlework. Its main advantage is its dense “plush” structure, the edges of which will not fray, and therefore do not require additional processing.
A simple bow for a Christmas tree is made approximately as shown in the photo. In this case, the upper part can be additionally decorated with beads, beads and just a bright ribbon of a contrasting shade.

You can make rounded edges, you get a completely different model.

A more complex model of such decor requires a detailed description; the whole process is clearly presented in the photo.
DIY New Year's decor:
- Cut the felt into strips of arbitrary thickness.
- Fold the strip in half and sew small stitches along the edge of the fabric.
- Cut the folds at equal intervals, not reaching the edge.
- Carefully gather the thread to form a circle.
- Trim and secure the edge.
- Decorate the top as desired.

How to make a ribbon bow for a Christmas tree
The above options are perfect for New Year's decor, especially since you can choose ribbons with the appropriate pattern. The color traditionally used is red, but if you don't have a specific color preference, you can choose multi-colored options.
In order to understand how to tie a bow from a ribbon, just look at the photo above. With some skill, such decorations can be made quite quickly.

With beautiful spirals you can not only decorate a ribbon bow on a Christmas tree, but also use the idea to create hair decorations.
Technology for making spiral elements:
- Wrap a satin ribbon around wooden skewers.
- Secure the edges with pins.
- Place in the oven at approximately 180º C for five minutes.
- After cooling, the tapes will acquire beautiful and uniform bends.

Original design made of tulle
The unusual appearance of this tulle bow can also be used to create New Year's decor. To do this, you need to take organza or cut a small strip of tulle. The algorithm of actions is shown in the photo and resembles the process of creating pompoms.

Homemade bows are an excellent option for memorable decor, the use of which is extremely wide.
There are plenty of examples of use, ranging from gift wrapping to decorating curtains. We looked at the most successful options for creating bows in our article, but the final result and possible variations will depend solely on your imagination.
A variety of accessories traditionally decorate girls' hair. But even as we grow up, it’s hard for us to give them up. They refresh our handbags, hats and dresses, and make the most everyday hairstyle festive. A beautiful bouquet looks even more elegant if you tie a small bow made of tulle or organza on it. But that's not all. Beautiful packaging is very important for a gift. A paper bow, originally tied on the box, will emphasize the solemnity of the moment. In the store you can find any bows for girls, interesting hairpins.
By making a fabric bow with your own hands, you will emphasize your originality.
Figuring out how to make a ribbon bow with your own hands is not difficult at all.
Any girl will be delighted if her mother makes her own hair decoration, decorates it with beads or beads, sparkles or tulle. Before you make a bow from fabric, you need to understand its purpose:
- small, made on a fork - for a small souvenir;
- bows made of satin ribbons - for girls' hairpins;
- lush, brightly decorated - for a children's party;
- paper - for gift wrapping;
- unobtrusive, elegant - for any dress;
- for interior decoration.
Before you make beautiful bows from satin ribbon, you need to choose it correctly. Its color should be in harmony with the dress or hat. There is no need to explain how to make a bow from a satin ribbon in the traditional way.
Let's try to make a beautiful multi-layered product from ribbons of different colors and widths tied together. Purchase material in 3-4 colors of different widths. The widest ribbon should be the longest, the narrowest should be the shortest. Cut their ends at an angle so that they do not fray. Lay out the strips of fabric so that the bottom is the widest strip and the top is the narrowest. Tie them with a narrow strip, leaving long ends to strengthen the decoration on a gift or hairpin. Add some beads.

You can make very elegant bows from ribbons with your own hands; step-by-step instructions will help you with this. A small ribbon can be used to create an elegant and graceful accessory.
Follow these steps:
- Cut a circle with a diameter of 2 centimeters from thick paper.
- Cut the tape into pieces 6-7 centimeters long.
- Using a glue gun, glue the end of one piece, and glue the other end of the same piece 5 mm apart.
- Place the end of the second segment between the glued ends of the first segment, and place the second one 5 mm apart.
- Glue several rows of such loops in this way; the last two rows can be smaller.
- The middle of the flower can be enlivened with rhinestones or beads.
Let's look at another method of tying a ribbon bow. To get this elegant openwork bow you will need satin ribbon, glue, scissors and a stapler.

The tape must be cut into 4 parts of different lengths, and the ends of each piece must be connected with glue. Lay the loops to size and fasten them in the center with another strip. Tie a knot beautifully, leaving fairly long ends. This elegant decoration will look great on a gift.
Using a fork
Sometimes a very tiny bow is needed to decorate a postcard, make tiny earrings, or make dolls. Let's look at how to tie a bow on a fork.

You will need a thin ribbon 0.5 centimeters wide and 10 cm long, a dinner fork and scissors. How to make a bow on a fork is clear from the following diagram. The mini bow is very easy to make.

A more complex ribbon bow on a fork will take a little more time, but the technique for creating them is very simple, no master class is needed.
Kanzashi technique
The term kanzashi means folding. Using this technique, you can make bows from ribbons folded in a certain way. It allows you to create amazing things, and the step-by-step instructions given here will help you make kanzashi bows with your own hands.

To make a bow for girls with your own hands, you will need:
- dark satin ribbon 5 centimeters wide;
- the same white 2.5 centimeters wide;
- the same dark one, 2.5 centimeters wide;
- threads of a suitable color;
- scissors, needle, glue;
- hair clip or elastic band.
Make your own hair bows as follows:
- Three pieces of 22.5 centimeters each are cut from a wide dark ribbon, and three pieces of 15.5 centimeters long from a white ribbon.
- Use a lighter to burn the edges, fold the dark sections in half, unfold and fold the ends with a small allowance. Reinforce with thread to the middle.
- We proceed in the same way with the second segment, and put it on the first, securing them. The third, also processed segment, is placed on top of the first two. We tighten the thread, tighten the bow, wrap it with thread and stitch it.
- We carry out all the same operations with a white ribbon, you will get exactly the same bow, but it will be smaller in size.
- Glue the white bow onto the dark one, wrap the middle of the product with a dark narrow ribbon, and secure it well. If you planned to make an elastic band, then before tying the ribbon, put the elastic there.
From grosgrain ribbons
Before making a bow from a satin or silk ribbon, make it from grosgrain ribbons. Rep holds its shape well and does not wrinkle.

You will need grosgrain ribbons of different widths and patterns, a needle, thread, glue, an elastic band or a hairpin and all kinds of decorations. Before you make a beautiful bow out of ribbons with your own hands, decide on its size; the width of the grosgrain ribbons depends on this.

Cut a rectangular template from plywood, the smaller side of which is equal to the width of the bow. We make a slot in the center of the figure. We put tape on the template so that the ends are directed in different directions. How many curls do you want for the bow, how many turns are needed. The ends of the tape must be secured. With the stitch forward, sew the ribbon through the through hole in the template. Remove the template, tighten the thread.

Usually this decoration has several layers. You can decorate the core with beads, or wrap it with a thin shiny braid. Tie it tightly and the decoration is ready.
Paper decorations
You want to wrap a gift beautifully, and the question arises of how to make a paper bow with your own hands. Paper decorations can come in different colors and sizes depending on what they are intended for. The simplest bows can be made with your own hands in a few minutes. By the way, you can decorate a Christmas tree with them.

Before making a bow for a gift, draw what shape your product will have and cut it out. Apply glue to the bridge between the parts, bend the sheets in the middle until the edges match. Coat the center of the second part with glue, place the first part on top, aligning the centers. Wrap a strip of tape around the parts and glue them together.

Handmade accessories will never go out of fashion. Craftswomen will always be interested in questions about how to decorate their hair and dress in an original way, how to make a small bow for a bracelet, elegant bows for their daughter for school, an unusual decoration for a handbag, how to make a bow from rubber bands, how to decorate your home and make it cozy. Having mastered these skills, you can always add zest to your outfit, beautifully decorate a gift, and make the interior of your home interesting.
Are you going to visit, have chosen a gift, and now you don’t know how to wrap it? Then you are at the right place. In this article, we’ll look at how to make a bow from ribbon to decorate gifts, and we’ll also tell you how you can make an exclusive gift for every taste from an ordinary ribbon.
How to create a festive mood?
A beautifully packaged gift with original decoration always creates a festive mood, no matter whether you give it or whether such a gift was given to you. It is a beautiful bow, which can be called a classic decoration technique, that “warms up” the imagination, making you tremble in anticipation of a surprise. The originality of this decoration lies in its versatility, since a bow from ribbons can be made of different shapes or sizes, and today’s market offers a wide range of colors, from plain to complex patterns. Such decorations can give the souvenir more solemnity. Initially, you need to pack the surprise in gift paper, how to do this, read the article: well, we will teach you how to make a bow from a ribbon, the main thing is to be patient and not quit work after the first failure, because the wonderful grateful smile of the hero of the occasion to whom you are gathered guests deserves a little effort.
How to make a voluminous bow from ribbon to decorate a gift?

To get a truly voluminous bow, you need to give preference to cuts made of hard material. Having selected the ribbon, do the following:
- Having decided on the size of the bow (the longer the loops, the larger the bow), you need to make loops from the ribbon in 5-9 folds, placing them one on top of the other.
- Smooth out the resulting loops and carefully trim the edges, as shown in the photo below. You should end up with almost triangles around the edges.
- Take the loops by the middle and spread them to the sides so that the cut out parts are in the center.
- Secure the narrowest central part. You can do this:
- the same ribbon;
- sew with thread;
- fasten with a stapler;
- twist with wire.
- Straighten the resulting half-loops, give them volume and the beautiful bow is ready!

How to make a lush bow from ribbon? Video lesson
How to make a simple bow from ribbon to decorate a gift?

You can make a strict version for a “male” present. It will look great both on the packaging and on a bottle of an expensive strong drink. And you can read more about souvenirs for the men's holiday in the article:. Let's get started:
- Cut a piece of wide ribbon of the required size, roll it up, and glue the edges with glue. It should look like a ring.
- Flatten the resulting ring.
- Hide the joint under the same, but thinner cut.
- Carefully glue the edges and the simple decoration is ready.

How to make a ribbon bow - a classic option
The classic version of the decoration is very simple to make, and at the same time creates an excellent frame for any gift.

With such a bow, a book, a box of chocolates or a service, as well as ordinary wildflowers will look great. This classic is performed according to the following steps:
- Take a long ribbon and fold it into two loops, as in the photo below. There should be one addition in each hand.
- Place the loop on the left at the back, crossing the two folds. It turns out to be a circle at the bottom.
- Pull the right loop through the formed circle and pull it off. The middle should be in the middle.
- Straighten the loops - the beautiful bow is ready! If necessary, you can cut the lower ends to the desired shape (oblique, triangle, etc.).

Video tutorial: how to tie a bow from a classic style ribbon to decorate a gift?
How to make a Dior bow from ribbon to decorate souvenirs?
The Dior bow is used not only to decorate gifts. With its help, unforgettable decors are created for parties, weddings and other celebrations. By the way, take note of the rules of behavior at the table at such celebrations. They are described in the article: .

To make such a bow, you need to follow these steps:
- Prepare four cuts of different lengths.
- Roll each of them into a circle and secure with thread or glue.
- Stack the circles incrementally one on top of the other.
- Tie the resulting structure of ribbons in the center, inserting the binding tape into the upper (smallest) circle, as in the photo below.
- Fasten the structure.

How to make a ribbon bow on a fork?
Do you believe that you can tie a beautiful bow on a fork? No? Then let's learn, we suggest trying out two options for making such a decoration.
Option No1
Let's try to solve the following equation: Ribbon + Fork = Original bow. To solve, you need to do the following:
- Cut a narrow ribbon of the desired size. For ease of use, it should be at least 18 cm.
- Conditionally divide it into long and short sides. The short side will not be used.
- Pass the long part between the 2-3 teeth of the fork you are using.
- And bring its end up between these same teeth.
- After these steps you should get a small loop. Don't tighten it yet.
- Thread the remainder of the long end through the loop inward again.
- Pull this end out and tighten the knot.
- Trim the long ends as needed and singe them with matches or a lighter.

OptionNo2
To get a beautiful bow in the form of a lush flower, you need to use two different ribbons:
- thin;
- wide nylon.
Execution steps:
- Insert a narrow ribbon transversely into the center of the fork. You will need it almost at the end of the work.
- Use a wide piece of nylon to braid the teeth of the fork, as shown in the photo below.
- Use a thin ribbon to tighten the bindings and tie them.
- Remove the workpiece and straighten it.
- Scorch the edges with fire.

The decoration is delicate. It will ideally complement any souvenir intended for the fair half of humanity.
Video lesson: how to make a ribbon bow on a fork
Photo ideas for decorating gifts with bows


Posted On 02.11.2017
 You don’t always have ready-made decorations for gifts or beautiful packaging tapes at hand. What to do if you want to make the gift wrapping beautiful? Make a bow yourself from scrap materials, namely paper. How to make a paper bow which can be used to decorate a gift? You just need a little patience and effort.
Curls can be not only on the top of the head
Do original cascade of curls You can get regular paper, preferably very thin. We cut a sheet of paper into thin strips, up to 1-1.5 cm, and then with the blunt side of the scissors we give them the shape of curls, running along one side of the paper. Curls form instantly. For this purpose, you can use regular wrapping paper. Having made the required number of curls, we fasten them with a stapler and attach them to the gift, gluing them or securing them in a similar way. The curls can be located either around the perimeter of the box or falling from the central part.

How to make a butterfly out of paper?
To make a butterfly bow, you will need two types of paper. One is denser and brighter (it could be a photograph from a magazine), the second should be one and a half to two times smaller and depict the body of a butterfly. We make the most ordinary fan from a larger leaf. From the small one we make a fan in the same way, trying to keep the folds the same. We divide the fan into three parts and slightly cut it on the right and left sides, retreating from the edge by 2-5 cm (depending on the size of the sheet). We place the smaller one on the larger sheet: so that the folds coincide and in the central part we press and tie the two parts together. Gently straighten it, giving it a fluffy shape - and the butterfly is ready. To make the product more eye-catching, it makes sense to use old magazines with pictures, fashion catalogs and others with brightly colored paper.
Bow Dior
An unusual bow can be made by preparing four rings of decreasing diameter. The smallest one should be such that it takes up no more than 50% of the width of the last ring. The rings need to be slightly overlapped, the upper and lower central parts should be glued in the same way. The rings also need to be glued, placing one in the middle of the other, and using a narrow paper tape to connect them across perpendicularly, thus obtaining an original decoration. The tape is taken of one color, but to give some contrast it is worth taking a transverse piece of paper of a different shade.
As for the Dior bow, you can connect its two halves together, getting a more lush and voluminous inflorescence. It will look very beautiful and unusual.

Original paper chrysanthemum
To get an original and lush chrysanthemum, you need to take paper of a bright or light color (for example, pink or bright red) and cut out ten to fifteen polygons. They should be in the shape of hexagons or look like flags, but in such a way that they are all fastened together. We stack the cut out figures on top of each other and pin them on top with a pin or a needle with a tip, the top of which can be shaped like a pestle by putting on a white or yellowish cap. It turns out gorgeous paper flower.

Combinations with paper ribbons and curls
Can be done quickly and easily original decoration with curls. We cut out four strips of paper in the form of thin and long ribbons, the ends of which we give an unusual shape, for example, like a flag, in the form of the letter “V”. We place two ribbons side by side on the box or packaging with a gift (with a small interval), cover them on top in the same way with two of the same ribbons and glue them together at the joints. On top of the glued tapes we attach other pieces of paper, similar in width, placing them perpendicularly. In total you will need four segments. We run the blunt edge of the scissors along the last attached pieces of paper tape, giving them a curl shape. That's it: the decoration is ready.
In the same way, you can experiment with the color of ribbons, using, for example, white and scarlet pieces of paper, creating compositions from thin and thick curlicue rings. Or by putting such curls into rings of larger diameter.

How to make a simple and original bow?
A beautiful multi-colored paper bow is made by taking eight pieces of paper in three shades of the same length but different widths. You can take the following colors, for example: the widest stripe is blue, the narrower stripe is purple, and the top stripe is pale pink. Glue strips of paper on top of each other. We bend the edges of the strips in the form of an envelope, connect them together and form two inflorescences in the form of a trefoil. Let's connect them together. Attach thin bows to the central part of the decoration. They should be done like this: cut very thin strips the thickness of a straw, which should be glued into a ring and then additionally connected in the center, getting a tiny bow.
To the resulting decoration, you can glue a thicker ring on top of the thin bows, which will crown the central part. You can attach two ribbons from the bottom, from the wrong side.
Most importantly, when creating paper jewelry, don't be afraid to experiment. After all, you can create compositions by unusually combining curls, ribbons, diamonds and irregular polygons, bows and fans. The main task of such jewelry is to add a certain zest to the gift being given, to the interior, or even to a fancy dress costume. A little strength and patience - and everything will work out!

How to make (tie) a gift bow(s) from ribbons

DIY satin ribbon bow for decoration

DIY satin ribbon bow for a gift

How to make a beautiful bow DIY gift

How to tie a bow beautifully. Classic bow

HOW TO TIE A BOW master class, diagrams with photos


DIY two-color ribbon bow. Simple, strict and

Home Hobbies
Is it difficult to imagine a solemn moment without decoration or decoration with elegant bows? Lush and strict, elegant and frivolous - they create a special mood at the holiday. Making a hair clip or a butterfly for an evening suit from satin ribbons is not difficult if you follow the instructions.
How to make bows from satin ribbons
The technology for assembling the decoration requires ribbons of different colors and special widths in accordance with your idea. A minimum set of tools and materials for manufacturing will be required. If you complete the master class, you will not have a question about how to make a bow from a satin ribbon. The proposed step-by-step instructions will make the work process enjoyable and understandable.
How to tie a ribbon bow
You will need:
- lighter;
- scissors;
- threads;
- needle;
- ruler;
- glue or heat gun.
Depending on the purpose of the bow, there are various options for manufacturing technologies. He can be:
- small, made using a fork - suitable for decorating a postcard;
- lush, elegant - in the kanzashi style - for a holiday in kindergarten;
- a formal bow tie for an important banquet;
- double – for hair decoration, attached to a headband or hairpin,
- solemn - on a gift box.

Satin bows can be made in the form of an original flower. If you choose the right color and shape, they will become unique decorations:
- elegant evening dress;
- frivolous sundress;
- styled hair;
- in the form of a wrist bracelet;
- stylish handbag;
- bridesmaid dresses;
- smart blouse;
- as a neck pendant;
- furniture in the interior;
- stylish dress for prom;
- curtains in the apartment.
How to make a bow from a satin ribbon in a classic style
The most popular and simple, this bow is used for clothing and interior decoration. Even a modest gift decorated in this way becomes elegant, solemn and attractive. To tie a bow you will need:
- take a piece 20 cm long;
- burn the edges;
- fold in half with the smooth side facing in;
- fold the edges outward again;
- take it in your hands so that each has a loop at the top, and a bend between them at the bottom;
- cross the folded parts in front, forming a ring under them;
- pass one loop through it, tie.

A strict beautiful bow made of satin ribbon with your own hands
You can tie a strict stylish bow for a special occasion. It will decorate a lady's bag, dress or gift. Here it is important to choose the right colors for the craft so that it looks elegant. How to make a bow from a satin ribbon, for example, like the one in the photo. Prepare for work scissors, glue, material of three colors. You should:
- take a workpiece 30 mm wide with a length of 18 cm;
- roll into a ring;
- connect the edges with glue.
The next steps to assemble the decoration are:
- fold the ring so that the seam remains at the bottom in the middle;
- iron;
- take a ribbon of a different color of the same width, with a length of 7 cm;
- wrap a ring around the workpiece crosswise;
- fix with glue;
- prepare a ribbon of a contrasting color of the same length, but thin;
- wrap around in the middle of the previous ring;
- seal;
- iron.

Two-color beautiful bow made of satin ribbon with your own hands
A stylish and very elegant decoration can be assembled from blanks of two colors. Ease of manufacture does not mean that it will look modest. Elegant and spectacular, it will decorate your hairstyle and original dress. You will need a wide and narrow blank. To make jewelry:
- measure 2 pieces 15 cm long - one narrow, the other wide, cut;
- put one on top of the other;
- roll into a ring;
- Fix the joint with glue;
- iron;
- use a narrow ribbon to tie a bow in the middle, covering the joint, forming a knot;
- cut off the ends;
- glue it.

DIY gift bows made from satin ribbons
A gift box for an anniversary or birthday will look much more impressive if you decorate it with a bow. Depending on the situation, it can be small, elegant or voluminous and lush, for example, like this. Tying it is very simple - you can quickly learn, even without a master class, by following the instructions:
- take a piece two meters long;
- wrap around the open palm of your left hand;
- remove carefully;
- leave the end free.
- on a workpiece folded in several layers, cut off both corners on one side, approximately 5 mm;
- burn so that they do not bloom;
- repeat the operations on the other side;
- fold the workpiece so that the cut parts are aligned in the middle;
- tie with the free end of the ribbon;
- straighten each petal, giving it volume.

A lush bow made by yourself can please a young beauty if it is woven into her hair or becomes a decoration for a gift box. To make it you will need 6 blanks 12 cm long, 5 cm wide, the same number 11 cm long and 30 mm wide. They must first be burned around the edges. You will also need an elegant thin braid, small beads and a piece of felt. Next, you need to do this:
- take wide blanks;
- fold in half;
- assemble sequentially onto one thread;
- tighten, fasten;
- repeat the process for narrow ribbons;
- cut a circle with a diameter of 40 mm from felt;
- stick a large blank on it;
- take pieces of thin braid 12 cm long - 6 pieces;
- fold each into a ring;
- glue on the front side, placing it on the petals;
- fix a piece of narrow ribbon on top;
- pour glue, approximately 10 mm in diameter, onto a piece of fabric;
- place the beads on it tightly in a circle;
- cut in circle;
- glue the decor in the middle of the decoration.

If you want to decorate your holiday card with a tiny bow, try using a fork. The process will go like this:
- take a fork in your left hand;
- loop a ribbon over it so that the edges remain to the right;
- Throw the far end behind the fork over the lower one in front;
- insert it in the middle between the teeth and bring it back;
- insert the remaining tip of the ribbon on the right into the same gap, but from above;
- turn the fork over and tie both ends with two knots;
- remove the bow;
- cut the ends and singe them.
DIY lacy satin bow
Do you want to learn how to wrap gifts like Dior? The technology will not cause difficulties, and the look will be unusual and original. To make this you need satin blanks 25, 20, 16 and 10 cm long. To make this decoration:
- burn the edges of the ribbons;
- roll the longest one into a ring;
- glue the ends;
- repeat the operations with other workpieces;
- stack all the rings on top of each other, starting with the largest one, placing the glued sections at the bottom;
- pass an additional ribbon on top of the rings (alternatively, it can go inside the small element);
- secure on the reverse side.

If the process of making jewelry according to the attached instructions seems complicated to you, watch the video master classes.
You will understand how to make a flower bow with your own hands without special tools, learn how to assemble decorations for gift boxes, learn how to tie a voluminous two-color accessory for a holiday hairpin, and understand that making bows yourself is a simple and fun process. Handicrafts will help you look original and unique, making your image attractive and stylish.
How to make a beautiful flower-shaped satin ribbon bow
Ribbon gift bow
How to tie a beautiful bow from a satin ribbon

Festive headband/How to Make Beautiful Headband Kanzashi

How to make a beautiful bow from a satin ribbon with your own hands

How to make a large, fluffy and beautiful ribbon bow on

How to make a bow from a satin ribbon with your own hands with a photo

Bow - Handicraft Masters

Animation Congratulatory bouquet GIF images

Gratitude - Animation pictures and poems. Good time of year!

Knitting is your hobby. Appendix 1 2018. Knitting magazine

Curtain design for the bedroom: 50 photos of the best design solutions

Vest in five minutes from Olga Nikishicheva. Good morning


- How to finish the edges
- Classical
- Two-color
- Extravagant
- Openwork
- Lush
A lush festive bow is traditionally used to decorate gifts, hairstyles, envelopes, and also as elegant accessories for any outfit. A cute DIY ribbon bow will be a wonderful decoration for gift wrapping or a postcard, the main thing is to choose the right shape and material.
How to finish the edges
To ensure that the ends look neat and do not fray, they should be processed. First, cut them at a 45-degree angle with sharp scissors. The V-shape in the form of a dovetail looks great on openwork designs.
Then take a lighter or match and scorch the edges, keeping the flame an inch away from the fabric.
How to make a bow from a satin ribbon with your own hands
This method is ideal for any synthetic materials.
The easiest way is to cover the ends with PVA glue. This method does not look very aesthetically pleasing, so it is only suitable for designs in which the ends are hidden under folds.
Classical
The gift wrapping will be decorated with a classic DIY ribbon bow; a simple step-by-step master class will help you make it in just 5 minutes:
- Place the ribbon face down on the table and cross the ends in the middle to create a loop on each side.
- Place the resulting loops on top of each other crosswise.
- Wrap the left loop around the right one, then pass it through the resulting center loop and tighten the bow.
Thin and airy fabrics will make the product lifeless and sluggish in appearance, so use thick satin, rep or crepe-satin to make it.

Two-color
An unusual two- or three-color bow will be a wonderful decoration for a hair clip or headband. You will need stripes of different colors, and each new one should be narrower than the previous one.
- Lay out two strips of contrasting colors on the work surface so that the narrow one is on top.
- Roll the workpiece into a ring and fasten it with glue.
- Iron the workpiece through a sheet of thick paper.
- Tie the middle and straighten the edges.
You can combine more colors with each other, the main thing is to select stripes of different widths to demonstrate all the color layers of the product.
Extravagant
A large, lush bow made of satin ribbons, made by yourself, will decorate a hoop, hairpin or headdress. For this master class you will need 115 centimeters of wide tape and a piece of thin wire.
- Measure 20 centimeters from the edge and make the first loop, holding its base between your fingers.
- Using the long end, make a similar loop next to the first one.
- Then make another loop, but on the opposite side.
- Continue to form the structure, alternating loops on different sides. As a result, you should end up with a butterfly-shaped piece.
- A piece of wire should be wrapped around the center of the workpiece and the excess should be trimmed with scissors.
- Take a short strip of fabric in a contrasting color and wrap it around the center of the piece to disguise the wire.
- Straighten the loops and give the product a rounded shape so that it looks like a lush flower.
Organza, satin or silk are suitable materials for this master class. The airy structure can be further decorated with a decorative cord or a beautiful plastic brooch can be glued to the center.

Openwork
How to make an elegant openwork ribbon bow with your own hands? It’s very simple, you just need to prepare two meters of satin, a glue gun and transparent tape in advance.
- Take a box decorated with wrapping paper and wrap a ribbon around it, after lubricating it with glue.
- There should be two long ends left on the box lid, take one of them and twist a large loop, gluing its edge to the center of the lid.
- Then the loop must be assembled, making several smaller loops from its folds and fixing their bases with glue.
- Then repeat the same with the other end.
Remember that the volume of the future product depends on the number of small loops. To make the design more voluminous, make the loops as small as possible.
Lush
For curvy figures, it is better to use rigid materials that hold their shape well, such as velvet. To clearly see how to properly make an elegant bow from a ribbon with your own hands, use the training video with a visual master class.
- Take a long ribbon and wrap it around your palm several times.
- Trim the corners of the workpiece from each edge.
- Unravel the workpiece and twist the same number of turns again, but so that the cut corners are in the middle.
- Tie the middle and begin to carefully pull out each turn and straighten the petals, twisting them along the axis.
Now all that remains is to fluff the decoration and attach it to the gift using double-sided tape.
Based on classical techniques, you can make designer bows, complementing them with beads, sparkles or perforations, and use them to decorate handmade candles or hairstyles for September 1 - the scope for imagination is limitless. Don’t be afraid to experiment with materials and colors; an original color scheme or unusual fabric will only decorate the product, making it unique and exclusive.
Little tricks in the arsenal of every housewife are designed to greatly facilitate and decorate our lives. In this article we will talk about an important accessory for a festive mood. How to make a bow from a ribbon and beautifully decorate a gift or the interior of your home with it - all the information is given below.
How to make a bow from paper or ribbon
You can make beautiful bows from different materials, but the most popular are paper and various ribbons. Let's look at the most popular manufacturing methods from these materials below.
Paper technology
Anyone will like elegant and unusual “jagged” jewelry, and if you master the technique, you can make such a miracle yourself.

To make it you need to prepare:
- paper of sufficient thickness (old posters are perfect);
- scissors;
- glue or stationery stapler;
- ruler.
How to make a paper bow:
- Cut strips of paper of equal thickness.
- Using a ruler, measure out pieces of different lengths.
- Roll each piece at an angle without deforming the paper.
- Fasten two pieces together to form a kind of “figure eight”.
- In total, you need three large and medium “eights”, as well as two small ones.
- The last figure is simply made in the form of a circle.
- Starting from the longest “eights”, arrange three pieces in the form of a circle, then fasten them in the middle.
- The medium length “eight” is also secured in the form of a circle.
- Place the middle “circle” on the large figure so that the teeth fall in a checkerboard pattern.
- Fasten the remaining two small “eights” crosswise and place them on top of the resulting figure.
- The “top” of our bow will be a paper circle placed on its side.
To illustrate the process of assembling a paper bow, there is a photograph that clearly illustrates the process.

An original and very delicate bow is obtained using another option. To do this, just cut out shaped parts from colored paper (it’s better to do this using a template) and fasten them together, as shown in the photo. For variety, you can use several colors, as well as paper with designs. Having shown the proper ingenuity, you can independently come up with new figures for an exclusive model.

Ribbon manufacturing technology
The most suitable material for creating such decor are ready-made ribbons, the range of which is constantly increasing.
There are many types, the most common of them: satin, guipure, silk and translucent organza.
In this case, you should also take into account the huge selection of colors, shiny varieties and the ability to choose stripes with a pattern. In general, there is room for your imagination to run wild, the choice of suitable products will depend solely on your aesthetic taste, but we will tell you how to make a bow from a ribbon with your own hands.
Manufacturing technology can be divided into stages of complexity. Having successfully mastered one option, you can complicate the task a little and move on to the next one.
Simple DIY satin ribbon bow
To do this, take a strip of sufficient length, and the principle of the knot itself is shown in the photo.

To make a neater knot, you can use the master class below on how to tie a bow from a satin ribbon. At first, this method will seem too complicated, but with due diligence and training, everything will work out purely mechanically.

Several options for ribbon bows
To create such a decor, it will be enough to select strips of different thicknesses and colors. A monochromatic bow will be significantly inferior in aesthetic terms, so it is better to choose a more interesting option.
To make such a bow, you should cut three strips of different lengths, combine them with each other and tighten them with a smaller piece. The edges can be made jagged, or simply tucked in - this will give the product volume.

The second option will be no less cute and also easy to implement.
Gift bow - Simple Recipes
To do this, circles are formed from suitable strips of different widths, but of the same diameter. Having attached the tapes to each other, the middle is fixed with another piece. The resulting decor can be used not only to create hair decorations, but also all kinds of ideas, a list of which you will find below.

How to tie a bow on a fork
You can try using improvised means. A simple and very attractive way to beautifully tie a bow from a ribbon, presented in an original way, using an ordinary table fork.
The step-by-step instructions in the picture will help you master this technique; for convenience, the ends of the tape are labeled with letters.

Such decorations are extremely attractive and are suitable, for example, for decorating clothes. With their help, you can add new colors to even a plain turtleneck.
You can complicate the process a little and make two-tier bows from ribbons with your own hands. Decorate the central part with a bead, and additionally make an organza base at the bottom. An example of such creativity is presented in the photo as a sample, so get inspired for your own projects.

Step-by-step manufacturing instructions
The simple technique of making bows on a fork can be slightly modified. To do this, we present step-by-step instructions for a DIY ribbon bow and corresponding illustrations.
How to tie a ribbon bow on a fork:
- Insert the tape and fasteners between the middle teeth of the fork.
- Pass the main tape alternately between the teeth in a checkerboard pattern.
- Fix the beginning of the strip in your hand, the rows alternate until the very top. The more there are, the more magnificent the product will be.
- Tie the resulting loops with fasteners using ribbon, trim the ends and scorch them a little with fire so that they do not unravel.
- Alternating stripes of different colors, sizes and surface textures.
- Using patterned ribbons.
- Fastening with thread will make the figure more voluminous.

Variations:
The main improvement may concern the size of the product.
Large bows from satin ribbons can be made using a cardboard template of a suitable size or your own fingers.
Options for decorating flower bouquets
Bouquets are held together with similar decorations, and bows can be made from paper and fabric ribbon. Both options are quite nice, and brief diagrams will show how you can create this decor as quickly as possible.
Want something interesting?
Option #1:
- Wrap the tape around your palm or any suitable object.
- Trim the ends of the edges for easier fixation.
- Align the cut pieces to each other (they will now be in the middle of the tape).
- Secure and straighten the “petals”.
- The more turns there are, the more magnificent the bow will be.
- Fix in the middle.
- “Fluff” the turns of the tape.

Option #2:
- Fold the tape several times in a figure eight.
- Fix in the middle.
- “Fluff” the turns of the tape.
- Carefully trim the ends and the bow is ready.

Option #3:
- Fold the bow according to the principle of the first option.
- Make cuts along the edges of the fixed tape.
- A fluffy bow will have a more voluminous and interesting look.

Option #4:
- The tape twists at the attachment points.
- “Petals” are formed directly in the hand. This way you can control the volume of the bow, which is very convenient for decoration. You can make the ends of different sizes.
- After the desired size and type of product have been achieved, secure in the middle with the end of the tape.

You can make original bows from satin ribbons with your own hands using the following technology:
- Wind a satin ribbon between two fixed knitting needles.
- Place a line in the middle.
- Remove the ribbons and gather the thread.
- Secure the thread, trim the ends - the bow is ready.

American design options
American bows got their name not entirely deservedly, because similar patterns can be found in various countries. The main requirement when designing such decor is to show imagination. The creation of such decor is based on the use of several types of products at once, so there will be a lot of options. This type can be called a traditional option; our master class will describe its creation in detail.
How to make a bow from a satin ribbon in the American style:
- “Eights” are formed from a thin ribbon.
- Individual parts of two or three pieces are fastened together.
- From below you can make a base from several straight strips fastened in the middle.
- For additional decoration, you can make the edges jagged.
- Secure the two parts together; you can glue a bead or a simple bow of a smaller size to the top.
Individual elements can be seen in the photo.

The end result should be something like this.

For children's hairpins, it is better to take a stronger rep ribbon. Nowadays they sell products with interesting designs, for example, favorite cartoon characters.

What can be decorated with homemade bows:
- Decoration of clothes, belts and shoes.
- Sofa cushions.
- Cutlery before serving to guests.
- Napkins, towels and kitchen curtains.
- Newborn envelope.
- Covers for champagne bottles.
- Wedding glasses, cars, witness ribbons and other festive attributes.
- Hair ornaments.
Decorating the New Year tree with bows is becoming increasingly popular. You can buy ready-made ones without any problems at any suitable store, but it will be much more interesting to make such a decoration yourself, especially if children help you with this. This would also be a great idea for a gift for loved ones for the New Year holidays.
New Year's bows on the Christmas tree
Simple and incredibly attractive decor can be obtained from the tips below. To make bows for the Christmas tree you will need a variety of materials: paper, felt, organza and even lace. Several successful examples are given in our article; they can be used as a model for independent inventions.

DIY Christmas tree bows made from felt
This unique material is in great demand in needlework. Its main advantage is its dense “plush” structure, the edges of which will not fray, and therefore do not require additional processing.
A simple bow for a Christmas tree is made approximately as shown in the photo. In this case, the upper part can be additionally decorated with beads, beads and just a bright ribbon of a contrasting shade.

You can make rounded edges, you get a completely different model.

A more complex model of such decor requires a detailed description; the whole process is clearly presented in the photo.
DIY New Year's decor:
- Cut the felt into strips of arbitrary thickness.
- Fold the strip in half and sew small stitches along the edge of the fabric.
- Cut the folds at equal intervals, not reaching the edge.
- Carefully gather the thread to form a circle.
- Trim and secure the edge.
- Decorate the top as desired.

How to make a ribbon bow for a Christmas tree
The above options are perfect for New Year's decor, especially since you can choose ribbons with the appropriate pattern. The color traditionally used is red, but if you don't have a specific color preference, you can choose multi-colored options.
In order to understand how to tie a bow from a ribbon, just look at the photo above. With some skill, such decorations can be made quite quickly.

With beautiful spirals you can not only decorate a ribbon bow on a Christmas tree, but also use the idea to create hair decorations.
Technology for making spiral elements:
- Wrap a satin ribbon around wooden skewers.
- Secure the edges with pins.
- Place in the oven at approximately 180º C for five minutes.
- After cooling, the tapes will acquire beautiful and uniform bends.

Original tulle design
The unusual appearance of this tulle bow can also be used to create New Year's decor. To do this, you need to take organza or cut a small strip of tulle. The algorithm of actions is shown in the photo and resembles the process of creating pompoms.

There are plenty of examples of use, ranging from gift wrapping to decorating curtains. We looked at the most successful options for creating bows in our article, but the final result and possible variations will depend solely on your imagination.


The range of satin ribbons is amazing in its diversity. Ribbons have different widths, colors, patterns, and finishes. This material is affordable and easy to use, and you can make very beautiful products from satin ribbons with your own hands. In this article we offer several master classes on creating both simple bows for every day and elegant, festive bows.
Let's look first at the simplest ways to tie a bow. Although, at first glance, it seems that tying a regular bow is very easy, there are still some tricks in this process. We will look at a method that will allow you to get an even, symmetrical bow with a beautiful center. To do this, you only need a satin ribbon and scissors.
1. Take a piece of tape of the required length.
2. Fold the tape as shown in the figure.

3. We pass one of the ears into the resulting loop below and tighten the knot.
4. This is what should happen.

This simple bow is suitable for decorating hair for every day.
How to make a beautiful bow from a satin ribbon?
For example, diversify a regular ponytail or spikelet with a bright ribbon.
Flower bow made of satin ribbon. How to do it yourself?
Now let’s look at the festive options for satin bows. Making them will be a little more complicated, but the result will be noticeably more impressive. Lush bows for hairstyles from satin ribbons can be easily made yourself. At the same time, the cost of the product is several times less than the price of a store-bought bow. The diameter of the finished product will be 14 cm; if you want to get products with a larger or smaller diameter, then change the sizes of the tape sections proportionally.

So, to make such a satin bow with your own hands, you need:
Six cuts each:
Satin ribbon 5 cm wide, 14 cm long;
Ribbons 2.5 cm wide, 10.5 cm long;
Silver ribbon 0.3 cm wide, 15 cm long;
Silver ribbon 0.3 cm wide, 8 cm long;
Felt circle with a diameter of 5.5-6 cm;
Decoration for the middle of the bow;
Matching threads, needle, scissors;
Lighter or soldering iron, glue gun or moment-crystal glue;
An elastic band, a hairpin or a clip for the base.
Before assembling the bow, be sure to trim the edges of the cut pieces with a lighter so that they do not fray during the process. Fold 6 five-centimeter pieces in half and gather them onto a double thread, pull the thread so that you get a flower and secure.

Make the second flower in the same way from pieces of ribbon 2.5 cm wide. Then make ears from pieces of silver ribbon, as shown in the picture. Glue the ends together with glue or a glue gun.

Glue large silver ears onto the large flower, one per petal, so that they look beautifully from under the top flower.

Glue a second flower on top and smaller ears on it using the same principle. Cover the core with the prepared decoration. A bead, button, or medallion will do.
On the back side, glue a felt circle to the bow, and attach it with an elastic band, for example. If you use a clip or hairpin, cover them first with matching grosgrain ribbon.

Your bow is ready. It took less than an hour to make an elegant satin bow with your own hands.
Lush bow made of satin ribbons decorated with rhinestones
We will teach you how to make this wonderful decoration with your own hands in the master class. This version of an elegant bow, which you can make yourself, will delight any first-grader. An elegant unusual bow is very simple to make, but it will take more time to complete, since it consists of a large number of parts. Please note that you need to carefully complete each piece, since the overall appearance of the bow depends on how well each element is made. If you do not have the skill to work with satin ribbons, prepare materials for 5-7 extra blanks.

Materials for work:
Tape 2.5 cm wide and 6 meters long;
Rhinestones or beads with a diameter of half a centimeter;
Lighter or soldering iron, scissors, moment-crystal glue, ruler, pencil;
A felt circle with a diameter of 5 cm, fastened with an elastic band or a hair clip.
We cut approximately 50 pieces of ribbon, eleven centimeters long, and trim the edges of the pieces with a lighter.
Fold each piece in half, satin side inward, drop a small drop of glue onto the satin side at a distance of 2-3 centimeters from the fold in the middle and press with your fingers. When the ribbon sticks well, turn it with the satin side out. It turns out that this is the detail.

Then we fold this part in the form of a bow, so that the glued area is in the center, and the edges of the tape are folded to it from the back side.

We decorate the workpiece with rhinestones or beads. We make at least fifty of these parts. This is the most important stage of the work; if you don’t get a neat workpiece right away, we advise you to practice a little before doing the “finishing” parts.
When the parts are ready, assemble the bow. We begin gluing the blanks onto the felt circle in a circle with a slight overlap. Should fit 11-14 pieces in the first circle.
We glue the second and subsequent circles in a similar way, slowly moving towards the center of the felt circle; the number of elements in the row will decrease as we approach the center. This should give you several circles, gradually decreasing in diameter.
The more elements, the more magnificent the bow will be. After all the blanks are glued, we attach an elastic band or a hairpin using glue or a glue gun, you can add ribbons for tying. The bright lush bow is ready.
These bows will definitely please your little princesses. You can decorate your hair with them both on weekdays and on holidays; with these accessories, budding fashionistas will look elegant and neat. And you will save on the purchase of hair accessories. You can, for example, please a first-grader with such a necessary and beautiful gift for the first of September, or give a gift for her birthday.
How to make a bow from ribbon? Several ways to make decorative bows
Home / Lifehacks
Hello everyone, dear needlewomen! Sometimes, to decorate a gift or create your handicraft, you may need to make a beautiful bow and decorate your creation with it.
There are two proven ways to make such a bow from a satin ribbon or from any other ribbon.

We immediately warn you that the first, and possibly the second and third time, you may not be able to make such a bow as shown in the video. Don't worry, it's just a skill that can be learned through practice.
But when your hands create the first cute bow, you will forget about your early failures :) It will be interesting to see who succeeded, so don’t be shy and send photos of your work.
Every woman has her own little secrets and tricks that make her life better and easier. And if there is also a little princess in the family.
Bows made from ribbons or various materials tend to add a festive mood, complement an outfit or hairstyle, decorate a gift set, complete a table setting, etc.
Most women have the opinion that making a bow with your own hands is a very difficult task. And completely in vain. Anyone can master such a craft.
To do this, you just need to prepare all the necessary materials, and then get down to business.
Making a beautiful bow from ribbon
Even twenty years ago, every schoolgirl wore braids with ribbons woven into them.
Today, manufacturers produce a wide variety of bows for hair, clothing, gifts, etc. from satin or nylon ribbon.
But the most beautiful bow can only be made with your own hands.
1) A rather interesting bow is made from a satin ribbon of two colors
With the free ends you can tie a bow to your hair, items of clothing, or attach it to gift wrapping.
2) Dior – a chic DIY bow made from a thin ribbon
This amazing decorative element can be attached to any surface.
3) You can make a big fluffy bow from ribbon with your own hands
To manufacture individual parts you will need to follow a few simple steps:

The royal bow is ready!
You can see how to make such a bow in the video.
4) DIY hair bow
A bow for decorating a hairstyle, made by yourself, always looks beautiful and original. And also a real exclusive. 
Are you planning a holiday or is your daughter going to first grade? In addition to a magnificent outfit, you need to prepare a beautiful bow to decorate your hair. Can such a bow be made from nylon tape?
If you were unable to find nylon ribbon of the required width on store shelves, organza can easily replace it.
To begin, we will prepare 2 ribbons 1.4 m long and 7.5 cm wide. We fold the ribbon in half lengthwise. Then we sew the folded edge with a needle by threading it on a thread. After the entire strip is stitched in this way, we begin to tighten the thread until the stitched strip becomes 0.4 m long.
Fasten the thread well and straighten the product. We do the same maneuver with the other tape. We cut out a circle with a diameter of 7.5 cm from felt or thick ribbon. We make two holes in the center of the circle, and thread a thin braid or ribbon into them to match the color of our bow. 
Apply glue along the edge of the base and glue the first piece, then coat the base with glue in a spiral and glue the tape, after finishing the first tape, glue the second.
To prevent the edges from spilling out, the tape must be burned.
5) DIY bow from paper ribbon
With the help of such a bow you can beautifully decorate a gift box or complement a table setting.
For such an occasion, you need to choose a very elegant ribbon, perhaps with a golden edge, as well as a pink or blue ribbon.
We make it from a plain satin ribbon, from a ribbon with a golden edge of the same color, a thin satin ribbon and braid with a pattern.
We begin to collect the flower from a piece of wide ribbon. Fold the ribbon in half and stitch it with thread. We perform this manipulation with all segments.
And remember, in the store you can always buy a lot of elastic bands and hairpins for your beloved daughter, but a bow or hairpin made by yourself always looks more impressive and elegant!
Views: 3,658


