Content
In this article we have collected for you the most interesting and beautiful options for decorating a headband with flowers. Stock up on materials, have a good creative mood, choose a convenient place and the right time and let’s create, create incredibly beautiful hairbands.
Headband with flowers made of corrugated paper
Corrugated paper is our ally in creating luxurious flowers to decorate your head. For these purposes, prepare the following:
- corrugated paper of suitable colors;
- scissors;
- threads;
- toothpick;
- foil;
- wire.
So, you need to cut out about five rectangles from paper, from which we will then cut out the petals. Or we will fold a strip of paper like an accordion and cut out the petals. They should look something like this:
When you unfold the accordion, each petal needs to be folded using a toothpick.
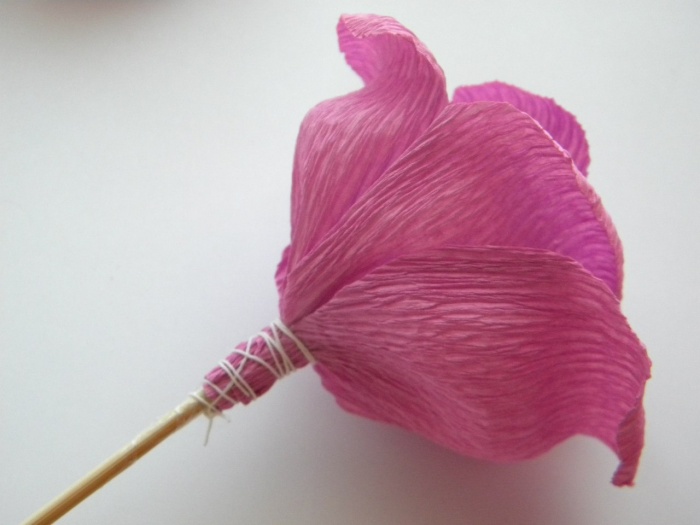
Now you need to twist a small ball from the foil and place it on a toothpick. It is important that our improvised stem is not too long, because this rose is intended for a rim.
After this, we simply wrap our ribbon of petals to the structure. By the way, this is how you make a rose with candies for a sweet bouquet.
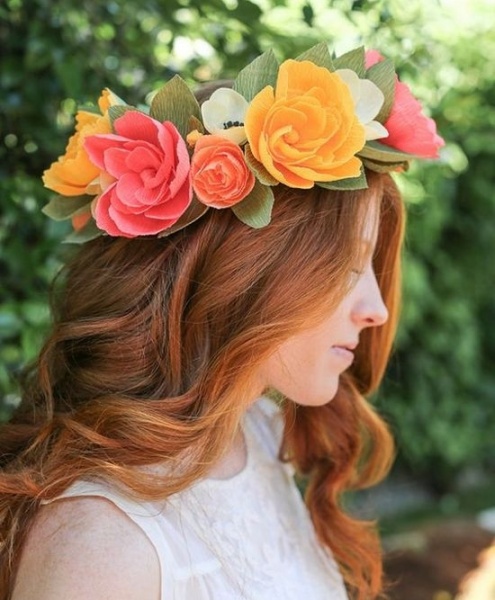
There can be many such flowers on a wreath. The technique for making corrugated flowers may differ from what was announced: a flower can be assembled from individual petals, you can use a ready-made template, you can fold a strip of paper in half and cut it into noodles, and then twist it, in general, experiment. Headbands with handmade flowers always look very touching and exclusive.
Decoration with flowers from foamiran
Foamiran is such a soft, almost suede-like material to the touch, very easy to use and very beautiful in finished products. Let's try to make flowers for the rim:
- foamiran sheet;
- toothpick;
- scissors;
- iron.
From our material, in this case white, we cut out up to five rectangles - future petals. The petals are cut out in the form of droplets, so you won’t need a template as such.

The petals can be slightly tinted. From the same material you need to cut out stamens - elongated thin triangles. As the base of the flower and to create the stamen, we will need a small foam ball and wire, from which we will make a base for the flower, onto which we will then glue the petals.

Before attaching the petals to the base, they need to be slightly heated with an iron and twisted, making them wavy.
You can glue the petals directly to the base in a circle, or in the form of a Christmas tree, placing the petals on top of each other. In order to glue the parts together you don’t need a lot of glue, just a small drop on each petal is enough.

There may be several such large flowers on the rim. By the way, unopened buds will help complement it - these are several petals that are tightly twisted, they cannot be straightened, and they come without a number of large petals.

Headband with kanzashi flowers
We have already described how to make a headband with flowers with your own hands using the kanzashi technique in our articles. It turns out very cute, such a headband is suitable for girls for a children's party or for some kind of themed party. A headband with flowers in this style is very easy to make. The classic option is to use satin ribbons, but in this case we’ll try to make a kanzashi flower from cotton fabric. We need:
- the fabric itself, even its print can be floral;
- thread and needle;
- scissors;
- button for the core.

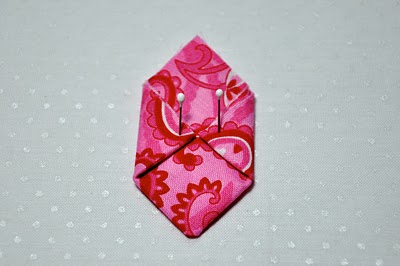
From the prepared fabric we need to cut seven squares for future petals. It is better to starch them, then the flower will turn out neater. Now, with the wrong side inward, you need to fold the square corner to corner to form a triangle. After this, we fold the remaining corners up, you can secure them with pins. Fold the remaining corners towards the center:
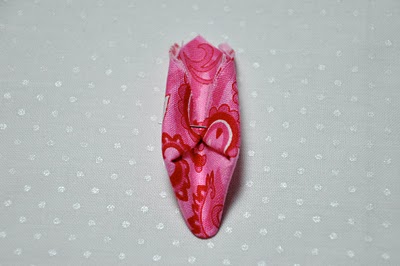
You need to do the same manipulations with all the remaining pieces of fabric. For all blanks you will need to cut off the raw bottom, as in the photo:

Now, using a needle and thread, connect all the petals and sew from the wrong side. For reliability, you can sew them from the front side, because the seams will be covered by the core.

A regular button needs to be covered with fabric in the color of the decoration and attached to the center between the petals. There are a huge number of headbands with flowers, photos of which you will definitely find on our website, but believe me, your flower will be one and only. After all, your soul will live in it.

Headband with ready-made flowers
Another simple option, but no less original and beautiful, is a DIY headband made of artificial flowers. And we need the following:
- artificial flowers;
- a thin bezel, or a wide one - it will be easier to attach flowers;
- glue;
- wire.
If the hoop is thin, then it will be more convenient to attach the flowers to it using wire, but if it is wide, then glue will be needed. Just twist it in advance, rehearse how you will combine the base with the decoration and create to your heart’s content!

You can choose many small flowers and assemble them into a composition; it can be, in general, one flower, but bright with various details: beads, stamens, mesh, tendrils and other decorations.
Various headbands, headbands, hairpins, hair decorations - all this is stylish, beautiful, interesting and in demand. Why not make your own hair product? This could be a headband, a turban, flagella or fabric bandages. For girls, you can make a crown or beautiful flowers on the headband with your own hands. If you work hard, you will get an unreal masterpiece that will amaze everyone.
Manufacturing techniques and options
There are options that will require a lot of hard work, but the results are worth it. So, You can make a handmade product using the following methods:

If, after reading the list, you are confused and do not know how to make a decoration with flowers with your own hands, then recommendations and a detailed description of the methods will help you solve the problem.
The easiest way
If you have little time and little experience in needlework, then this method is a great opportunity to make yourself an unusual decoration.
Sequence of work: buy a pair of hair ties with beautiful flowers, size and color, and also a headband, preferably in the right tone. Cut or peel off the flowers from the elastic bands, create a composition from them and attach them to the product.
All is ready. Anyone can make such a product.
In the same way, you can make a headband with your own hands from satin ribbons.
Complex creation method
Making your own jewelry is very easy. Hairbands made by yourself will cost a small amount of money, and their creation will not take much time. But it will be a wonderful product made just by you. In general, making things helps to show your creative abilities, saves money and hours of searching for the necessary decoration in the store, and gives you the chance to feel like a real designer. Making hair jewelry yourself is pure pleasure.
Necessary materials
Most of the materials for this product can be found at home if you arrange them correctly.
 Materials required for work:
- Headband for base.
- Textile.
- Decorations.
- High quality glue.
- Sharp scissors.
- Desire and strength.
Making the base
So, for the base you need the rim itself. To make the base, you need to take an existing simple rim, or, if it doesn’t exist, make it yourself. To do this you will need a piece of very large and flexible wire. You can take it from your dad, brother, friend, or purchase it in a store that has everything for handicrafts.
After cutting the wire to a certain length, you need to make the ends round.
Next, having given the base the chosen shape, you need to make a cover for it. It can be sewn quickly and easily. You can also paint the base using a special sprayer. To do this, you can use standard black and white or other shades. Everything will depend on your imagination.

Product decoration
After creating the base, you can proceed to making the decoration. This will require a small piece standard mesh, piece quality fabric. For the base, you can take black and white colors, which are always in fashion. So, for example, you can use black velvet material and white mesh. From these 2 fabrics, fold bows in turn, then fix them in this position with glue. If you like, arrange them in the shape of flowers or butterfly wings.
When folding the part from the bottom of the decoration I need to make a ring, through which the decoration will be put on the product itself.
It works best when the pieces of material are rotated in such a way that each of their components is clearly visible.
 If your imagination and strength allow, you can make a small hat by attaching it to the product. This decoration looks no less interesting and fashionable than a floral one. Plus, you can braid the headband with ribbons.
Another trend this season is the marine theme. Therefore, you can make a seagull or an anchor. The seagull can be created from the same black and white fabrics. Making its shape is quite simple. To make her look more graceful make it more voluminous, you can also decorate it with beads.
You can ask one of your male friends to make an anchor from the same piece of wire. After which you can simply paint it black or golden with your own hands. When all the parts are dry, you need to throw them on the headband.
The product is secured with the help of a ring, and not just with glue, because in this position it can be dragged to any side as you want. So you have learned how to make a headband with flowers with your own hands. You can also make kanzashi hairpins for this decoration. A master class with recommendations will help in this work. Choose any method, buy materials and equipment. Make unique products yourself.
Attention, TODAY only!
Handmade jewelry is becoming increasingly popular. It’s no longer fashionable to buy a product from China in the nearest store; it’s stylish to make such an accessory yourself.
Headbands with flowers are one of the most common types of head decorations., which have won success among adults and children. Making such an accessory with your own hands is not difficult.
To start making, prepare scissors, several bright colored ribbons, fabric glue, wire or a finished hoop.
If you have no experience in making hair jewelry yourself, use a ready-made hoop to decorate it.

The resulting accessory is perfect for girls: It can be worn to school and holidays. To prevent the headband from standing out too much, decorate it with small daisies, diluting their row with blue flowers.
How to make a headband from foamiran?
Foamiran is one of the most popular materials among needlewomen today. It has an affordable price, and flowers made from foma are distinguished by their liveliness.

You can decorate wedding and holiday hairstyles with a wreath of foamiran flowers, give the product as a gift for a celebration, and wear it for a walk.
note! It is necessary to work with flowers made of foamiran carefully - the material is plastic and can easily change shape.
To decorate the headband you will need purple and burgundy foamiran, iron, super glue, scissors, green ribbon for making a stem, beads, thin wire, and a headband.
Below is a step-by-step manufacturing process:
| Cutting | The material is cut into squares of equal size 2x2 cm. 15 squares are cut from purple raw materials, 20 from burgundy raw materials. The shape of petals is cut out from squares |
| Formation of petals | When working in this technique, it is necessary to form the petals. To do this, turn on the iron to medium temperature, make a depression at the base of the petal and soften it with heat. The edges of the petal are curled with your fingers, imitating beautiful real flowers. |
| Assembling buds | A base for the bud is made from foil, after which the petals must be attached to it. Each flower element is secured with glue at the base. You should get 1 purple and 1 burgundy bud |
| Making the stem | To do this, you need olive foamiran, from which a sepal is cut out for the bud. The flower itself is glued onto the base. A stem is formed from wire, wrapping it with green or emerald ribbons |
| Final assembly | All elements of the work are fixed to the rim using glue |
The resulting headband will beautifully frame curls of dark hair color.
It will not only decorate a festive look, but will also serve as a good gift for a girl. At the final stage, the hoop can be decorated with bright beads, creating contrast.
Handmade headbands made of fresh flowers
It’s not difficult to create a hoop or wreath from fresh flowers with your own hands.

The manufacturing method consists of simple operations that even a child can perform:
- Tools. To decorate your hair with voluminous real flowers, you will need the flowers themselves - it is better to take lush and long-lasting buds, green satin ribbons, hot glue.
- The technique is reminiscent of crocheting: Flowers are separated into small clusters and attached to the base of the headband using ribbon wrapping.
The flower is applied to the base, wrapped with tape, then the next one is applied. Hot melt adhesive is used every 5 cm to secure the tape.
- Having reached the middle of the rim, you should finish the work. After this, start wrapping the remaining flowers from the other edge, following the technique.
The prepared fittings must be completely masked with green tape. You can use strips of organza - then the product will be delicate.

In addition to the hoop blank, you can also decorate hairpins with fresh flowers, creating a set of jewelry.
Important! The use of wildflowers is preferable when creating a headband for photo shoots in a romantic style.
You can supplement real buds with candied berries. They can be large, but it is better to use small fruits.
How to make a headband from other materials?
In addition to these materials, other raw materials can be used. Crafts perfectly decorate curls, and a hairstyle, complemented by a handmade headband, will attract the enthusiastic attention of others.

note! You can wear a headband with flowers with any haircut: cascade, bob or loose long hair - fashionable jewelry adds expressiveness to any hairstyle.
Let's consider other options for materials for making your own accessory:
| Technique | Description |
| Kanzashi | The technique involves the use of wide satin ribbons and fabric where flower petals are laid to form a bud. A flower crown made using the kanzashi technique is perfect for little princesses |
| Product made of polymer clay | Soft colored clay is rolled into layers and baked in the oven. After that, it is varnished and attached to the rim. A hoop with red poppies made of polymer clay is a good option for a romantic photo shoot |
| Knitted accessories | Every girl can crochet flowers. After this, they can be fixed on the hoop to create an original accessory. |
| Felt models | Felt flowers are soft and pleasant to the touch. A braid decorated with such products looks original and attractive. |
| Paper options | Children's paper crafts can be a great addition to complete the headband. The origami technique allows you to make any shapes |

At the peak of popularity today are flower hoops with ears.- they are cute and neat. Such models go well with black and light curls, and also cause delight among passers-by.
Useful video
- Related Posts
Do not rush to throw away your old headband if it has become worn out or the decorations have fallen off. You can always give things a second life using a little imagination and the materials you have on hand. Let's see this for ourselves by making an elegant and delicate headband with flowers with our own hands.
Take the old headband and clean it of any remaining jewelry and fabric.
In addition, we will need:
- small beads or finished decoration;
- glue (necessarily transparent so that yellow smudges are not visible);
- lace 1 cm wide, 1.5 m long;
- guipure ribbon 0.5 cm wide, 4 m long;
- stationery clip (for ease of use);
- scissors and needle and thread.

You need to jump ahead a little and think about how to make the ends of the headband look neat. The answer suggests itself. Glue small pieces of lace to the ends. Don't despair if the base of the rim turns out to be black. It can be very advantageously played up using lace. You will get an interesting contrasting pattern.

Secure the end of the lace ribbon with a clip and wrap the lace around the headband in a circle.


We cut off the ends, leaving about a centimeter on both sides, and glue them on the inside.


A bright accent in this hairband will be the ribbon, from which you need to weave a patterned strip - a braid.
To do this, fold a 3-meter long ribbon in half and tie a small bow.

Pressing the knot tightly, pull the right end of the ribbon, thus unraveling one side of the bow. This will give us the initial loop we need.

We make a loop from the right half of the ribbon and insert it into the initial loop, tightening the end that we hold in our hand.


Thus, we weave a braid equal in length to our headband.


We will also need the same smaller braid, woven from the remaining meter of ribbon. We want to make a headband with flowers, so we’ll assemble a flower from this small braid.

Gather the braid along one edge and tighten the thread.

The result will be a flower. Trim the protruding ends of the ribbon and decorate the flower with a bead.


If desired, you can make completely different flowers from satin ribbons and decorate the headband with them.
For reliability, you can secure it with clamps and wait a few minutes until the glue sets well.


Let's continue decorating the floral headband with our own hands by adding a thread of beads. Glue it exactly in the center of the rim.
If you have beads separately, you must first put them on monofilament or fishing line. But it is much more convenient to work with ready-made beads, the so-called pearl thread.

The final touch is to sew or firmly glue the previously made flower from ribbons to the lace.

This is how you can easily repurpose an old item and end up with a beautiful and fashionable piece of jewelry!

Check out a few more Krestik master classes on decorating hairbands:


Since ancient times, women have tried to attract male attention to their beauty through the use of various accessories. Fashion trends of recent years are clearly demonstrated demand and relevance Modern women have such an accessory as a headband. Commitment to this decoration can be observed among both foreign and domestic stars. Manufacturers offer fashionistas headbands for every taste. Some of them are real handmade masterpieces.
 Headbands can decorate not only representatives beautiful long hair, but also look very effective on those with short haircuts. They are very different:
- thin and very massive;
- simple headbands made of satin ribbons, headbands made of beads;
- modest and defiant;
- with a single decorating element and a whole set of various elements.
Advantages of making a headband with your own hands
- making it yourself will become less expensive than purchasing a high-quality item, the price of which can amount to thousands of rubles;
- DIY making will allow you to become owner of exclusive jewelry;
- you can make any number of jewelry with your own hands, each of which will be designed for a specific combination of wardrobe items, a certain style;
- making headbands can become not only an exciting hobby, but also a way to make money.
Gallery: DIY hairbands (25 photos)


What you need for creativity
 A mandatory item for making a headband is a hoop. Modern stores offer a wide range of hair hoops made from various materials. When purchasing, you should pay attention to quality of the purchased item and its strength. If you have an old headband on hand, you can use it as a base, first ripping it apart and removing unnecessary decorative elements.
A variety of elements can be used as decoration. The choice of certain decorative elements is largely determined by the chosen d For making a headband using the technique. The following techniques exist:
- floral technique, which is characterized by a wide use of artificial flowers, flowers made of polymer clay;
- production of decorative elements from felt and leather;
- the use of lace ribbons and braid as the basis for decorating the headband;
- decoration with beads, rhinestones, seed beads of various colors and sizes;
- use of kanzashi hairpins, use for making satin ribbons.
In addition to the hoop and decorative elements, for the manufacturing process you may need:
- transparent and securely fastening adhesive;
- wire and wire cutters;
- scissors;
- needle and thread.
Making a headband from ribbons with your own hands is the simplest manufacturing option. To get the finished product, just carefully wrap a satin ribbon around the hoop and secure its ends. In order to make more complex models, additional time and carefully selected decorative elements will be required.
A beautiful children's headband can even be made from paper - for example, if an autumn headband or wreath is needed for a kindergarten matinee, it can be made from paper flowers and leaves, small artificial fruits and berries. You can make the same paired accessory for mom. Very elegant headbands are made this way: the hoop needs to be covered with a piece of fabric and decorated with a scattering of stones and beads.
How to make a headband with flowers with your own hands - master class
 Jewelry with flowers has always been at the center of fashion; it has been and is actively used in fashionable designer collections. Headbands with flowers are very popular due to the onset of the hot season. Artificial flowers in bright colors are the perfect addition to your summer wardrobe. Headbands with flowers are most suitable for a romantic style. Stylists recommend wearing hoops with beach dresses, shirt dresses, and long sundresses. The hit of this summer was wearing a thin hoop with flowers not in the traditional way on top of the hair, but wearing it on the forehead in the form of a tiara.
Let's imagine how to make headbands with your own hands, a master class. To create an accessory, you need to choose a hoop of small width. All you have to do is choose and buy your favorites in the store artificial flowers. The process of making a headband with your own hands, master class:
- braid the headband with a satin ribbon;
- flowers are cut off at the base;
- Using glue, the flowers are fixed to the rim.
Headbands made using the kanzashi technique and kanzashi hairpins remain the most fashionable modern trend. Very unusual and beautiful Kanzashi hairpins and flowers look great made using this technique. The kanzashi technique as an art form originated in Japan and is very popular among modern craftswomen. The main material used is satin ribbons of different colors, from which the petals are made. The quantity and color of the petals depends on the wishes of the master.
In the original, the kanzashi technique implied the existence of only two types - sharp and round. Today, many new forms and their modifications have been invented, which makes it possible to create interesting and original products. The process of making flowers from satin ribbons is quite simple and will be more understandable after watching the video on how to make them. yu kanzashi hairpins master class:
- you need to cut the satin ribbon into squares of the required size.
- each square is folded into a petal, the ends of which are singed to prevent the threads from shedding;
- with the help of a needle and thread, the petals are connected to one thread and pulled together, forming a flower;
- The flower blank is attached to a base in the form of a circle, which can be cardboard covered with a satin ribbon or a felt circle.
- the core of the flower is formed, which can be beads, rhinestones, or buttons of unusual shapes;
- Using glue, the finished flower is attached to the base.
A hairpin using the kanzashi technique can additionally be decorated with beads, beads, rhinestones.
Kanzashi headband master class
 We recommend watching a master class on the sequential production of flower inflorescences for making jewelry using the kanzashi technique. A kanzashi wedding headband in cream tones looks unusually gentle and feminine. To make it you will need:
- champagne-colored satin ribbon, from which you need to make 33 squares, the length of each side of the square is 5 cm;
- gold-colored ribbon for making 12 thin strips 2.5 centimeters wide and 10 centimeters long and 8 thin strips 9 centimeters long and 0.5 centimeters wide;
- 3 pieces of gold color huggers;
- 3 pieces of chameleon beads;
- stamens are white;
- gold cord;
- a string of white beads;
- felt base 2.5 by *15 centimeters white;
- white hoop.
Manufacturing sequence:
- The edges of the squares are treated with fire to prevent fraying and flower petals are made.
- From the wider gold strips, make the leaves of the flower arrangement by cutting diagonally with scissors.
- A composition of 5 petals is assembled, which forms a delicate flower. The result should be three flowers. A hugger and a chameleon bead are placed in the center of the flower.
- An element in the form of an unopened bud is formed from three petals, and leaves are formed from golden triangles. The result should be six buds.
- Small bushes in the form of loops are formed from a thread of beads, a piece of gold cord, and a narrow gold ribbon of brocade.
- Golden quadrangles, manufactured bushes, unopened buds and flowers are glued onto a felt base.
- The resulting composition is fixed on the hoop.


