Good afternoon everyone, today we will make snowmen from different materials. I will show you how to make a beautiful snowman out of paper, how to make a snowman from scrap materials that are in every home. You will find on this page several master classes, which will show you interesting ways to make a snowman with your own hands. Many of the ideas can be done together with children - for the next exhibition at school on a winter theme, or for a children's New Year's crafts competition at your work.
Let's start our series of crafts from large snowmen. I suggest you three master classes, during which you will get BIG SNOWMAN.
Master class No. 1
SNOWMAN from garbage bags.
In the photo below we see a beautiful craft - a large snowman in a smart hat. This is a fairly simple job that you can easily do yourself. Suitable for this craft white trash bags, or regular bags from the store around the corner (then we use those parts of the package where there is no color picture).

The basis of the snowman is a cardboard cone. We roll a sheet of cardboard into a bag (as for seeds) and fix the edge with tape or a stapler). We trim the uneven edges of the bag with scissors so that it can stand evenly and straight on the table.
Cut white garbage bags into squares arbitrary size. The larger the squares, the deeper the fluffiness the snowman will have, and the more material will be needed. You can cut squares (3 x 3, or 4 x 4, or 5 x 5, or 6 x 6).

Prepare the glue by heating a hot-melt gun with a glue stick. We wrap a square of film around the tip of a pencil - this is how we get a bunch with a sharp center, it is convenient to apply a drop of glue on it and glue it to the base of the cone.

And we need to cover the entire cone with such bunches - the pasting comes from the lower circular rows and so, tier by tier, we move upward in a circle

Now we make a hat for the snowman. You can make a pattern for the bottom, sides and brim of a hat from cardboard and assemble all these parts. Could it be easier?- Cover a jar of olives with pieces of cardboard.
It can be made even easier: take a jar of yogurt, glue wide hat brims made of cardboard to its edges and paint everything with black gouache (mix it with liquid soap so that it applies well to the plastic, and then spray it several times with hairspray to fix the color).

Cut out eyes and buttons from black cardboard and attach it to the snowman - it’s best to glue buttons not to the fluffy coating, but to the very base - to the cone. To do this, we attach a toothpick to each element with hot glue (as in the photo above) and glue such a button on a long stem to the cone, breaking through the fluffiness to the cardboard.
Master class No. 2
HOW TO MAKE A SNOWMAN
from modular origami.
At school we are all taught to fold paper modules and then assemble them into pot-bellied vases. And since we already know how to do this, then it is entirely within our power to collect BELLY SNOWmen. Everything is very simple here, the children will help you fold the modules - you sat down at the table in front of the TV in the evening and cut several sheets of office paper into rectangles and layered them into modules. And then the next evening, a snowman was assembled from these paper parts - like from a Lego set. A large voluminous craft is obtained.

If you are a beginner master of modular origami, then first make a small snowman, as in the photo above.
And if you have free time and long-term inspiration, then take on a larger project.

Even the cheerful snowman Olaf from the cartoon can be made using the modular origami technique. How to work with modular origami ( how to fold the module itself, and how to connect them to each other, I explained in the article

Master class No. 3
How to make a snowman
PAPIER MACHE
on the air balloon.
Below we see a beautiful large snowman. It is made from two balloons. 
The idea is simple and clear - coat pieces of newspaper with glue. From my own experience, I’ll tell you that you can’t do this quickly with a brush (throw away the brush) - just pour glue into a saucer, scoop glue from the saucer with your fingers into your palm with the same hand, take a piece of paper and directly with your palm, in a split second, cover a piece of newspaper with glue and immediately onto the ball... grab it We place a new piece with a glue hand and onto the ball, and so on...

When the entire ball is covered with 3-4 layers of newspaper, leave it to dry for a day or overnight. 
Using a knife, we cut off the sharp part of the ball, where the tail is - take out the rubber ball, it will not be needed. And cover the hole with masking tape or other tape.


This cut will be the BOTTOM of the snowman. And on top of the large ball we attach a smaller ball - also previously covered with newspaper. secure with tape or masking tape.

We cover the adhesive areas with patches from the same newspaper. And immediately from this newspaper we roll up a tight ball of the nose, and also wrap it with newspaper wet in glue - so that it becomes denser. And with several layers of newspaper patches we attach the nose to the front of the snowman.


Snowman hands We also make it from newspaper flagella, or from wire. We make hands in the shape of twigs.
In my opinion, it is better to take the wire as a basis and secure it thoroughly. Punch a hole through the left and right sides of the snowman so that the end of the wire comes out from the left side and from the right side. Wrap newspaper patches around the wire and form twig fingers. Dry, cover with brown gouache, sprinkle with hairspray.
IF YOU DON'T HAVE WHITE PAINT. You can cover the snowman with a layer of white paper napkins (or white toilet paper) - 2-3 layers will hide the newspaper font and the snowman will turn white.
And also You can make the final layer of toilet paper in the form of strips with fringe. You will get the effect as in the photo below.

How to make a snowman
FROM NEWSPAPER LUMPS.
You can do without balloons in our craft. We just roll sheets of newspaper into comas. And then we glue these lumps with white sheets of office paper using PVA glue. For such work, you can buy glue not in tubes, but in a bucket, universal or construction PVA (this will be cheaper in terms of money).
And before wrapping them in white paper, it is better to fix the lumps of newspaper so that they do not unfold. The cling film used to wrap suitcases at airports helps with this.


Master class No. 4
How to make a snowman
FROM BOTTLES OF YOGURT.
Yogurt bottles often have convex, thick shapes and smooth curves - this is a suitable shape for a snowman. And milk bottles are made of white plastic - this is a suitable color for a snowman.


In the photo below we see a snowman made from a milk bottle. The cap is made from a BALLOON, the edge of the balloon is cut off and placed on the neck of the bottle.

But below, a round head made of a foam ball is attached to the white bottle. The snowman's cheeks and smile are drawn on the ball, and the nose and eyes are glued on. The hat and scarf are made from a sock or a piece of woolen fabric.

But even IF YOU DON'T HAVE a foam ball, you can construct a snowman's head FROM A WALL OF NEWSPAPER, wrap it in cling film so that the newspaper holds the shape of a lump. Then secure the round lump on the top of the bottle with tape. And then THIS TEMPLATE for the future snowman should be covered with pieces of newspaper smeared in PVA glue (as we did in the second master class) and allowed to dry.

After this, paint the dry silhouette of the snowman white (gouache or spray paint) and decorate it with clothes.


Also, two short glasses of your yogurt or soft cheese can turn into a funny snowman. And as we see in the master class below, it’s easy and quick to do it yourself at home, together with your children.

Master class No. 5
SNOWMAN FROM THREAD
with your own hands.
In the photo below we see a cute snowman made of yarn balls. Perhaps you have already seen such crafts before at children's exhibitions, as the work of other parents. And they admired the openwork beauty of such transparent, delicate snowmen.


On our website I have already made a separate article with detailed master classes. There you will find all the nuances and tips. And here I will just give an infographic with step-by-step photos showing the whole process.


How to make a snowman
from FOAM BALLS.
And now one of the fastest ways to make a snowman with your own hands. We come to the “Everything for Creativity” store and buy foam balls there (preferably two sizes - one larger, the other smaller in diameter). You can buy 2 balls, or three... or more. Look at the money - they are not expensive, the price does not bite.
Next, your task is simple - we cut the balls (cut off the tops) and collect them together with these flat cuts. It is better to attach it not only with glue, but also to make a FASTENING ROD inside from an ordinary toothpick. After fastening the parts, it is better to tint the balls with paint. gypsum putty or varnish or paper napkins and PVA glue. Choose a blue coating for your craft - in any case it will turn out beautiful and gentle.

Some people coat the snowman with glue and sprinkle it with salt - grains of salt imitate snow (as in the photo below). Someone coats it with glue and covers it with thin pieces of cotton wool - the snowman turns out to be felt, like a felt boot.

You can do it very beautifully - pick out scales from a pine cone and paste them over the lower part of the snowman - dress him in a pine cone caftan. And make a hat from birch bark from a birch tree - you will get a snowman with your own hands, as in the photo below.

You can assemble the snowman parts NOT VERTICALLY, but at different angles. We cut off the tops of the balls at an angle towards each other and stick the toothpicks in at an angle too - and this makes the figures curved. Like the snowmen bent over and bent - like in the photo with the craft below, DANCING SNOWMANS.

The snowman can be placed ON A PEDESTAL - on a skewer, or on two long legs (as in the photo below). To thicken the legs, you can cover them with a napkin using PVA glue, achieving the desired thickness and proportions.


Master class BELLY SNOWMAN made from halves of balls.
To make such a snowman with our own hands, we will need two balls, whose diameter differs slightly from each other. One is slightly smaller than the other.
From each ball we cut off A LITTLE LESS THAN HALF. And we put these trimmed balls next to each other at the cut points.

We cut out the details of the snowman's uniform from mold or felt. And we attach these parts to the body of the snowman using glue from a hot gun.


We paint the snowman's scarf and hat with patterns (with a felt-tip pen or paints).

You can make many New Year's crafts from foam balls. A whole composition on a snowy landscape with a Christmas tree made of balls and a team of snowmen. Everything is done according to the same principle - we cut off the tops of the balls and connect them at the place of the cut.

How to build a snowman
from CUPS.
If you spare no glue and buy 2-3 pipes with cups of 100 pieces each, you can make a beautiful snowman. You can, of course, save these cups by taking them out of the trash can next to the office cooler (if the supplies order white cups, then they will be suitable for a snowman).

This snowman craft is very simple. All you do is place the cups in a circle - like in a round dance, with the bottoms towards the center. We fix everything with a drop of hot-melt glue (you can use squares of double-sided tape, it also holds well). And then we place more cups on top of this round dance... and again - until the dome grows (this will be half a sphere). Next, we turn the sphere upside down with the first round dance and continue to build up the second half of this sphere on it.


Using the same principle, snowmen are made from drink bottles. The cut quarters of the bottom of the bottle are placed in a circle in the same way - with the cut towards the center and the bottoms out.

Snowman woven from newspaper.
How to make a newspaper bundle.
If you unfold a large sheet of newspaper and begin to twist it diagonally into a tube, you will get a strong and flexible bundle of newspaper. From such thin newspaper tubes you can weave a snowman, just like people weave baskets.

Let's see how easy and simple it really is to do. Here is a newspaper, here we roll it up into a PENCIL to make it convenient, into a narrow tube.

To prevent the tubes from unfolding, you can secure them with a drop of glue. And make a lot of threaded tubes in advance, put them in bundles, tying them with an elastic band or string.

The beginning of weaving is 8 tubes. We put them CROSS ON CROSS, four at a time. And we intertwine these four by four tubes in pairs - we slide them under each other, as can be clearly seen in the photo below.

Immediately after these four tubes, we Twist the ends of this bent tube ONCE WITH EACH OTHER (we just swapped them) and threw them through the next portion of four tubes. This can be seen in the second photo below.

We repeat this WITH ALL the four pipes of our cross.
And we notice that the ends of our first tube have become SHORT. This means it’s time to lengthen them - to do this, we take out TWO more tubes from our supplies and coat their ends with a little glue and insert them inside the short tails of our weaving. This is shown in the photo below.

After this lengthening, we move our cross beams apart in different directions. So that the tubes in the crossspread out like rays of the sun.
And now our two elongated ends will go along all the rays, each time intertwining around each of them. That is, the ends of the tube bend around the ray, crossing each other, changing places.

To ensure that our weaving is round and uniform, and does not tighten somewhere stronger, somewhere weaker, it is better to place a jar or vase in the center of the weaving and tighten our weaving around this shape. This way we will repeat the uniform roundness of the can, and we will get an even braid.

You can weave two halves of a SPHERE, then gather them together into a ball (as in the photo below), or continue weaving upward, narrowing the sphere to the top of the ball.

After the newspaper snowman is ready, it is painted with spray paint from a can. And they decorate with eyes, nose, buttons, a hat and a scarf.

Using the same principle, you can weave snowmen from willow twigs. These snowmen can decorate your summer cottage with your own hands; they will not be afraid of rain, like a newspaper, and will last for many years.

How to make a snowman
FROM WHAT'S AT HAND.
the fastest ways.
You can simply buy a package of white toilet paper. Place the rolls on top of each other. Cut out eyes, nose, mouth, twig hands from cardboard. Use an old woolen sock to make a hat. And here he is your snowman - standing there smiling. Cute, cute and big. It's nice to look at and not ashamed to show.

Here's another great way. Pour white coarse salt into a white sock. We tie the sock with twine at the top and also make bandages twice in the middle of the sock. We get a beautiful snowman. We give him a figure and face like the cartoon snowman Olaf.


Or let's do something even more interesting. Knead a cool, tight salty dough. Three glasses of fine salt, three glasses of flour, a couple of tablespoons of vegetable oil so that it doesn’t stick to your hands - and knead the dough with water. Pour water over the eye until the dough becomes like plasticine. And then add more flour so that it is definitely tight and firm. With tight dough, the snowman holds its shape better.
And if you take not wheat, but RYE FLOUR, then the snowman will definitely not settle, it will keep its shape firmly. Rye flour will give the craft a brown color. But this is not a problem - when the craft dries to a solid state, it will be easy to paint it with gouache or any facade paint.

Also, lumps of dough can be fixed on a pedestal made from an inverted flower pot. You will get a new craft. You can make a whole happy family of snowmen using dough and pots.

You can make a very bright colorful craft in the form of a snowman FROM BALLOONS. Just buy regular round white balls and multi-colored sausage balls for twisted crafts.
In order for the snowman to melt firmly on the floor, you need to add water to the lower balls - they will be the center of gravity for the snowman.

You can also very quickly make a snowman out of a pillow. The easiest and fastest way is to just sew on buttons and roll the nose out of a piece of bright orange washcloth. Tie the neck of the pillow with any homemade scarf, put on a hat (even a simple hat, not necessarily a New Year's cap).

Snowmen from FELT,
How to make a snowman out of wool.
Nowadays many people are interested in felting wool. Here in the photo below we see what a beautiful snowman can be made from a piece of ordinary wool for felting.

The fastest felting method is the wet method. In a bowl of warm, soapy water, the hairball molds like a lump of plasticine. We simply roll the wet wool in our hands and roll it into a tight ball. Three of these balls give us body parts for the snowman.

You can felt not necessarily spherical shapes. And not necessarily in a wet way. You can simply dry twist a piece of wool to the desired shape and comb it with a felting needle. It’s very simple: you poke a needle into this woolen bundle, and from this it compacts itself and knits into the dense shape that you gave it when you folded it.

You can separately felt the legs and arms of the snowman and attach them to the body by needle combing.

Twig handles are made using the wet method, when the wire is wrapped in a tuft of wool and rolled on the table with wet, soapy hands.

Additional clothing items for a snowman can be made from felt or fleece.

You can make a real broom for a felt snowman from the fibers of a homemade broom.

You can make a whole dried composition from wool with snowmen, Christmas trees, gifts, penguins and other characters that fit the New Year's theme.

Here are some simple ideas on how to make a snowman from a variety of materials. But we haven't said everything yet...
This article will have a continuation... because while I was writing all these letters, my hands were making and photographing more new crafts with snowmen. Very soon there will be a link to an article with new works - we will make snowmen out of paper.
In the meantime, catch existing links to articles about snowmen.
Olga Klishevskaya, especially for the site ""
If you like our site, you can support the enthusiasm of those who work for you.
Happy New Year to the author of this article, Olga Klishevskaya.
DIY New Year's snowmen can be made from a variety of materials: glass light bulbs and plastic bottles, napkins or corrugated paper, terry sock or woolen threads. Preschool children can make these crafts using the appliqué technique, and adults can learn new techniques such as decoupage, polymer clay modeling, knitting or sewing.
To do this, you can use it as additional training material, which describes in detail all the intricacies of performing each job. For example, if you decide to sew a felt toy, then there you will find tips on what order to sew the parts and how to fill them to make the toy three-dimensional.
If you like modeling with polymer clay, and you have already decorated with this technique, you can take it as new ideas and create stylish New Year’s decorations, for example, a pendant or “Snowman” earrings.
DIY New Year's snowmen: master class
They turn out very beautiful DIY Christmas snowmen, master class will show you how to complete this fun craft step by step. As a rule, it is on New Year's Eve that everyone is busy with creativity, some decorate the Christmas tree, some decorate the house or the lawn in front of the house, some create cards with their own hands, where congratulations will be written for relatives, and some prefer to make souvenirs -presents. As a matter of fact, if you decide to make a snowman, then they can be used both for decoration and as a gift.
If you're interested, how to make Christmas snowmen with your own hands, then, first of all, you need to pay attention to the technique of sewing toys using felt. If you have decided to try this type of needlework for the first time, then do not worry, since this material is very convenient, easy to cut, does not fray, so you do not need to additionally process the edges. After all, remember how difficult it was to work with satin ribbons, when we made them, they may come in handy for you too. And if you fill the sewn parts with down, you will get a beautiful three-dimensional figure.
Among the materials that we will need, felt comes first - white, burgundy, black, blue, green, red, orange. Holofiber will serve as a filler; you also need to take six beads for decoration, felt-colored threads, glitter, and Dragon glue.
Before cutting out the parts, you need to trace them on felt, and first you need to prepare a sketch or pattern of all the elements. It can be printed, or transferred from the monitor to paper (just place an A4 sheet in the monitor and trace the elements with a pencil).
Now you need to cut out the elements on paper. Take white felt and fold it in half (because this material does not have a reverse side). We will use it to complete the base of the snowman. We attach two circles of paper (which we cut out) on top; this can be done using pins. You can cut out as many bases as you want to end up with snowmen.

Next, you can sew the circles together using threads of a contrasting color, for example, green. Hand stitches look very beautiful on this material, but they must be neat. The circle does not need to be sewn up to the end right away; first it must be filled with holofiber, and only then sewed up. On top of this already formed circle, you need to put both sides of the upper, second part, combining them. Also secure with pins and sew with hand stitches. At the junction, you also need to sew first on one side, fill it with holofiber and sew up the second side.
The base is ready, it's time to decorate it. The snowman should have a beautiful black cap. Cut it according to the pattern using black felt. You can trace the details along the contour with chalk or a piece of dry soap. There should still be two parts for each element of the craft.
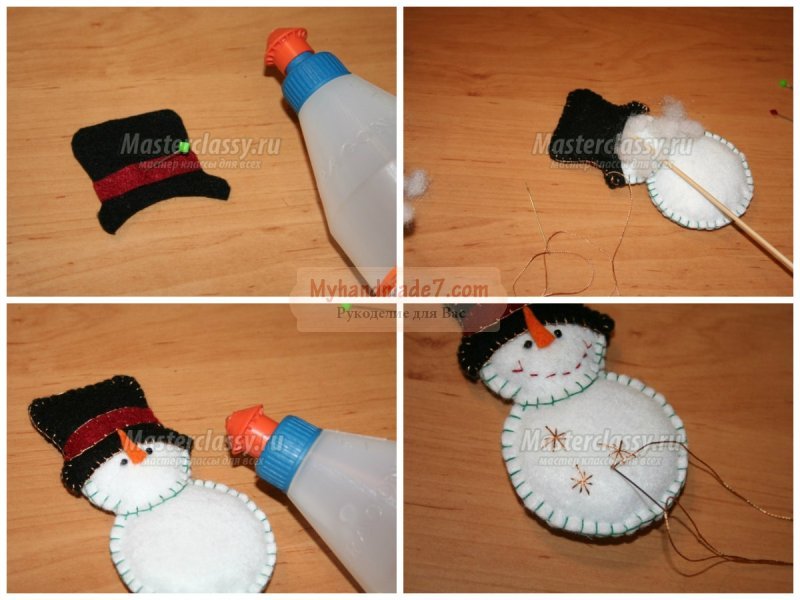
Now we attach the cap to the head, it must be “put on” over the head and secured with pins. Cut a strip from the burgundy color that will be attached to the front side. It must be glued with Crystal or Moment.
We make the eyes using black beads; they need to be sewn or glued. Orange material will be needed to cut out and then sew the nose, and attach the finished nose to the face (glue it). You need to embroider the mouth of the toy using hand stitches so that it looks just like natural.

You also need to embroider a snowflake on the bottom circle using hand stitches. You need to cut a Christmas tree out of green. Sew hand stitches down the center, sewing it to the base.
Cut a couple of stripes from blue. Glue one on the neck, so you decorate the snowman with a scarf, and form the other strip into a bow and secure it in the center.

We got these beautiful ones DIY Christmas crafts: snowman must be original, so decorate each next one with other elements.
If you like sewing from felt, then be sure to try it, they will tell you what color material to buy.

DIY Christmas crafts: snowman
DIY Christmas snowmen from bottles Decoupage techniques require special skills, so children do not always cope with this type of creativity on their own. But we offer you the simplest option - crafts from threads; here you only need to know how to make pom-poms. Naturally, we will need white yarn, and we will also need some blue yarn for decoration.
To make a pompom, you need a template that is an open ring. For each pompom you need to take two identical ones. It is better to do it from thick paper (cardboard, for example). The diameter of your template will determine the size of the pompom.

Now we need to remember how we sculpt a snowman, because for this we always use three snowballs of different sizes, the same must be done here, but the snowball will be pom-poms. Small will have a diameter of 4.5 cm, medium - 6 cm, large - 8 cm.
Two identical templates must be folded, wrapped with yarn, it must be wound tightly. Now cut a small piece of thread. Squeeze the workpiece tightly in your hand and cut the threads from the outside between the two template parts. Thread the prepared piece of yarn through and tie it. Now the finished pompom needs to be trimmed, cutting off all excess. Make three fluffy lumps and you can form a snowman, for this you need to use hot glue.

The eyes should be made of black beads, the nose should be made of orange felt, filled with holofiber. We will decorate our toy with a cylinder, which we will also cut out of blue material. The mittens are made of red, and the hands must be made of thick wire, wrapped with black yarn. At the end, decorate it with a blue knitted scarf.

DIY paper Christmas snowmen
DIY paper Christmas snowmen- this is an activity for the little ones who find it difficult to make crafts using sewing or pom-poms; for preschoolers you can offer very beautiful appliqués. A snowman can be made from napkins; although the activity is simple, it is very exciting and useful; thanks to such creativity, the child develops thinking, imagination, and fine motor skills.
In addition to napkins, you will also need scissors, a stapler, glue, and cardboard for the base (preferably blue). First you need to take ordinary white napkins (three pieces) and fold them together. Fasten them in the center with a stapler. Cut out a circle with scissors, which must first be drawn with a pencil.
Next, carefully lift each layer, holding it in the center. Do the same with the next batch of napkins, only this time the circle should be of a smaller diameter. Now take one napkin and fold it: in half and in half again. Cut out the smallest circle. Now you need to glue the three parts onto the cardboard base and decorate the snowman from napkins.
Cut out a hat from colored paper, make eyes from black plasticine, and a carrot nose from orange.

DIY New Year's snowmen made from socks
It’s always interesting to give a second life to old and unnecessary things, for example, it often happens that one sock is lost and the second one can be thrown away, but we offer you a creative idea on how to do DIY New Year's snowmen made from socks, you will also need an old small children's hat, a circle of thick cardboard, cereal, and white thread. Scissors, a needle, two small buttons for the eyes, a piece of red foam rubber.
You need to put a circle of cardboard into a white sock to make the craft stable. Then pour cereal into the sock (you can take rice or buckwheat). Tie the top with white thread. Then use a thread and a needle to outline the neck, tighten it, and give it shape. In the same way, you need to make the handles.
Cut off the top of the hat and bend its edges to make a hat for a snowman. Another piece needs to be cut off for a scarf.
Now you can sew on the button eyes. If there are buttons in the shape of hearts, then you can decorate the body with them.

DIY Christmas snowmen from bottles
A bottle of liquid caramel has the right shape to make a neat snowman out of it. You also need to take white plasticine, white, gray and yellow threads (for knitting), two toothpicks, beads for the nose, black plasticine for the eyes, superglue for joining parts.
The bottle should be coated with a thin layer of plasticine. Make a hole in the middle for your hand and insert a toothpick. Next, the entire bottle must be wrapped in white yarn, pressing it to the plasticine. Fasten and trim the ends.
As a bucket, which traditionally serves as his headdress, you need to take a jar of yogurt. It must be cut to the desired height and glued on top with superglue. Next you need to glue the nose, eyes and buttons.

You can find several more ideas for creating New Year's toys using various techniques and techniques. For example, you can make balls from threads: dip the threads in glue and wrap them around an inflated balloon; when they dry, the balloon bursts, and transform the resulting ball and two more of different sizes into a snowman figurine.
In this article we will show you what crafts in the form of snowmen you can make with your own hands from scrap materials.
Of course, you can and should make real characters out of snow! For example, :

But what if you live in the south, and there is snow only somewhere high in the mountains? Or is there enough snow outside, but you want to have a cheerful, never-melting friend at home? Or maybe there is an exhibition of winter crafts at a kindergarten or school and you urgently need to create a small miracle with your own hands?
Then our ideas, photographs and master classes on making snowmen are for you!
If you want to add to our collection, send a photo to the competition " ". So, what can you make a “Snowman” craft from? See the options with photos and videos.
Snowmen made of cotton wool
Cotton wool is a material that looks very similar to snow in its lightness and whiteness. It is not surprising that many crafts are made from it. In order for the snowman to keep its shape, a base is prepared from foil, plastic bottles, burnt out light bulbs or just lumps of paper, and cotton wool is already glued on top.
Step by step description
Cotton toys carry a special atmosphere. They are very light, pleasant in the hands and do not break. Everything needed for work can be found in every home. This master class by Svetlana Satina shows how to make a snowman from cotton wool and PVA glue.

Materials:
- cotton wool,
- newspaper or magazine,
- foil,
- white paper napkins,
- threads,
- PVA glue,
- brush,
- toothpick,
- awl,
- twine thread,
- Red ribbon,
- acrylic paints or watercolors.
Progress
Roll three balls of different diameters from an old newspaper. We connect them together and secure them tightly with foil.


Zig-zag cotton wool is more suitable for creating toys. It easily splits into strips and is easier to work with. We divide the cotton wool into strips and wrap them around the snowman, wrapping them tightly with threads. White threads are more suitable for work, as they are easier to mask with pieces of cotton wool. We try to pull the thread so that it lies in different directions. We increase the cotton mass until we get a figure of the desired shape and size.
Keep in mind that wet work awaits us, after which the snowman will increase in volume.

The figure in rough outline is ready, now you can move on to the details. We dilute PVA glue in half with water to make it more liquid. If you don’t have such glue on hand, you can always replace it with paste. By the way, our ancestors worked with him. The only downside of the paste is that after drying it turns yellow.
Again we split the cotton wool into thin pieces and paste them over the workpiece, thoroughly coating the cotton wool with glue. While working, we try to smooth out all the layers as tightly as possible so that the toy turns out with a good crust after drying.

While we are working with wet cotton wool, we constantly smooth it with our fingers, trying to press harder to expel excess air.
We form handles from two identical strips of cotton wool and glue them to the body. We make a small cotton cone and glue it to the place of the nose. Use a toothpick to draw a line for the mouth, and use it to outline the eyes.

In general terms, the snowman is ready, it's time to send it out to dry. This takes several hours, sometimes even days. To speed up the process, some dry the figures on a radiator, then the material shrinks less smoothly.
When the toy is completely dry, we begin to further shape it. We make a hat from white paper napkins. We fold the dry napkin spontaneously, as if creating a headdress. We coat the improvised hat with a large amount of glue. We wait until the napkin is completely wet and make folds on the hat.

To make a scarf, cut the napkin in half, fold it several times in width, apply glue to the inside and smooth it with your finger directly on the table. Then we wrap the scarf around the snowman's head, beautifully distributing the folds. If anyone has plain colored napkins on hand, then you can use them to make clothes for a snowman; you won’t have to paint them in the future. At this stage, we send the toy to dry again.

How to color a snowman
Our snowman is dry and ready for further action.
To paint the toy, take yellow acrylic paint, dilute it with PVA glue and apply it to the scarf and hat. While the yellow color dries, paint the nose of the carrot orange. We draw the mouth in red, put black dots in place of the eyes, and outline the eyebrows. Using the same color, we apply light strokes on the carrots, imitating cracks.
Acrylic paint dries quickly and you can start decorating the scarf and headdress. We draw red stripes on the scarf and put white dots. We put red paint on a flat brush, lightly wipe it on a napkin and use a dry brush to pass along the top of the cap. Overall, the snowman is ready, but something is missing. Among the New Year's toys there was a small golden ball that fit well on the snowman's hand.
In this form, the cotton wool snowman has a complete image. If there is no goal of hanging it on the Christmas tree, then you can consider the work finished.


To decorate the New Year's beauty with a toy, you need to make a puncture in the upper area of the hat with an awl. We thread a twine cord through the hole with a crochet hook, tie a knot and decorate with a red ribbon.
Now the toy is completely ready. And this is him paired with a friend.
The creative and cheerful Snowman Olaf from Frozen -

More options for how to make cotton snowmen; every child can do such crafts:


Simple but effective crafts are made from cotton pads.


"Snowman". Trushina Lydia, 8 years old.
The base of the snowman is made of paper and covered with cotton wool. Hat made of cardboard and lid. The Christmas tree is made of painted cotton pads.

Zakharova Olga Mikhailovna
The snowman is made of foam balls, the hat and scarf are knitted and decorated with snowflakes.

"Cheerful Snowman" Evseeva Varvara.
Paper threads, wire, padding polyester.

"Olaf." Solodovnik Anya Valerievna.
Snowman is a Christmas tree toy made of paper, legs made of thread. For decoration I used decorative eyes and a nose.

“I’m the only one so cool, snow-white and with a broom.” Kupriyanov Egor and mother Natasha.
Threads, cardboard, foil, cotton pads, twigs, beads.

"Snowman Postal Man" Solodovnik Igor.
The snowman and skis are made of triangular modules, the hat and mitten are folded according to an origami pattern, and the sticks are made of boiler tubes.

From plastic cups
"Snowman". Dmitrachkova Valeria Valerievna.


Video from YouTube channel on how to make a snowman from plastic cups:
Snowman from a plastic bottle -

"Snowman". Sorokin Artyom.
The snowman is made from flower pots glued together and painted white with acrylic paint. The cylinder is also made from a flower pot and a tray for it, painted with black acrylic paint. Eyes and nose are glued on. A mouth is drawn. Our snowman is decorated with a tinsel scarf.


Snowman made from a sock
Vorsina Lyudmila Leonidovna, work performed jointly with Vorsina Luchezara.
Snowman made from a sock. Materials: clean white sock, knitted scarf, sequins, beads, buttons, padding polyester inside.
Everything is sewn on with regular thread, the scarf is tied.

Video “A snowman made from a sock in 5 minutes”:
“Visiting the Snowmen.” Alferov Alexey.
The work is made from pieces of fabric and cotton swabs.

Snowman using sculptural textile technique - :


From fabric
Felt snowmen

The master class was prepared by Olga Mikhailovna Zakharova.
Materials:
- Felt: white, blue, red, orange, black, light blue,
- glue "Moment"
- braid,
- needle and thread,
- black half beads (for eyes),
- two buttons,
- a piece of white fur,
- padding polyester (batting),
- the roll is white.

Description of work, step by step:
1. From white felt, cut out a snowman according to the pattern (2 parts).


Between them there is a layer of padding polyester. Sew both halves together.
2. Cut out mittens, mittens, a hat, and a scarf from red (blue) padding polyester. Glue it onto the snowman using Moment glue.
 3.Glue the braid onto felt boots, mittens, a hat and a scarf.
 4.We cover the snowman with white braid (ruliks).
 5. Cut out and glue the eyes, mouth, cheeks, nose. Glue the buttons.

 Homemade snowman is ready!


Video on how to quickly sew a snowman from fleece:
"Snowman". Verenich Olga.
The snowman is made of cotton material and filled with padding polyester. Small details and the hat are made of felt. Painted with watercolors. The buttons are made of salt dough. The scarf is made of wool.

"Snowman". Zakharova Olga Mikhailovna.
Made of fleece, the hat and scarf are knitted and decorated with beads.

"The snowman is rushing to the Christmas tree." Shekhalev Yaroslav.
Sequins, beads, felt, cardboard.

"Snowman". Sudarikov Ilya.
Made from foam balls coated with acrylic relief paste “Snow”. Felt hat, scarf, mittens and nose. Wire handles with tinsel. Decorated with rhinestones.

"Snowman". Sementsova Natalya.
The work is made of cut threads.

"Olaf the Snowman" Sudarikov Ilya.
Sewn according to a felt pattern.


Paper snowman
In this master class I will show you how to make a funny snowman from a cardboard tube from cling film, foil or toilet paper roll. Such a funny craft will not leave any child indifferent. You can decorate with it or perform a festive performance. Make several similar toys, and your winter collection of crafts will be replenished with new original characters.
To make a snowman you will need the following materials:


Using a black marker, draw a snowman's face and buttons on the tube. If you wish, you can color it with colored markers, pencils or paints. You can also decorate the craft with glitter, decorative glue, and stickers.

Glue bamboo skewers to the back of the craft using a hot glue gun. Make a nose in the shape of a carrot from plasticine. Glue the hair from colored paper. Make legs from cardboard. To do this, glue two circles from below using a heat gun. This is the final snowman!

Made from paper napkins snowman. We mixed 1 third of water and 2 thirds of PVA glue, dipped white napkins in this mixture and rolled them into balls, combined our blanks while wet and let our snowman dry, then glued bead eyes, a cardboard nose and cap to it, and drew a mouth with a felt-tip pen . The snowman is ready. (from the master class "" of the Vasyukov family)

"Naughty snowman." Naumov Fedya and mother Sveta.
Cardboard, paper, twigs, paints.

New Year's decor of a chocolate bar in the form of a snowman
It is always pleasant to receive a sweet gift, and if it is also decorated in a special way, then the surprise will be doubly pleasant. An ordinary chocolate bar can be decorated using the popular winter image of a snowman. This is a unique gift for the New Year. You can make it for a baby, put a yummy disguised treat under an elegant Christmas tree. Or the child himself can make such a New Year’s craft to give it to someone. The snowman will turn out to be cheerful and mischievous.
What you need to prepare to decorate the chocolate bar:
- the chocolate itself - a traditional bar;
- white paper, colored paper;
- yellow and red fluffy pompoms;
- green paper - plain or corrugated;
- decorative tape with a beautiful pattern or grosgrain ribbon;
- doll eyes or a black pen;
- scissors;
- glue or double-sided tape.
How to decorate a chocolate bar for the New Year step by step
1. Take a sweet gift and prepare everything you need for work - paper, fluffies, eyes. If there are no pompoms, then they can be replaced with real buttons or half beads. The snowman will be white, so a regular sheet of white office paper will be suitable as the main material. Any Christmas-themed items you have will work.
 2. Carefully wrap the sheet around the chocolate bar, leaving a sweet gift inside. The top and bottom parts can be left unbent to use less glue. Seal only the back wall using a glue stick or double-sided tape. You can wrap the paper in one or several layers so that the pattern of the chocolate bar does not show through, and it is a surprise for the child what is inside. The excess parts at the top and bottom can be trimmed with scissors if desired. In front of you is a white rectangle, which is the basis of the craft. Next you need to turn him into a snowman.
 3. Take a beautiful decorative or regular tape and stick it to indicate the head and torso, draw a small tail. The transverse stripe will visually divide the figure into 2 unequal parts. The ribbon will become the snowman's scarf. Attach doll eyes at the top or draw them with a black pen.
 4. Attach 3 yellow pom-poms in the form of buttons at the bottom, and place a carrot near the eyes. This snowman decor is quite traditional. Cut out carrots from orange paper. This is the nose.
 5. Make a hat using black or purple paper. Prepare a cylinder, glue 3 red pompoms on it and glue green leaves to make a Christmas flower.
 6. When the hat is ready, stick it on the top of your head. Glue a decorative decoration – a heart – into the area of the heart, adding rhinestones to it. An interesting sweet New Year gift for a child is ready. You can make a whole basket of such products, using not only the image of a snowman, but also the famous Father Frost, Snow Maiden, deer, penguin, and so on. Get creative by introducing children who love candy to exciting creativity.

Another paper snowman -

Snowman made using papier-mâché technique -

“Snowman”. Gronskikh Sofia.
The snowman is made of colored paper and cardboard. Multi-colored napkins are used for decoration.

"Snowman". Svintsov Vadim.
The snowman is made of corrugated paper. Decorated with a knitted hat and scarf. Inside the snowman is filled with padding polyester.

New Year 2020 of the White Metal Rat is approaching, and each of us is preparing for this wonderful holiday. Some people plan to celebrate the holiday at home, with their family, while others, on the contrary, in a noisy company of friends, on the street. In both cases, I would like to beautifully decorate the New Year's meeting place. Typically, the New Year's decoration of the home consists of a Christmas tree, all kinds of garlands and beautiful festive compositions from Christmas tree branches and tinsel. On the street, traditionally, a snowman is made from snow and decorated with various fun accessories. But what if you want to have such a funny snowman in your apartment, or it happens that there is little or no snow outside? For such cases, we offer some great ideas on how to make a snowman for the New Year 2020 with your own hands from scrap materials.
Snowman made from plastic cups
In order to make such a rather unusual snowman, you don’t have to work hard, because creating such a miracle is as easy as shelling pears!
To make it you will need:
- plastic cups - 300 pcs.;
- PVA glue or stapler;
- plasticine.
Progress:
- 30 glasses should be laid out in a circle and fastened together using a stapler or glue. The first row is ready. According to the same principle, we make the second and all subsequent rows. For each subsequent row, fewer and fewer glasses will be required, since they are cone-shaped. Thus, the first lump should be obtained.
- The next lump should have a more round shape and smaller dimensions. We take 22 plastic cups and form the second lump in the same way as the first. After that, we turn it over and lay out the missing rows. If desired, you can make a third lump, however, in this case, it may be too unstable.
- Connect both lumps and make sure that everything turns out correctly and evenly.
- Let's start decorating. Make eyes from black plasticine and a nose from orange plasticine. Wear a hat or cap. You can also use a scarf, ribbons, fabric and other elements for decoration.
- You can put a New Year's garland under the snowman, in which case it will also glow. The main thing: show your imagination! This decoration can be installed indoors or outdoors.
Master class on making a snowman from plastic cups
Snowman made of threads

One of the easiest options for making a snowman for the New Year 2020 with your own hands is using ordinary threads. It looks original and is done, surprisingly, quickly and easily.
- A skein of white thread,
- PVA glue,
- Balloons - 5 pcs.,
- cotton wool,
- Needle.
Progress:
- First of all, you need to inflate the balloons, they will be the body. 3 - different sizes and 2 - the same (for hands).
- Use a needle and thread to pierce a jar of PVA glue. The thread must be saturated with glue. We remove the needle and wrap the thread around the inflated balls, which have been previously coated with a small amount of vegetable oil (so that the thread does not stick to the ball). Try to wrap the balls as carefully as possible so that there are no gaps at all. Once all the balloons are wrapped, place them in a warm place to dry completely (at least 24 hours).
- After this, pierce each ball with a needle and remove its remains by the tail.
- We sew all the parts together with white thread. For maximum effect, you can coat the stitching areas with glue. Leave it until completely dry.
- The eyes can be made from buttons or beads, the nose and mouth from colored paper. Wear a hat and scarf. Our snowman is ready for the New Year!
Master class on making a snowman from threads
Snowman made from beer caps

A snowman made from beer caps does not require great creative skills to make. Even a child can easily make such a New Year’s craft with his own hands. And since a snowman from ancient times is considered a good helper in the fulfillment of cherished desires, such a craft will not only serve as a decorative element, but will also attract good luck and luck to your home.
To make it you will need:
- Bottle caps;
- Acrylic paints - white, black, orange, red;
- Brushes;
- Ribbon;
- Hot glue;
- Buttons;
- Scissors;
- Glitter (at your discretion).
Progress:
- Take three bottle caps and paint them white, then glue them together with hot glue.
- Glue a red ribbon to the back of the future snowman, making a loop at the top.
- Using a thin brush, draw the eyes, nose, mouth and buttons on the snowman.
- We tie a thin ribbon, which will serve as a scarf, between the first and second lids. To make it more beautiful, you should glue a button or other decorative element that you like.
Our cheerful snowman is ready for the New Year!
New Year's craft "Chocolate - snowman"

New Year's holidays in every family, of course, are not complete without sweets. But, given the fact that the New Year is a time of magic and the fulfillment of all cherished desires, you should definitely transform an ordinary chocolate bar into a rather cute snowman, thereby intriguing your children with beautiful homemade packaging.
You will need:
- white or blue paper;
- Scissors,
- Black felt-tip pen,
- PVA glue,
- Orange corrugated paper;
- Scarf and hat (can be made from a sock or corrugated paper);
- Fir branch with beads or other decorative elements.
Progress:
- We take a clean sheet of paper and wrap a chocolate bar in it, and so that it does not unfold, we glue it with PVA glue.
- On the finished snow-white tile, draw the eyes of the snowman with a black felt-tip pen, and form a nose from a small rectangular piece of orange corrugated paper, tightly wrapping it into a cone and gluing it with glue.
- We draw a smile with a black or red felt-tip pen, and create a blush on the cheeks using a red pencil, which we use to shade on a small piece of white paper, and then lightly rub it on the cheeks.
- We make a hat and a scarf from a sock: cut it in half and sew one part, where the heel remains, using a needle and thread. Using a thread from the top of the hat, we create a bubo. To make the hat seem mischievous, sit slightly at an angle and tighten one side of it with thread.
- We cut the scarf in a semicircle from the second half of the remaining sock and tie it around the snowman’s neck. To prevent the ends of the scarf from sticking out in different directions, we secure them to the tile itself with double-sided tape. We decorate the scarf with fir branches and beads or anything of your choice. Ready!
Master class on making a chocolate snowman
Candy snowman

You can make a snowman quite creatively for the New Year 2020 using candies; it will fit perfectly on your holiday table or near the Christmas tree.
To make it you will need:
- Candies "Raffaello";
- Foam balls (one small, the other a little larger) - 2 pcs;
- White paper;
- Hot glue;
- Toothpicks - 3 - 4 pcs.;
- Scissors;
- Foil;
- Chenille wire (fluffy, flexible);
- Silver cardboard;
- Rain.
Progress:
- Take two foam balls and cover them with white paper.
- We connect the finished glued balls together, place them on top of each other (small ball on a large one), place them on toothpicks, and secure them with hot glue.
- We make mittens: cut out mittens from foil and insert a small candy into them and seal it inside with hot glue.
- Using chenille wire, we wrap both mittens around the edges, making them fluffy, and twist it at the base of the mitten.
- We paste the resulting snowman with candies: we paste the bottom ball in three rows, at a short distance, and on the top - three candies.
- We wrap the entire snowman in rain, securing it with hot glue. We put a cap made of silver cardboard on the head and also attach it to glue.
- We glue eyes taken from an old soft toy onto the face, a nose from gold foil, a mouth from red rain or other material.
- We glue on the mittens, and then the legs, made using silver cardboard in an oval shape. Well, that's it!
Snowman made of cotton wool

Such a craft will certainly interest the guests of your home, and probably none of them will immediately guess what this beautiful snowman is made of.
We will need:
- Deodorant bottle
- PVA glue,
- cotton wool,
- Buttons,
- Beads,
- Ribbon,
- Crepe paper.
Progress
- Carefully cover the bottle with cotton wool using PVA glue and place it in a warm place to dry. Attach the scarf (ribbon) with glue.
- Sew several small buttons onto the body. Make eyes from beads, and a mouth, eyebrows and nose from crepe paper. It will turn out very fluffy and soft.
Master class on making a snowman from cotton wool
Snowman made of balls

This is probably the simplest New Year's craft that even a schoolchild can make with his own hands.
For production you will need:
- multi-colored markers or felt-tip pens.
- modeling ball – 1 pc.,
- white balloons – 2 pcs.
Progress:
- We inflate white balloons of different sizes and tie them together using threads or ponytails.
- We inflate the modeling balloon and secure it in the form of a scarf where the white balloons are tied. Use a black marker to draw eyes, orange for a nose, and red for a mouth.
Master class on making a snowman from balls
Snowman made from a sock

To make such a snowman for the New Year you will need very little time and effort.
Materials:
- White socks
- Two buttons
- Scissors,
- Rubber.
Progress:
- Cut the elastic from the sock.
- Secure it on the wrong side with an elastic band and turn it inside out.
- Now fill the sock with rice and cotton wool.
- Give the shape of the snowman using an elastic band: secure it in the middle.
- Make eyes out of buttons, put on a hat and scarf. It will make a great souvenir or Christmas tree decoration.
Master class on making a snowman from a sock
Fabric snowman

From fabric you can make with your own hands not just a unique snowman, but also an excellent soft toy for your child.
We will need:
- White fabric,
- Threads,
- Needle,
- Buttons,
- Sintepon,
- Ribbon,
- Beads,
- Cardboard.
Progress:
- Sew a small bag from white fabric, then fill it with padding polyester.
- Using thread, tie it tightly in two places to form the head and body. Sew a ribbon and secure beads at the ends.
- Make a nose out of red cardboard and eyes out of buttons. You can tie a scarf made of plaid fabric around your neck.
Master class on making a snowman from fabric
Light bulb snowman

Did you know that you can make an original Christmas tree decoration from an old light bulb? It's very easy and simple!
Hello dear readers and guests of the blog. We continue to prepare for the New Year, and today we will look at the question of how you can create everyone’s favorite winter character - the Snowman - with your own hands.
Of course, you will immediately say that the most popular way to make a snow hero is to sculpt it from snow. But it can be very cold outside, and besides, you can’t bring such work into the house, because it will melt.
Therefore, I want to offer you exclusively homemade creativity. Let's try to sew, knit, glue snowmen from different materials at hand. And you can use the finished crafts as decoration for your home or holiday table, as well as for your loved ones, or take part in various exhibitions in kindergartens and schools.
And be sure to involve your children in the process, because this is a very exciting and educational activity.
A super-issue has been prepared for you with detailed master classes on making funny Snowmen. So get ready, it's going to be hot! 😀
We will start our needlework from ordinary plastic cups. They are very suitable for creating a snow character. Especially if you take white cups as a basis.
Here is a very simple and, most importantly, fast manufacturing method. At the same time, such souvenirs are excellent quality.
You will need:
- Plastic cups;
- Glue;
- Colored paper or cardboard;
- Scissors;
- Colored laces;
- Wire.
Manufacturing process:
1. Take the glass and turn it down. This will be the body and head of the future craft.
Or you can simply draw these elements with a felt-tip pen or sculpt them from plasticine.
3. Glue the parts onto the base. Using wire and colored laces, make a headphone handle. Glue it. Additionally decorate the product as you wish.

And hand-drawn options.

Or the cup can be used only as a body, but the head can be cut out of thick paper.

And now the most popular way to make a winter character from a large number of cups. The work is not difficult and even children can do it. But you need to prepare more disposable cups.

You will need:
- Plastic cups;
- Stapler;
- Hot glue;
- Thin scarf fabric or scarf;
- Colored paper;
- Scissors.
Manufacturing process:
1. Fasten the cups to each other using a stapler in the form of a circle with the bottoms facing inward. Choose the diameter at your discretion, depending on the size of the craft you need.


2. Add cups in the next row to the resulting circle, fastening everything with a stapler. Continue this work, but the first round sphere should have a hole so that the souvenir stands stable.


3. As a result, you should end up with a large ball with a hole at the bottom. Using the same technology, make another ball, but with a smaller diameter than the previous one.


4. Glue both balls together.

5. Tie a scarf or wide ribbon around your neck; you can also sew a scarf yourself from fabric.

6. Now make a hat from colored paper or cardboard, following the photo instructions. Cut out eyes, buttons and roll a carrot cone out of orange cardboard.


7. Glue the prepared parts.

8. Your work is ready. And put a garland inside, then the snowman will also glow.
Thanks to this technology, you can create funny and mischievous characters. Turn on your imagination and create!


I hope you enjoy this creativity and inspire you to create new crafts.
How to make a snowman with your own hands from a sock
Next in line is making souvenirs from ordinary socks. You can also take terry ones, it all depends on your imagination. In general, I really like these products. They turn out soft, delicate and attract attention.
This year my daughter and I will be making a Snowman out of sock. It will perfectly complement our composition on the window.

You will need:
- Sock;
- Threads;
- Scissors;
- Rice for filling;
- Buttons;
- A piece of fabric;
- Needles with a bead at the end.
Manufacturing process:
1. Take a clean sock and cut it into two parts.

2. Take the top of the sock.

3. And secure its bottom with thread.

4. Hide the resulting knot inside.

5. Now fill the workpiece with rice, or padding foam or cotton wool.

6. Use your hands to form the body and head.

7. Secure the base of the head with thread. Tie the top too.

8. Sew a scarf from a piece of fabric and tie it around your neck. Form a hat from the remaining part of the sock, simply fold the edges.

9. Insert black eyes, an orange nose and sew on buttons. Wear a hat. Voila, the souvenir is ready!

Actually, everything here is simple and clear. The only thing is that you can make the body from three balls, and not from two.
And here are the finished products for your sock needlework. 😀


Craft “Snowman” from papier-mâché. Step-by-step instructions for beginners
Remember, in childhood, papier-mâché technology was a fashionable technique for making various products?! She is still trending. After all, the most basic materials are needed for execution, and the whole process will not take much time.
Well, the souvenirs turn out amazing, you can’t even immediately tell what they are made of. Just a miracle! For the New Year, crafts in the papier-mâché style are just right!
If you are ready, then let's quickly start the process.

You will need:
- Toilet paper;
- PVA glue;
- Cotton wool;
- Paints;
- Cardboard;
- A piece of fabric;
- Scissors.
Manufacturing process:
1. Prepare all materials. Cut out a blank for the legs from cardboard.

2. Tear the toilet paper into pieces.

3. Add glue, stir the contents.

4. From the resulting mass, mold three balls of different diameters. Glue the first ball onto the cardboard base, the second onto the first, and the third onto the second.

5. Now pinch off pieces of cotton wool and coat them with glue. Cover the workpiece with pieces.

Additionally, the cotton wool can be coated with glue already on the product to smooth out all the unevenness.
6. Dry the workpiece. Meanwhile, cut out handles and a spout from paper or cardboard. The nose, by the way, can also be made using the papier-mâché technique.

7. Once the product is dry, it can be painted with white paint. Or don't do it. If you choose painting, first paint and dry the souvenir again. And only then draw the eyes, mouth, eyebrows, smile and buttons. Glue the handles and tie a piece of fabric (this is a scarf). If you choose the second option, then do absolutely everything except painting.
The craft turned out to be very bright, and the snowman looks like it’s alive.
You can also make souvenirs in the following images.


Crocheted and knitted snowmen with patterns
Now, lovers of knitted products, sit closer to your monitor screens. Ideas for crocheting and knitting amiguru toys have been put together especially for you). Save the diagrams and description, and get to work. You will still have time to knit a couple of soft souvenirs.


Such a huge selection of knitted items, it’s dizzying!
Master class on making a three-dimensional paper snowman
Now we will create from a material accessible to everyone - from paper. I’ll say right away that there are a lot of paper crafts in the shape of a Snowman, so we won’t be able to sort them all out. This needs to be written as a separate article. Therefore, here and now we will consider the most popular manufacturing methods.
First, I suggest making a winter character from ordinary crumpled paper. Children will really like this activity. It’s so simple, just crumple the paper).

You will need:
- White paper (A4 format) – 1 whole sheet and 1 cut in half;
- White paper (A3 format) – 3 pcs.;
- Orange paper in the shape of a square - 8 by 8 cm;
- Red paper in the shape of a rectangle - 4 by 15 cm;
- Blue paper in the form of a strip - 1 by 18 cm;
- PVA glue;
- Markers.
Manufacturing process:
1. Take a whole white sheet of paper and crumple it into a ball.

2. Now unroll it and smooth it out with your hand. After this procedure, crumple the paper again. Repeat the smoothing and scrunching steps until the paper is completely soft. Do the same with sheets of A3 paper.


Such lumps can be made from several crumpled leaves. Just wrap each lump with another sheet.
4. Also crumple the orange paper and form a cone. This is a carrot nose.

5. Now glue the resulting parts together.


7. Glue it on the head. Make a scarf from a blue strip and secure it around your neck.

8. Draw eyes, mouth, hair and buttons for the winter hero.
Now the technology is more complicated, namely quilling. Although there is nothing complicated here, just train your hands a little and everything will work out.

You will need:
- Quilling paper (various colors);
- Glue;
- Scissors.
Manufacturing process:
1. Cut sheets of white paper into strips 5 mm wide. Next, twist them into two large spirals. This will be the head and torso.


2. Glue them together.

3. Now cut strips for the hat from different colors. Twist them and arrange them in the form of a pyramid. Glue the parts together. You can decorate the top with a pompom.

But from corrugated paper you can make an option similar to the one from the first master class with crumpled paper. And also take and hide a gift in the product. Cool idea!

And here is a diagram for its manufacture. 
Of course, do not forget that snow heroes can decorate not only the interior, but also. Therefore, make different applications from colored paper.

Or pendants made from ordinary wide stripes look very good. And there is nothing complicated here. I cut out wide strips of different sizes, glued them together and decorated them. Now the souvenir is completely ready.

You can also use only one wide strip, and use small chocolates as a base. It turns out to be a sweet gift.

Or think about products made from ordinary circles, when you bend them and glue them together. Thanks to this technology, you can make a toy for the Christmas tree.


You can take ready-made stencils and make cool little people out of them. Or use the origami technique.


By the way, it’s great if you take not just paper for making crafts, but for scrapbooking. Look, the works are very bright.

An ordinary “accordion” made of paper is also suitable for creating such heroes.

Or these striped Snowmen.

And this is the technology for making paper striped balls.

But for team work, use your palms. From them we can glue our character.

And of course, you can simply cut out the snow hero from paper and decorate the window glass with it. That is, do it. Here are the stencils for you. Save, print and cut! 


You can also search for finished products yourself. Everything regarding paper is done in an easy and understandable way.
Snowmen for the New Year made of cotton wool and cotton pads

You will need:
- Cotton wool;
- Soap;
- PVA glue;
- Paint brush;
- Orange paint;
- Black beads;
- Sequins;
- Toothpick;
- Thin branches.
Manufacturing process:
1. Tear small pieces of cotton wool.


3. In a container, dilute PVA glue in a small amount of water and add glitter. Apply this mixture to dry cotton balls.

4. Now wrap a small piece of cotton wool around the tip of the toothpick. Paint the workpiece with orange paint with the addition of PVA glue. Dry the part and remove from the toothpick.

5. Take a clean toothpick and coat it with glue. Place two cotton balls on it, starting with the larger one.

6. Glue bead eyes, button beads, and an orange nose. Insert the branches in place of the handles.

7. Additionally, make a hat out of paper and a scarf out of fabric.
Or choose the simple option. Make lumps of cotton wool and glue them together.

These are some beauties!


And now a step-by-step description of crafts made from cotton pads. Look what a beauty I found.

You will need:
- Cotton pads;
- Glue;
- Eyes;
- Small bump;
- Plastic bottle;
- Knitted hat and scarf;
- Paper;
- Scotch;
- Scissors;
- Toothpicks;
- Spray can of paint.
Manufacturing process:
1. Cut the cotton pads in a spiral and then twist them.

2. Make a lot of these blanks.

3. Make a large lump of paper and secure it with tape. And then cover it with cotton pads. Then make a smaller lump and also cover it with cotton wool.


5. For the legs, you also need twisted cotton pads, but glue them onto two untouched pads.

6. Glue all the pieces together. Cut out parts for skis from the bottle.

7. Glue the parts for the skis and paint them with spray paint. Dry them.

8. Put on a hat and tie a scarf. Glue the eyes, the pine cone and attach the snow hero to the skis.
You can simply sew your favorite character from cotton pads and felt.

Or, like using cotton wool, roll and sew into balls, and then glue them together.

Interesting next idea. When cotton pads need to be glued onto an ice cream stick. It makes an excellent decoration for the New Year's table.

Naturally, don’t forget about the application. Make cards or paintings.

Making a snowman from threads, a balloon and glue
And many people’s favorite art made from threads and glue. Snow characters made from such materials turn out airy and very beautiful.
Let me briefly remind you of the manufacturing process. First, inflate the balloon into the shape you want. Then wrap it with threads, which you pass through glue. Dry the workpiece. Gently pop and remove the ball. The base is ready. Next, fantasize and do whatever and whoever you want!

And I selected a video plot based on such creativity. Let's see.
DIY snowman made from cardboard and napkins
I also have in store for you an interesting master class on creating a snowman from ordinary napkins and cardboard. The product definitely deserves your attention. So read more carefully.
Let me remind you that I did not make all the work myself, everything was taken from the Internet.

You will need:
- Napkins;
- Glue;
- Cardboard;
- Threads;
- Scissors;
- Sintepon.
Manufacturing process:
1. Make balls of different diameters from cardboard. Cover them with napkins and connect them to each other.

2. To make the arms and legs, crumple up the napkins and wrap them with thread, giving them the desired shape. Glue to the balls.

3. Using padding polyester, make our balls with arms and legs fluffy. Just cover our snowman with it.

Of course, here you can also look at crafts made from napkin “roses”. It also looks very impressive.

Or take beautiful round paper napkins and simply glue them together and add any decorations.

Video about how to make a snowman from a bottle
We have come to the issue of making souvenirs from plastic bottles.
I suggest making a funny snowman with your child based on the following plot. Or use the creative ideas below.
Here pieces of cotton wool and a transparent bottle come to life and turn into funny characters.

Or take sweets instead of cotton wool. Then you can drink tea and treats.
Or sew a costume for a bottle in accordance with the theme of the craft.
Bottles can also be painted.
Or use large containers as flashlights. Just put it inside.
And here is a street decoration made from a large number of bottles. It looks original and impressive.
Big snowman made of pompoms for the New Year 2020
Another way to make snowmen is to make handicrafts from pompoms. The result is real soft toys. If you are interested in this creative direction, then take into account the following instructions.

You will need:
- Cardboard;
- Yarn;
- Scissors;
- Glue;
- Scarf, hat;
- Eyes, nose.
Manufacturing process:
1. Cut out two pairs of identical rings in four sizes from cardboard. Separate the rings into pairs and wrap the pairs with white yarn. At the end, pull the thread through the middle and cut the yarn along the outer edge. Spread the rings a little, wrap the thread around the middle and tie it in a knot. Next, carefully remove the rings and shake the pompom.
1 size - outer diameter 130 mm, inner diameter - 40 mm; Size 2 - 100 and 30 mm; 3 size - 55 and 17 mm; Size 4 - 36 and 17 mm.

2. Make the body and head from pompoms, using pairs of rings of the largest and two medium sizes. Pom poms should be spherical. Make your hands from rings of the smallest size.
And more samples of finished works.
Moreover, the sizes of such toys can be any: from small to large.
Felt snowmen with patterns
I can’t ignore sewn crafts either. Let me remind you that most often they use felt for sewing. You can take absolutely any fabric.
Therefore, first select a product, print out the patterns and start sewing. As a filler, you can use synthetic padding polyester or ordinary cotton wool, and even cereal.


How to make an outdoor snowman from tires
And I want to briefly go over the street decorations in the form of my favorite New Year's characters. I recommend using waste tires as material.
They make cool, and most importantly great, crafts. In this case, all that is required of you is to paint the tires. And of course adding the necessary attributes.
Now I will show you finished work on creating snowmen from tires. And you decide for yourself whether you will make such products or not.


I believe that such crafts will decorate any yard and cheer up even on the coldest and snowless day.
DIY snowmen from scrap materials for kindergarten and school
In conclusion, I have prepared for you a whole photo gallery with ready-made snowmen from different materials for children's creativity. I won’t describe in detail what and how, I think from the pictures everything is clear. Of course, if you have any questions, ask, I will answer everyone!
And if this year your educational institutions are organizing a work competition, then be sure to participate. And the product could just be a cute little snowman.


It's time to take stock. In today's episode, we have successfully examined many different and interesting ways of making snowmen from scrap materials. And if you didn’t yet know how to make a snow character or from what, then now, I think, you have no more questions, but only more ideas. So quickly choose from the proposed options and get creative, otherwise the New Year is just around the corner!
Have a great mood everyone! Bye bye.


