Everyone has a pair of jeans in their wardrobe that it’s time to either throw away or give to those in need. If you don’t feel like throwing them away, and no one in need needs them, you can engage in creative activity. This article will provide ideas on what jeans can become other than stylish shorts.
Butterfly
To make a butterfly, you need to cut out two small rectangles from fabric, measuring 30X12 cm and 2.5X12, respectively. A larger rectangle along the wide side is folded along the dotted line and ironed and glued with a thermal strip. Afterwards, so that the butterfly has an elegant look, we fold it along the small side according to the dotted line, stitch it, grab it with a narrow strip, and fluff the edges for decoration. Then we take a blue elastic band, insert it into the butterfly and we get a pretty decent fastening.

Bag
From old jeans you can make:
- travel bag;
- if you sew a base to a piece of trouser leg, you get a walking backpack;
- laptop bag;
- a child's handbag made of small pieces of fabric.
It is not necessary to use large pieces of fabric; you can make a bag from scraps.

Case for phone, tablet, laptop
When making a case for a tablet, you need to find a rigid base, for example, a piece of thick cardboard. Having cut out a rectangle of the required size, we cover it with fleece fabric. Then we cut out a blank for the cover from the jeans, and glue the cardboard onto the denim. We bend the jeans and fix them with Moment glue. Iron the cover from the outside with an iron. We make the backing from jeans, glue it onto the case, and attach elastic bands to secure the tablet. We make holes for the camera and microphone, and sew the folds with a machine. Ready!

Cup holder
The idea is as simple as a Kalashnikov assault rifle: a seam is cut out of old jeans and coated with quick-drying glue. The fabric has good heat-insulating properties and will protect the table surface from the effects of temperature.

Pillow, pillow cases
There is absolutely freedom for creativity here - you can make a pillowcase from scraps or a whole one, with or without pictures, you can even make it with a pocket for useful little things, sweets, for example. Sizes and shapes are selected to your taste, and depending on the available pillow.

Rug
The rug requires a lot of fabric, so the best solution is to make it from scraps. The size of the resulting product depends on how many old pants, skirts and jackets will be sacrificed.

Shoes
You can’t think of anything here – sandals, slippers, and boots. For some products you can’t even find a name – felt boots or boots, it’s unclear. But the main thing is not the name, but the convenience, practicality and aesthetics of the shoes. You can even add a high-heeled sole to such a delicacy.

Skirt
If you are not satisfied with the jeans in some way - either the color, or torn in some place, or the style is not satisfactory - then they can be completely altered into a skirt, while repainting the fabric, adding decor, or fluffing the edges of the fabric.

Organizer
Since denim fabric is quite strong, it makes a pretty decent wall organizer. It all looks like a panel equipped with pockets. You can also decorate it well with a variety of accessories such as labels, dogs and pendants.

Detachable collar
Made from an old denim shirt or jacket. The collar is cut off from it, after which it is decorated at its own discretion with beads, spikes, rhinestones - the main thing is to make it look interesting.

You can just cut off the legs, but there are a lot of options for decorating the resulting shorts - inserts, rhinestones, rivets, decorative elements in the form of ribbons and bows, you can artistically tear the shorts, fluff the edges of the fabric.

A cat is also a person, and he should have a place in the sun. You can equip a bed for your pet without any special material costs, the cat will not be offended that they saved money on it.

If you want to upholster a chair with fabric, but don’t want to spend money on it, old jeans will help you save money, and their pockets will also serve to store various small items.

A holster for tools is made like this: a jeans leg, from which the upper part with pockets is cut off, is cut lengthwise, the edges of the fabric are processed, and then the holster pockets are sewn on a machine. The number and size of the holster's pockets are adjustable depending on its capacity.

For those who like an unusual style in the kitchen, we can recommend making an unusual napkin for the kitchen with a pocket for cutlery.

Cosmetic bag
A good option for using denim fabric is to sew a cosmetic bag out of it, decorating it with various accessories like beads, buttons or rhinestones.

Apron
Denim fabric makes a strong and durable apron. With good imagination, if you decorate it in an interesting way, it will look no worse than a branded product.

Earrings
If you want to give your beloved a gift with your own hands, and one that no one else has, you can make her stylish, original earrings from denim, decorating them with jewelry.

In order not to throw away an old jacket or jeans, you can use their fabric to make a container for a wine bottle. You can also leave the pocket in it to hold a corkscrew or a folding knife for uncorking containers.

Hot pot holder
Comfortable and stylish stands will protect the table surface from exposure to hot temperatures. A similar accessory is made in the shape of a circle or rectangle, and the edges are bordered with fabric for aesthetic purposes.

For frame elements, pieces of fabric cut into narrow strips are used, then rolled into a roll and glued, which are then attached to a cardboard base. This approach allows you to arrange the most bizarre shapes to decorate the frame.

Cover for books (electronic and regular)
The design of the denim book cover is very similar to the tablet case described above, the only thing is that there is no need for holes for the camera and microphone.

Essentially the same grip, only made of denim - nothing complicated.

Necklace
It is made from narrow strips of fabric, figuratively rolled and tucked in the shape of rose flowers, for example. It looks original and elegant.

With an original and elegant design, it provides protection for the sewing machine from dust and mechanical damage. Pockets allow you to store threads, scissors, needles and other accessories necessary for work in the case.

Mask
A mask made from old denim is perfect for a children's party or as a theater prop for school.

An original solution, you don’t even need to cut anything out - just sew up the bottom of the jeans legs, and fill the resulting container with soil in which you can grow ornamental plants.

Blanket or bedspread
To make a denim blanket, you will need a lot of free time and unnecessary fabric. Due to its size, the blanket or bedspread will be sewn from scraps.

Curtains
Curtains can be made from scraps, or cut the legs of jeans lengthwise and sew them together.

Hammock
The most important thing is to make a reliable fastening for the hammock. The fabric has a good margin of strength, but you should not use completely worn out jeans for a hammock.

Backpack
From fabric you can sew not only the backpack itself, but also the handles for it. Denim is thick and durable, and is a great material for a backpack.

House for cat, dog
It's not just people who love denim. Clothes, no matter how much you wash them, absorb the smell of the owner, and for a dog this is the best smell in the world; he will immediately settle in a house where the owner smells.

Here, anyone likes anything - cats, bears, donkeys, monkeys or horses, in a word, you can make a whole zoo.

Lamp cover
If you wish, you can make a cover for the lampshade no worse than the branded one, and decorate it stylishly with embroidery or jewelry.

Bracelet
The bracelets are made from narrow stitched strips of fabric and decorated with various trinkets.

A soft denim case will perfectly protect your glasses from dust and mechanical damage.

Sundress
You can sew a denim sundress if you have experience, free time and desire. The experiment is quite bold, because even some branded items do not fit on a person the way he would like.

Dress
To cope with the task of turning jeans into a dress, you need to be an experienced seamstress. If you have a lot of time and desire, everything is possible. The result can be much more interesting than the original product. In general, the most important thing is the process itself; sometimes it brings no less pleasure than the result.

We present to your attention a selection of creative ideas with step-by-step master classes for making phone cases with your own hands.
Mobile phone case made of paper using origami technique (budget option)
You will need: a sheet of A4 paper of any color, PVA glue.
Master Class
- Lay a sheet of paper horizontally.
- Place your phone on top.
- Wrap the phone to the end of the sheet.
- Fold the bottom of the paper up to the phone several times.
- Fold the triangles at the bottom of the sheet up.
- Secure the folds with glue.
You will need: elastic bands of 3 colors in the amount of 500 pieces, a hook, a weaving machine (it should have 2 rows: the holes in the bottom row should point to the right, and the top ones to the left).
Master Class
- Slide the elastic bands from the top row of the second pin, then cross them onto the third pin of the bottom row.
- Place the elastic bands crosswise, from the second pin of the bottom row to the third pin of the top row.
- Place the elastic bands in the same way from the third pin of the top row to the fourth pin of the top row. You should get three crosses.
- Pass two pins through the center and weave four more crosses in the same way. You should get four crosses and there should be two free pins left at the edges of the machine.
- Place rubber bands on the top and bottom pins of the next row, facing oppositely. In the same way, put rubber bands on all the pins of the previous row.
- Turn the machine vertically towards you so that the top pins are facing you with their heads.
- Place the first elastic band on one bottom and one top without crossing.
- Attach without crossing the remaining elastic bands along the top row - one after the other, without missing the two middle pins.
- Make the bottom row in the same way, connecting with an elastic band on the second side.
- Using a crochet hook, remove two rubber bands from the bottom row of each pin.
- Skip the middle pins, there should be two rubber bands left on each pin.
- Take elastic bands of a different color and make the next row in the same way as the third.
- Remove the two bottom loops in a circle and again put on elastic bands of a different color in a circle, then remove the bottom loops.
- Make two rows in the same way, alternating colors. (For one row, put the loops on once, then remove).
- Make a hole for the screen in this way: turn the machine vertically, the bayonets of the left row should be facing you. Remove the bottom elastic from the third pin of the left row and place it on the fourth. The last loop should cross over to the seventh pin.
- Remove the remaining loop from the middle five pins. There should be three pins left with rubber bands on each side.
- Knit the next row in this way: start from the third working pin to weave elastic band by elastic band clockwise. Leave five pins on one side.
- Remove the bottom elastic bands, there should be two loops on the pins.
- Knit another eleven rows, alternating colors in the same way.
- Knit a row clockwise, filling all the pins.
- Remove the bottom elastic bands from the pins, but do not remove the five ones that were not used before.
- Skip the two working pins in the row where the unknitted pins are, slip the lowest stitch off the third pin and place it on the next pin. Do this until the last two pins are empty. Knit one row.
- Take the machine vertically, remove the bottom loop from the right row of the second working pin and put it on the next bayonet. The last loop should be placed over the fourth working pin.
- Remove the bottom hinges from the third and second pins.
- Place the loops in a circle, leaving the two pins empty, then remove the bottom loops.
- Slide the elastics onto the next row using all the pins. Remove the loops and do not touch the pins, which have two elastic bands.
- Swap the top and bottom loop on the first pin, transfer the top loop to the next pin. Connect the structure.
- Remove one bottom loop from the next two pins and transfer them to the next pin.
- Knit a row in the usual way.
- Close the cover this way: make a row of crosses as in the beginning, using all the pins. Make the next row between the opposite pins in crosses.
- Remove the bottom loops and leave the elastic bands used to make the figure eights. There should be three loops left on the bottom pin.
- Place the bottom loop of each pin onto the next pin. Make the next row in the same way.
- Make a knot with an extra elastic on the right side, then remove the cover from the machine. Hide the knot and straighten the protruding loops, and then put the case on the phone.
Hot glue mobile phone bumper case
You will need: glue gun, nail polish, tape, parchment paper.
Master Class
- Take parchment paper and cover the phone so that the back panel and side panels are seamless.
- Secure the joints with tape in the screen area.
- Mark the places where the camera, sockets and buttons are located.
- Apply hot glue to the sides of the phone, then outline the designated areas.
- Make a pattern on the back of the phone so that the pattern connects to the side of the phone.
- Wait until completely dry.
- Apply your favorite color of nail polish and color in the pattern.
- Wait until completely dry.
- Put a case on your phone.
Balloon mobile phone case (budget option)
You will need: balloon of your favorite color.
Master Class
- Take a balloon, inflate it and do not tie it.
- Place the phone screen side up on top of the ball.
- Press the phone into the ball, gradually deflating it.
- Release the ball when there is little air left and continue pressing the phone into the ball.
- Wait until the ball covers the phone, this is a sign that the case is ready.
You will need: a notepad with an elastic band to the size of your phone, a stationery knife, a ruler, glue, felt, a pencil, cardboard, a narrow rubber band.
Master Class
- Cut out the sheets and sides of the notebook using a utility knife.
- Divide one side of the notebook in half, marking with a pencil.
- Cut along the line to the outer grain of the notebook cover using a stationery knife, then cut a strip half a centimeter wide in this place for the future fold.
- Glue the inside sides of the notebook cover.
- Trace the notebook cover onto the felt and cut it out.
- Place the felt on the inside of the notebook cover, then cut the felt along the side fold.
- Glue a felt blank to the notebook cover.
- Outline the phone on a piece of cardboard, then cut out the blank.
- Glue the cardboard to the felt and cut it to the desired shape, leaving a centimeter from the cardboard.
- Cut two corners of the felt on each side, then glue the corners.
- Glue two elastic bands across this blank.
- Glue the blank onto the folded outer half.
- Put a case on your phone.
You will need: a sheet of cardboard of any color, scissors, glue, marker, eraser.
Master Class
- Draw the phone twice on cardboard at a distance of half a centimeter and cut it out.
- Make two folds along the lines in the center of the workpiece.
- Glue one side of the case to the back cover of the phone.
- Attach a thin elastic band to the case so that the case can be closed.
You will need: felt of any colors, needle, thread, glue gun, scissors, ruler, pencil.
Master Class

Fabric mobile phone case
You will need: thick fabric, thread with a needle, acrylic paints, colored paper, scissors, glue, stencil, ruler.
Master Class
- Measure the dimensions of the phone, use a stencil to cut out two identical blanks with wavy edges.
- Draw SpongeBob's face on one blank.
- Make a sponge outfit out of colored paper and glue it on.
- Sew the pieces together from the wrong side.
Leather mobile phone case
You will need: leather of any color, scissors, clips, thick thread, cardboard template, pliers for installing eyelets, two gypsy needles for decoration (two aiglets, decorative thread), pen, ruler.
Master Class
- Measure the dimensions of the phone, add a centimeter to the length, and two to the width, remember the parameters.
- Make two identical leather blanks with the required parameters.
- Round the corners of the workpieces.
- Make round small holes on the cardboard template with a spacing of 5mm.
- Fold the leather blanks with the insides facing each other and attach the template.
- Use tongs to make holes along the bottom and sides. Secure the template with clamps.
- Place two needles on the thread on both sides.
- Sew from the side in this way: go through the first hole with one needle, straighten the thread, then sew in turn with two needles, pulling them into one hole, but in different directions.
- Sew the entire cover, then fasten the thread several times.
- Make two through holes with a distance of a centimeter on the top of the cover.
- Place eglets on the ends of the decorative thread.
- Thread decorative thread through the holes and tie a bow.
You will need: yarn, scissors, glue gun, tape, parchment paper, ruler, baking paper.
Master Class
- Wrap the phone in parchment paper.
- Secure the folds and seams with tape on the screen side.
- Make a base on the back of the phone using a hot glue gun, covering the entire back and side with hot glue except for the camera and microphone openings.
- Wait until it dries completely and remove the base from the phone.
- Wind the thread parallel to the ruler, taking into account the width of the phone.
- Apply glue to one edge of the ruler and glue it to the base.
- Wait for it to dry completely and cut the thread along the opposite edge of the ruler, then cut the thread from the skein.
- Fill the entire cover with fibers of yarn, leaving 5 mm between rows.
You will need: beads of any colors of the same size, glue gun, toothpick, cardboard.
Master Class
- Place some beads on the table.
- Apply a bead of hot glue to the cardboard.
- Dip the tip of a toothpick into a drop of hot glue.
- Touch the toothpick to the bead.
- Dip the bead into a drop of hot glue.
- Glue the bead to the phone.
- Glue the rest of the beads on the back and side covers of the phone in the same way. Please note that the work is painstaking and will take a certain amount of time, but you need to work at a pace, since hot glue hardens quickly.
You will need: rivets (to cover the entire phone you will need 80 rivets, partly as in the picture - 31), glue gun, cardboard, tongs or tweezers.
Master Class
- Prepare the rivets by placing them with the sharp part facing up.
- Take the rivet with tweezers.
- Apply a small bead of hot glue to the rivet.
- Glue the rivet to the phone.
- Glue all the rivets in this way.
You will need: cosmetic glitter, brush, hairspray, clear nail polish.
Master Class
- Spray hairspray on part of the back cover of the phone.
- Apply glitter to the tire using a brush.
- Apply glitter quickly as the polish dries and the glitter may not stick.
- Seal with a good coat of clear varnish.
- Let it dry.
You will need: beads, glue gun, tongs or tweezers.
Master Class
You will need: cotton or wool thread for knitting (white, black), needle, hook (clover 1.8 mm), black marker, cotton wool.
Master Class
- Cast on the required number of loops to match the width of the phone. (Standard size - 20 air loops, designation - VP).

- Knit 4 rows, 19 single crochets (designation: RLS), make 20 loops with a rise and make a turn. This should form the base of the cover.

- Tie the bases in a circle, sc, to the desired height of the cover. (Standard size – 10 cm).
- Tie the ears according to the pattern shown in the picture.
Have you noticed how today's generation strives for individuality? And this individuality is visible everywhere: in clothes, in behavior, in actions, in barely noticeable little things, such as a hairpin made from an old clothespin. It has become popular to sew clothes to order or even make something unimaginable yourself, from pieces of old shirts and jeans. Handmade is being revived and now it is difficult to find a girl who does not do some kind of handicraft in her spare time. What is this, a protest against the high cost of goods (why should I buy something at exorbitant prices if I can do it with my own hands even better and at no extra cost?) or a restless thirst for creativity and self-expression? I think it's both!
DIY phone cases
Do you want the case to fit your phone like a glove, please the eye and at the same time reliably store it from any unpredictable external factors? Nothing could be simpler. But first you will have to decide on the material - will it be felt, felt, beads, yarn, jeans or a piece of some old thing, for example, a sweater or sock!
1. Phone case made from an old sweater
Of course, the easiest way is to remake the cover from something else (as in the case of a sweater), so if you are not a fan of fuss, this idea is for you...

2. Phone case made from a sock

If you “ran away” one sock from a completely new pair with cool prints, then you can use that too.
If you are good at knitting, you can knit a cover and then decorate the finished product with applique or embroidery.


3. Phone case made of felted wool
But you will have to work hard on felt: felt a piece of dense fabric from fibers using a soap solution, wrap the phone in polyethylene (so as not to get wet), put it in this fabric and continue felting, giving the case the desired shape. Dry the finished product (you can use a radiator) and decorate it to your taste.


4. Beaded cover
Bead embroidery is a very painstaking work, but the finished result is worth it - such cases look like jewelry, especially if you use stones and large rhinestones along with beads. To begin, cut out two flaps from thick fabric (beads fit very poorly on delicate satin and chiffon and do not hold the shape of the “pattern”) (the front and back of the case), two centimeters larger in size than the phone itself. Don't stitch them!
Now, using a pencil or pen, carefully outline the design that you are going to embroider on the cover and start working. Follow from the center to the edges, try not to make or leave errors - it’s better to break off one row of beads than to end up with a finished work with a bristling pattern! Be extremely careful! Use a thin and very sharp needle for bead embroidery and string three or four beads at a time - this will make your work easier. If you are using stones or large rhinestones, these need to be sewn on first! When you have finished decorating both sides, sew the cover from the wrong side and turn it inside out.

5. Felt cover
Felt is one of the most fertile materials for creativity! Quite dense, with edges that do not fray, it is easy to sew and glue, and has a wide range of colors! You simply cut out the parts you need, glue or baste them together, sew the cover itself with a chain stitch and that’s it! But what funny faces and figures you can make from it!


Here is a very simple master class on how to make an envelope case out of felt...


6. Phone case made from a tie

I made this simple quilted sleeve for my laptop to keep it safe in my backpack. By making such an accessory yourself, you can be sure that it will fit perfectly and fit into your style.
This is an easy sewing project if you know how to use a sewing machine and know how to make a straight stitch, a zigzag stitch, etc.
Step 1: Materials and Tools


Materials (of course, you can use any fabric):
- Denim in the form of old unnecessary trousers
- fleece blanket for stuffing
- Cotton material for lining
- Sewing thread
Standard sewing equipment:
- sewing machine
- scissors for fabric and threads
- pins
- iron and ironing board
- Ruler
- Chalk or felt-tip pen for fabric
From the optional:
- overlock
Clue: If too many needles break when sewing on denim, get a special needle for denim, they should not deteriorate quickly.
Step 2: Cut the fabric


First I cut the fabric to approximately the size I needed. I ironed the fabric to make sure the cuts would be clean. I cut a long rectangle twice the length of the laptop, with room on all sides for seams and further modifications. The stuffing process requires free space around the edges, since several layers of fabric will affect the size of the finished cover. If the laptop is large in thickness, this also needs to be taken into account in the size of the fabric.
I used two layers of fleece for the padding of my case. I first sewed a small piece of fleece on my machine to make sure it could handle the thick layer of fabric without the outer fabric pulling at the seam (this can be a problem when sewing polyester).
I sewed two layers of fleece together to secure them in place. I cut the fleece so that the top of the bag does not reach the edges. This will help when stitching and finishing the top edge of the cover.
Step 3: Stitching


This step involves stitching the layers together. I double-checked that everything was in place and pinned the layers together. I then made a zig zag stitch down the middle of the layer stack. You can use any stitch you like - straight, patterned, contrasting thread, etc.
I pre-marked the seam with stitches, and tried to make two parallel seams on either side of the marked line. Towards the end the seams were a little loose, so next time I'll mark the straight lines with chalk using a ruler.
Step 4: Sew the cover


Now fold your “sandwich” of fabrics in half so that the outer layer (in my case, jeans) is on the inside, and try it on on your laptop and decide where to sew the edges.
Note: The cover will be turned inside out during sewing. If you have the same fabric inside and out, make some markings so you don't confuse the back with the right side!
I pinned the edges and stitched them together. Again, the seams were not even, so I strongly recommend drawing straight lines first, and only then stitching along them.
First, it is better to sew one side with stitches (take the longest stitch that your machine offers), put the case on the laptop, and decide where to sew the second side.
You can turn the cover inside out to see how best to fit it. If the cover turns out to be too tight or, on the contrary, spacious, simply undo the stitching and sew again.
Once you have achieved the desired size, sew over the stitches with an even, continuous seam. Stop the machine 2-5 cm before the edge (the top of the case where the laptop is placed).
At the bottom of the cover I stitched small corners diagonally to round the edges.
Step 5: Finishing the Top Hole


You need to trim the edges of the cover opening. Put it on the laptop and mark the place where the edge of the case should be. Then fold the raw edges of the front and back layers inward, as shown in the photo. Press the edges so you can sew them together with a straight seam.
Sew the edges very close to the hem to give your cover a neatly finished top.
Did you know?: Professional seamstresses sometimes call ironing “pressing.”
Step 6: Finishing the Edges


When the hole of the cover is processed and looks neat, you need to start finishing the sides. I added a small denim loop as a handle and double stitched the sides for strength.
I trimmed off the excess fabric at the edges and overlocked them with a serger.
Note: Make sure your serger can handle denim. On my case, I had to skip the place of the edge to which the fabric loop is sewn, because my overlocker could not sew so many layers.
If you don't have a serger at hand, you can simply zigzag the edges again. In my project, I overcast the bottom of the case and the corners.
It's time to get rid of any loose threads and make the case look neat.
Turn out the cover - and that's it!
Step 7: Final Thoughts
New things from old jeans.
Almost every person has a pair of jeans in their closet that have long gone out of fashion or are simply boring. As a rule, such things simply gather dust in the far corner and one cannot even raise one’s hand to throw them away. In fact, in skillful hands, even old and unnecessary jeans can find a second life.
If you show a little imagination, you can make a lot of useful and, most importantly, exclusive things out of them. In our article we will tell you how to make a children's toy, a fashionable clutch, a beautiful sofa cushion and a women's wallet from old jeans.
What you can make from old jeans with your own hands - DIY products from old jeans: ideas and photos of beautiful crafts
Denim items Shoes made from old jeans
  Jewelry from old jeans
 Bags made from old jeans
 Lampshade made from old jeans
  Ottoman made from old jeans
 Provided you've invested in quality jeans, you can make a lot of new and creative things out of them. The easiest way to bring an old thing back to life is to try updating it. For example, a model with wide legs can be sewn in and then decorated with embroidery, painted, holes made that are fashionable this season, or trimmed with delicate lace. If you don’t like such ideas, then try to do something for the interior. It could be a vase, a pillow or even a lampshade.
And remember that in this case you are not obliged to follow any strict rules. If you wish, you can cut the jeans into pieces and then make an original tablecloth or patchwork quilt out of them. True, if you do just that, you will also have to spend money on insulation and lining. Above you can see several interesting ideas that you can easily bring to life if you wish.
How to make a cosmetic bag from old jeans: patterns, photos

 Three-color cosmetic bag made of jeans
 Bright cosmetic bag
 Pattern No. 1
  Pattern No. 2
 Pattern No. 3
 The easiest way to sew a cosmetic bag from old jeans is to cut off the bottom of the legs so that you end up with a square or rectangle. Then the workpiece will need to be turned inside out and a double seam made on one side and a zipper sewn in on the other. The finished product will remain inside out and can be used. To make such a cosmetic bag look more attractive, you can spend a little more time and decorate it with embroidery or bright beads.
If you want to do something more original, then make a denim cosmetic bag using the patterns that we posted a little higher. In this case, you will only need to print the pattern to the required scale, attach it to the jeans and cut out all the necessary details. If you do everything correctly, then after stitching you will get a voluminous product in which you can put a lot of cosmetics.
But still remember that such more complex patterns require maximum precision. In view of this, try to determine the dimensions of the workpieces as accurately as possible and, of course, cut them correctly. If you try to do everything by eye, it is likely that your cosmetic bag will turn out shapeless or skewed.
How to make a clutch from old jeans: patterns, photos

 Evening clutch
 Everyday clutch
  Romantic clutch
 Pattern No. 1
 Pattern No. 2
  Figure No. 1
 A clutch is a unique thing that perfectly complements not only an evening look, but also an everyday look. The denim product, the patterns for which you can see a little higher, can be worn with casual clothes, romantic outfits and even with formal office looks.
However, keep in mind that if you are sewing a clutch specifically to complement office clothes, then it is best to make it from black denim. If you sew it with blue trousers, you will end up being limited in the selection of colors. And, of course, do not forget that the clutch implies the presence of a long chain, which will allow you to carry it not only in your hands, but also on your shoulder.
If you wish, you can replace the chain with a leather strap or sew a similar one from denim. All these details will make the finished clutch more convenient and versatile, but unfortunately, they will make it very heavy. Therefore, it will be better if you still spend money and buy a steel chain in a gold or silver tone.
- Print the pattern to the desired scale
- Cut the leg of the jeans and make a blank from the widest part
- Cut the workpiece and bend it as shown in Figure No. 1
- Fold as shown in the master class and carefully sew all the seams
- Be sure to strengthen the sides of the clutch and place a weighting agent in the slamming part of the product
- Attach a chain to the finished clutch and decorate it to your taste
How to make a wallet from old jeans: patterns, photos

 Idea #1
  Idea No. 2
 Idea No. 3
 Pattern No. 1
 Pattern No. 2
 Another original item that can easily be made from old jeans is a wallet. Since this item is sewn from many small parts, you can easily make it from different pieces. If you wish, you can try combining jeans of different colors in one product.
For example, black and dark gray or blue and pale blue. This combination will allow you to create a visual effect of volume and make the finished product even more original. I would also like to remind you that you should choose the smallest zippers for your wallet. It will be easier to sew them onto small parts and, most importantly, they will look organic on the finished product. If you do not want to use locks, then replace them with Velcro.
Just try to sew them in in such a way that they are not visible from the outside. Oh, and if you want your denim to look perfect, be sure to sew a lining inside. It can be made from a special fabric or from thinner denim. If you use dense material for these purposes, it will ultimately interfere with the correct folding of your wallet.
How to make toys from old jeans: patterns, photos

 Denim cats
  Dog made from jeans
  Denim Bear
 Pattern No. 1
 Pattern No. 2
 Old jeans are an ideal material for sewing toys. Since the fabric from which they are made is very dense, you can easily make the most complex crafts from it.
In this case, you do not have to worry that the finished product will not hold the correct shape or will quickly deform. Provided you fill it correctly, it will remain in perfect condition for many years.
Secrets of sewing toys from old jeans:
- Remember, it is best to sew a thick fabric like jeans by machine using a special needle. If you try to sew it by hand, you will most likely not be able to do it well.
- If you don’t want the fabric to start crumbling when cutting small parts, then use not ordinary scissors, but ones with serrated blades. They will cut the fabric in a zigzag pattern, thereby preventing it from deforming.
- Fill the finished toy only with high-quality material that will definitely not provoke allergies in the person who receives it. It can be padding polyester, padding polyester or holofiber.
- If it turns out that when cutting the parts, a rough seam remains on them, under no circumstances try to get rid of it. As a result, you will be able to decorate it beautifully and thereby give individuality to the finished product.
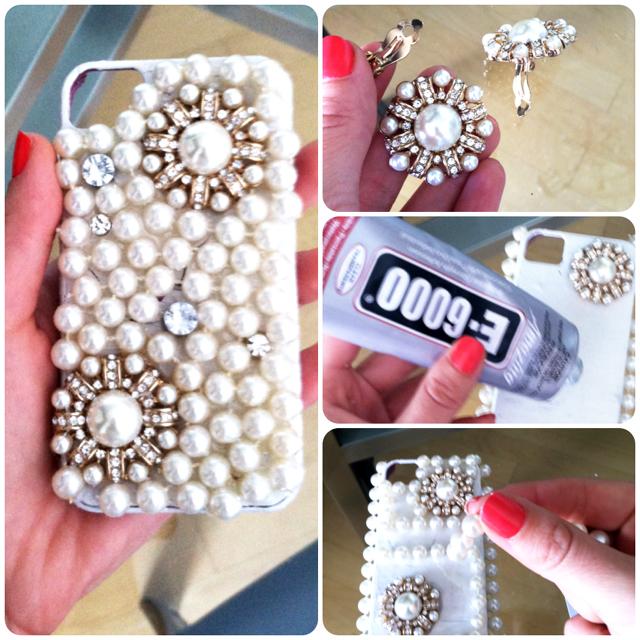
How to make a case for a phone or tablet out of old jeans?

 Case for tablet
 Denim phone case
 Pattern for phone
 Pattern for tablet
 As for denim covers, they can be made in two ways. The first method will appeal to those who don’t like to bother, but at the same time really want to have a unique thing. In this case, you practically won't have to do anything. You will need to cut the piece to the desired size and simply sew it on one or both sides. If in the end you want to get a more fashionable item, then sew a cover using the patterns that you can see a little higher.
In this case, you can make a product that will not only protect your tablet or phone from damage, but also close securely. In such a case, you can provide an internal pocket, inside of which you can later put thick cardboard, thereby strengthening the lower part of the product.
- First, cut off the leg of your jeans.
- Lay it out on the table and place your tablet or phone on it
- Draw the outline of your gadget using chalk or soap
- Fold the blanks with the wrong side up, pin them together and sew them together as carefully as possible
- If necessary, reinforce the upper part with a thick border
- Turn the product inside out and you can put your tablet or phone in it
How to make stool covers from old jeans?

 Idea #1
  Idea No. 2
 I would like to say right away that in order for a stool cover to be not only beautiful, but also comfortable, you must put something soft under it. This can be a specially made pillow or just a piece of thick foam rubber. Also, do not forget that in order for even such a thing to have individuality, it must be decorated.
Bright satin ribbons, lace or ruffles are perfect for these purposes. They can simply be sewn along the edge of the cape or fixed with beautiful folds and decorated with bows. Now let's talk about how to properly sew a cape. If you want to make it as quickly as possible, then simply place the stool on your jeans, outline it with chalk, and then cut it out, making a 1 cm overlap on each side. Sew the edges of the workpiece, sew ribbons to the corners that will secure the cape to the stool.
At the next stage, cut out a piece of foam rubber, place it on a stool and you can fix the cape. If you want the product to cover the stool up to the crossbar, then in addition to the main blank, you will also have to cut four side ones, the width of which will correspond to the distance from the seat to the crossbar. When the blanks are ready, all you have to do is sew them together and your cape will be ready.
How to make oven mitts from old jeans?

 Potholder from pocket
 Jeans potholder
 Butterfly potholder
  Oven mitt
 In principle, you don’t need any special knowledge to make a kitchen pot out of old jeans. For example, you can make it from pockets by simply cutting them out and reinforcing them with thin padding polyester. In this case, you will only need to stitch everything correctly and sew a buttonhole to the finished potholders, by which they can be hung in the kitchen.
If you want your potholders to be as similar as possible to those sold in specialized retail outlets, then you need to do the following. Take a piece of paper, place it on the table and place your hand on it. The hand should lie in such a way that four fingers are folded together and the fifth is moved to the side. Trace your hand with a pencil, step back 5 mm from the resulting line and cut out the workpiece.
It will need to be applied first to denim, and then to padding polyester, and the contour will be drawn on these materials. After this, you will need to cut out four blanks, fold them together and stitch along the contour. If you do everything correctly, then after you turn the product inside out you will have a potholder in the shape of a mitten.
How to make an organizer out of old jeans?

 Organizer made from old jeans
  Pocket organizer
 Organizer made from whole jeans
 An organizer made of denim can become not only a convenient device for storing small items, but also a real interior decoration. Depending on the size, such a thing can be placed on doors (entrance and furniture), walls and even on chairs. It can be made strict, bright or slightly childish. In the latter case, you can try to paint it with flowers, animals, or simply embroider it beautifully.
If we talk about how to do something like this correctly, then in this case you can do the following. If you do not plan to hang the denim organizer in a visible place, then you can stitch the top of the trousers and secure a rope to the resulting seam, from which you can hang the finished product. Next, you will need to sew the pant legs together and you can start making the pockets.
To do this, you will need sharp scissors, with which you will make slits along the length of the pants. At the final stage, you will need to sew one part of the slit to the back of the trousers and the organizer will be ready. You can see more creative ideas in the pictures above.
How to make flowers and brooches from old jeans?

 Denim brooch
 Master class on making flowers
 Ideas for making flowers
 If you show a little patience, you can make a beautiful flower out of old jeans that can be used to decorate clothes, interiors, or make hairpins, headbands, chokers and brooches. The easiest way to make such a craft is to cut a piece of fabric from jeans, lay it out on the table, and then use a cardboard stencil to cut out blanks of different sizes that imitate a flower.
Remember, the larger and fluffier you want the final decoration to be, the more fabric blanks you will need to cut out. When everything is ready, all you have to do is fold them, starting from the largest to the smallest. The sheets can be secured to each other using special glue or simple thread. If you want the finished flower to keep its shape as well as possible, you can try starching it.
As for the edges of the petals, they can be left without any processing or slightly dissolved. Yes, and if you think that a flower from one pair of jeans will turn out very dark, you can make several petals from a brighter material, for example, chiffon or satin.
How to make a rug out of old jeans?

 Recommendations for making a rug
 Weaving ideas
 I would like to say right away that trousers alone will not be enough to make a rug. As a rule, it takes approximately 4 jeans to produce one small rug. To make such a thing, you will definitely need to cut the jeans into strips, tie them together and twist them into a kind of ball, and then use this kind of yarn to weave a rug with a thick hook.
If knitting is not your thing, then you can make a rug like a patchwork quilt. This means that first you will need to prepare the required number of squares of the same shape, attach a contrasting border to their edges, and then sew all these blanks onto a thick base.
Braided rug (pigtail)
- Cut old jeans into strips of equal width
- Weave them into braids and connect them together into a long rope.
- Select threads that match the color of the fabric and begin sewing the braid together
- You can give it the shape of a circle, oval, square or diamond
How to make a decorative pillow from old jeans?

 Square denim pillow
 Figured denim pillow
 If this is not the first time in your life that you will be sewing, then you probably know that sewing a standard pillow is the easiest. First, you will need to decide whether it will have a square or round shape, and after that you can start creating an original thing.
So:
- First, make a stencil of the desired shape, and then apply it to the cut jeans
- Trace the stencil with chalk and carefully cut out the workpiece
- Fold the blanks with the wrong side inward, and carefully sew everything together, leaving room for the zipper
- Sew in a zipper and fill the pillow with synthetic padding or synthetic down.
- If you wish, you can decorate the edge of the pillow with denim ruffles or denim flowers.
Video: What to make from old jeans. Ideas: DIY alterations and crafts


