In this master class, we have collected the best bracelets that can be made from leather. They will help complement the outfit and create a complete look.
Tools and materials Time: 1-2 hours Difficulty: 4/10
- artificial or genuine leather;
- buttons, rivets;
- hole puncher;
- pliers;
- scissors;
- hammer.
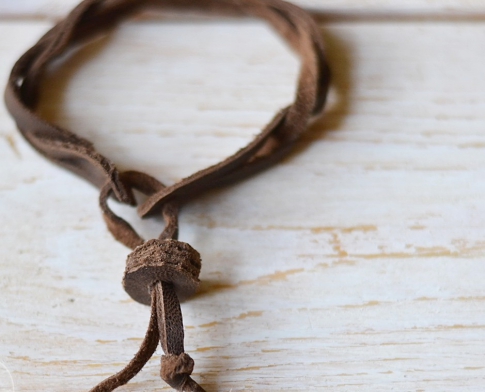
Simple leather bracelet with an unusual shape

This simple master class leather bracelet, which we will show below, is made quite quickly, and the result will exceed all your expectations.
We will need

1) A piece of leather


4) Hammer
Step-by-step master class
Step 1
Cutting out the base for the bracelet
This is the piece of leather we had from the very beginning:

Measuring the width of the wrist

Step 2
Cutting out the base:
Was:

Became:

Before you cut the leather, you should have a good idea of what you want to achieve. We ended up with a base like this:

Step 3
Making notes for buttons
Our base is ready:

Now we apply the blank to the hand and insert a pin in the place where we want to make a button


You need to push the pin deep enough to make a mark on all the layers. Be careful not to puncture your hand.

We pull out the pin, remove the bracelet, lay it out on a flat surface, and insert the pins into the places with holes.

There will be buttons in these places.
Step 4
Preparing buttons and tools
We take our buttons and tools out of the packaging.

To work, we need 4 types of buttons and each of them must have its own attachment


The black circle is needed in order not to damage the surface on which we will place the buttons
A piece of rod will be needed to insert buttons
Step 5
Skin preparation
Now we will make holes for the buttons (if you have a hole punch, then everything will be much faster. Just punch holes in the places with pins)
Pull out the pins

Place a black circle under the hole

We insert a piece of the rod, the sharp end to the skin and hit it with a hammer


This is what the hole should look like:

We do the same on the other side

Step 6
Insert the top part of the button
Tools and materials for insertion:

We put the nozzles on the plastic plate


Ready! The top part is done.
Step 7
Insert the bottom part of the button
Each part of the buttons requires its own tool. For the lower part it is like this:

We put the nozzles on the plate

Now look carefully at the pictures and insert the button in the same way. Don't get confused


Here's what happens:


The bracelet is almost ready

Step 8
Decorating the bracelet
To make the bracelet more interesting, let's add another button.
Place the button at the desired distance (about 1-1.5 cm) and press it against the bracelet to leave a mark


Punch a through hole using a pin

We repeat steps 5 and 6 and get a super cool bracelet


This is how it will look on your hand:


Don't be afraid to get creative with your shape. Experiment!
Leather wrist bracelets for men
Bracelet from an old belt

Sooner or later, a leather belt will wear out. In order not to throw it away, we suggest you make a vintage bracelet.
We will need:
- Old leather belt
- Hammer
- Nail
- Scissors
- Pencil
How to do:
- Wrap the belt around your wrist 3 times
- We put a mark on the end after the 3rd time
- Trim off excess with scissors
- Using a nail and a hammer, make a hole so that the bracelet can be closed with a clasp.
All! Just a few minutes and the bracelet is ready!
But no, here’s another thing, such a bracelet can be made for a girl using her old belt

Creative bracelet with iron clasp

This creative leather bracelet is made quite quickly and is perfect for practicing the first steps in working with leather.
We will need:

- Metal clasp (you don’t have to use exactly the same one as ours, any one will do)
- Hole puncher
- Hammer or button inserter
- Rivets
- Scissors or breadboard knife
- Ruler
- Varnish (optional)
- Glue (optional)
How to make a leather bracelet for men with an iron clasp?
Step 1
Cut a strip of leather 5 cm larger than the wrist. The width should be 2 cm larger than the fastener. To do this we use a knife or scissors.
Step 2
We bend 2.5 cm of leather on each side (we cut off the excess, so we ended up with a larger fold). You can glue it, or you can leave it as is

Step 3
We wrap the wrist, attach the clasp and put marks on the place where it is attached

Step 4
Punch holes using a hole punch (as a last resort, you can use a knife) and insert rivets, driving them in with a hammer

*The main thing is to choose the required diameter of the rivets so that they are larger than the hole in the fastener

Step 5
We repeat the same thing on the other side.

Step 6
If desired, the bracelet can be varnished

Leather wrist bracelets for women

For those who love arrows, we made this bracelet.
We will need:

- Old leather belt (must be thin so that it can be cut with scissors)
- Chain
- Scissors
- Hole puncher
How to make a cute leather bracelet:
1) Cut out 2 rectangles from an old belt

2) Cut out the arrows from leather (we didn’t use a template, but you can draw one and cut it out)

3) We make 2 holes on the arrows: one in front, the other in back. To do this we use a hole punch

4) Pull the chain through the holes

5) Wrap the chain around your wrist (if it is long, you can cut it with pliers)


We will need:

- Buttons
- Button inserts
- Hammer
- Scissors
- Paints
How to make a colorful bracelet with patterns

1-2) Cut out strips of leather 2.5 - 5 cm larger than the circumference of the wrist. Our width is 1.5 cm, you can make any other
3) Apply the first layer of paint in the form of geometric patterns. Let it dry
4) Apply a second coat of paint


This bracelet will be a great gift for your girlfriends! Be sure to do it :)
Bow bracelet
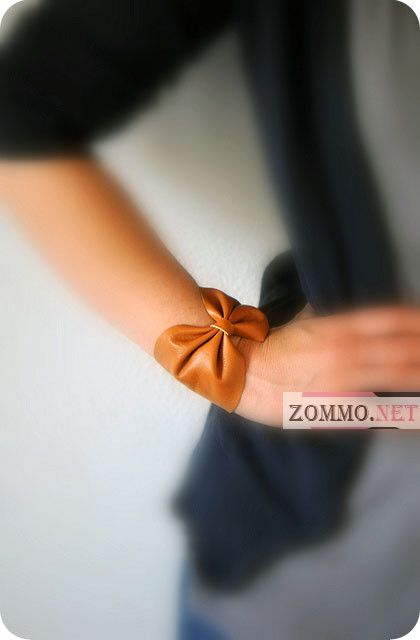
We will need:
- Piece of leather 22 x 10 cm
- Scissors
- Threads
- Buttons
How to do:
1) Cut out an oval piece of leather measuring 22 cm x 10 cm (yours may be different, depending on the width of your wrist)

2) Fold the skin in the middle as shown in the picture below

3) Wrap thread around the fold

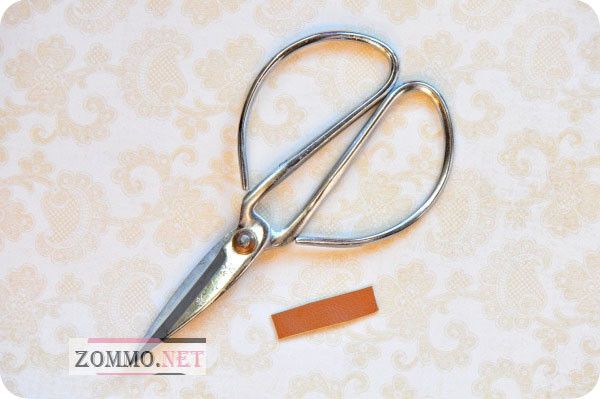
4) Cut out a small piece of leather, approximately 4 cm x 1 cm
5) Glue a small leather rectangle on top of the threads

6) Using threads, sew buttons on opposite sides of the bracelet


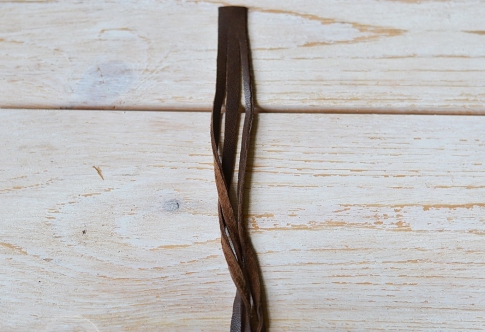
Weaving leather bracelets
Weaving patterns for bracelets
Now we can look at an example of how to weave a leather bracelet:
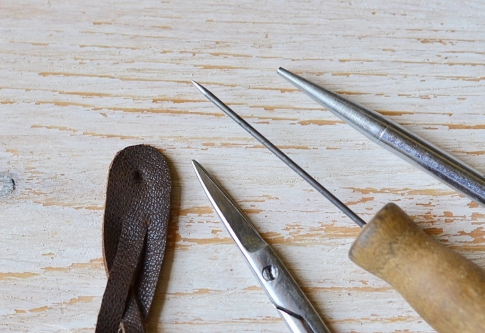
Bracelet with carabiner

We will need:
- Leather or suede tape
- Scissors
- Pliers
- Tool for clamping (not only a specialized one, but a simple clothespin will also work)
- 2 clamps
- 2 rings
- Carbine
How to do:
1) Cut a piece of tape so that you can wrap your wrist 3-4 times (we cut it 4 times)

2) Cut 2 more pieces of the same length

3) Lay out the laces in a straight line, put on the clip and secure with pliers

4) Using a clamping tool, fix the laces and braid the braid (how to braid is up to you, everyone has their own method. You can see the basic diagrams just above)

5) We wrap our unfinished bracelet around the wrist, you should get 2 turns. We cut off the excess, leaving 1-1.5 cm

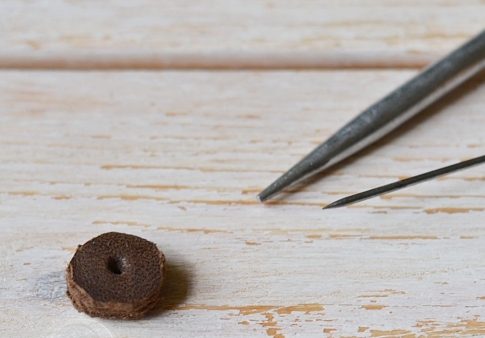
6) We put on the clip, as in point 3
7) Using our pliers, we put on the rings. We close one, leave the other ajar

8) We put on the carabiner and close the ring

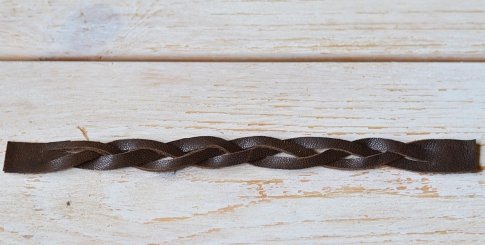
If you did everything correctly, you will end up with a woven leather bracelet like this.

True, we already have 2 of these on hand :)

Don't be afraid to experiment: make a longer bracelet or make several of them, change the color of the leather or weave.
Several video tutorials on weaving bracelets
Why are these leather bracelets the best?
They are quite simple to implement. It took us more time to write the master class than to do the work itself.
They are durable. Bracelets made according to our MK will be worn for a very long time.
They are unisex. Although we've broken the bracelets down into categories, they're all really unisex. Even men's bracelets can be made from pink leather, then they will become women's :)
Similar materials
How to make leather weaving? How to learn quickly? How to become a master and give beauty to yourself and your loved ones? We'll talk about this in the article. Fashion does not stand still. Very often, in magazines and fashion shows, skin dominates. Previously, leather products were reflected in clothing, but recently leather accessories have been gaining popularity. Let's look at the basics of working with the material.
Handicraft progress
The history of working with leather is quite interesting. Processing began from the Stone Age, when clothing made from skins, belts, belts and bags gradually appeared.
Weaving is a type of leather processing where craftsmen combine several techniques to create a product. Often in jewelry practice there are woven macrame elements made from lace.
What can you create from? It's easy to use up unwanted leather items. For example, gloves, briefcases, etc. But do not forget about the quality of the material. Pay special attention to thickness, elasticity and color. It will be more difficult to work if the product has a drawing or some kind of ornament.
But the masters advise not to remake the old into the new. It is better to spend money on new leather so that the accessory will last longer and be attractive. Each item has its own expiration date, so often unnecessary things can ruin the whole job. Leather is sold in specialized stores. I'm glad that there are many colors and product options.
For beauty
It’s easy to make bracelets with your own hands, which are becoming more and more popular. Such products look elegant and beautiful. It all depends on the weave. You need to purchase pieces of leather that will become the base and cut them into strips. Manufacturing requires few materials and a lot of attention.
So, let's begin. Let's consider several weaving options that are suitable even for men. The first option is a bracelet bracelet.

It is thin, delicate and looks beautiful on the hand. This accessory is multifunctional because it can be worn at any time of the year.
We will need a leather blank. If there is no such thing, then cut a wide strip of leather and put buttons at the ends, as the diagram shows.
Depending on the fittings, the style of decoration changes.

The second option is “Women's Secrets”. The accessory is suitable for bright summer outfits. You can choose the color yourself, depending on your ideas. The technique is simple, even a child can handle it.
Take three colors of thread, a strip of leather, some chains, a plug with a clasp, scissors and glue.
- Cut the thread into 9 parts (20 cm, two pieces each). We lay them out in threes, having previously secured the edges.
- Let's start weaving. Watch every movement so that the product is smooth and beautiful.
- Finally, pay attention to the clasp. Secure the bracelet before trimming the ends. Apply glue to the ends of the bracelet and clasp. The accessory is ready!
To make sure it works correctly, look at the photo:

The third option is an unusual braid.
- To get a wicker product, we take three identical leather ribbons.
- Remember the numbering of the stripes: 1-left, 2-middle, 3-right.
- Let's start weaving. We pass the edge of the product through No. 2 and No. 3, and lower it down. The stripes are twisted.
- We pass the edge between No. 1 and 2, lowering it down.
- We repeat the previous movements until the end of work on the product. Straighten it.

Craftsmen divide types of bracelets into categories. They vary in design.
- Thin and thick accessories:

- Accessory with buttons, fasteners:

- With patterns or rhinestones:

- With a few turns around the wrist:

In addition to regular weaving, there is circular weaving. In addition to thin leather, you will need a rope. It is this that the cords braid.
Progress:
- Take four birch cords about 2 cm. We prepare a rope of the same length. Pay attention to the diameter - from 3 to 5 mm.
- Using glue (preferably “Moment”) we connect the ends in a circle (15-20 mm in length). Secure the gluing area with thread.

- We divide the cords into two parts. Remember the left and right parts by mentally numbering them. We take the left ones in the left hand, and the right ones in the right.
- Let's use the diagram.
- When the length is about 130-140 mm, we secure the end with thread.
- Lubricate the unbraided ends with glue. Leave to dry.
- Flatten the ends of the tubes. Make a place for the fixer, install.
Here is the result, which looks like a whip:

Leather bracelets do not last forever because they are made of delicate material. You don’t always find high-quality products in stores, so when purchasing, check its strength and the presence of excess threads. Of course, the leather belt also needs to be checked. Often they can become worn, worn out and lose their shape. It is dangerous to buy products in online stores; there is no way to check the quality and verify the authenticity of the brand. Try making your own accessory. It's easy to enjoy the work. But it’s even nicer to wear something you made yourself.
Video on the topic of the article
The creation of leather bracelets is reminiscent of something primitive - of the times when the first people invented jewelry. Nowadays such jewelry is at the peak of popularity, symbolizing freedom and non-recognition of rules.
Try making your own leather bracelets to embrace fashion trends.
Selection of materials
Craftsmen who make their own leather bracelets know that each craft pattern requires a certain type of material.
For example, if you want to create wide symmetrical or asymmetrical bracelets with a minimum of decoration, you will need thick, rough leather - saddle and crust. Most often, men's bracelets are made from saddle cloth.
If you need thin woven bracelets and baubles, choose soft leather ribbons, like suede or yuft - they bend and stitch well.
Make a wide blank, which you will decorate with many ribbons and stones, from leatherette - it is soft and can be easily processed with needles and hole punches. In addition, leatherette is much cheaper than natural material.
Women's bracelets
In the last few years, world-famous designers have introduced the fashion for leather bracelets. People lined up in jewelry stores to buy Chan Lu leather bracelets with natural stones, nuts and rivets.
But handmade jewelry is in no way inferior to the originals! Try it, it's very simple.
Leather bracelet with beads
The jewelry consists of several suede threads, bracelet clasps with flat clips, and beads with holes large enough to fit your laces through.
- Prepare the required number of lace cuts, equal in length to the size of your wrist + reserve for knots.
- Secure one side of the laces with the clasp clip.
- Start stringing beads onto one of the threads with your own hands, securing them on both sides with knots. Do the same with all the other threads.
- Once the process is complete, secure the loose ends of the laces with the clip of another fastener.
Your bracelet is ready! To vary the appearance of your jewelry, use several types of beads, alternating them on a thread or putting each new type on a new cord.
Braided bracelet with chain
These leather bracelets can not only be worn with casual wear but can also be worn at formal events due to their sparkling appearance. Bead bracelets are woven in a similar way, which are also universal to wear.
In the process you will need bracelet clasps with ring fasteners, 1 long piece of suede ribbon and 1 thin gold chain.
- Thread the ribbon and chain through the ring of the first part of the clasp. Arrange them so that you have 2 side leather laces and a double chain in the middle.
- Start braiding a regular three-strand braid with your own hands.
- After completing the weaving, secure the bracelet parts in the ring of the second clasp.
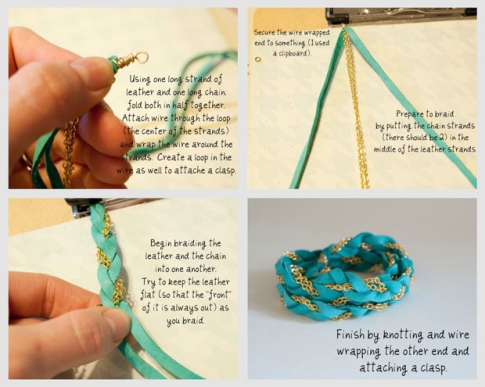
Now you can put on your leather bracelet. You can thicken such bracelets by fastening together several similar weaves at once.
To learn how to weave popular Chan Lu leather bracelets with your own hands, check out the following video tutorial.
When creating such bracelets with your own hands, round or faceted natural stones are used. They can easily be replaced with cheaper plastic beads that look similar to turquoise, coral or pearls.
All women's leather bracelets can be worn with sports, casual, safari and marine styles, that is, with clothes for nature, walking and relaxation in neutral tones, similar to the color of the leather on the bracelet.
Bracelets for men
Men's leather bracelets are distinguished by their simplicity and laconicism compared to women's ones. Often the maximum decoration of such jewelry is rivets, spikes or types of weaving.
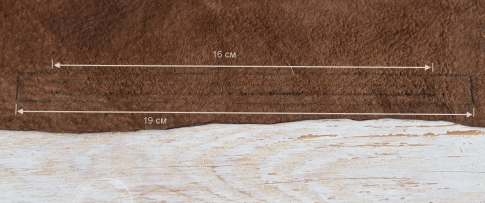
Now you will try to make a woven leather bracelet for men with your own hands. While working, you will need a piece of leather 5 centimeters wide and about 20 centimeters long.
- Draw the pattern of the product on the back of the leather. The length of the bracelet must be at least 19 centimeters. Make 2 cuts in the middle, not reaching the edges by 1.5-2 centimeters.
- Place the workpiece vertically and mentally or using an erasable pencil, number the cords from one to three. Bring the bottom edge of the bracelet between 2 and 3 cords.

- Straighten the cords as you weave. Continue weaving in the following order: the first cord with the second, the third with the first, the second with the third.
- Bring the bottom of the workpiece forward between the third and second cords with your hands.

- Adjust the cords again so that the lines go down to the bottom of the workpiece in the correct order - first, second, third cord.

- Repeat steps two through four. You should now have a finished braid.
- Give the desired shape to the edges of the bracelet and use an awl to make holes.
- Set the bracelet aside. To make the fastener, glue several pieces of leather together and leave to dry for a day. When the workpiece is dry, round the edges, make a hole in the middle and smooth out the unevenness with sandpaper.
- Thread a thin leather cord through the holes in the bracelet. Pull both edges through the resulting leather nut. Tie the edges of the lace with knots.
Weaving is quite simple to perform, so you can master it the first time.
The decoration will be a welcome gift for your man. These bracelets will fit perfectly into a casual street style. High-quality work will suit even classic-style suits if you are heading to an informal meeting. But at a special event it is better to appear without a bracelet.
Children's bracelets
Children love to imitate adults by decorating themselves and wearing their parents' clothes. Make your own leather bracelets for a little fashionista or fashionista that will attract your child with their bright design. Such bracelets can compete in popularity even with well-known bracelets made of rubber bands.
You will need a long thin leather cord and bright floss threads. This decoration is universal - depending on the colors of thread you choose, it can be given to both girls and boys.
- Wrap the bracelet loosely around your wrist 2 times and add allowance for tying. Cut to the measured length.
- Secure the cord with tape. At a distance of approximately 5 centimeters, drop some glue and attach the first color of floss. Start wrapping the thread tightly around the cord until you reach the distance you need. Place a drop of glue again and secure this thread.
- Start wrapping the bracelet with a thread of a different color. Continue alternating colors until you have braided about 2 inches of the bracelet. Secure the last color of floss using a needle and glue.
- Tie the remaining part of the cord in a knot around the other side. The knot should be strong, but the cord should pass through it freely.
- Repeat the previous steps on the other side of the cord and tie the cord again.

To make it easier for you to make strong knots on a leather thread, wet it with warm water and remember well to soften it and give it elasticity.
Kids can easily wear such jewelry to kindergarten, school or for a walk. And thanks to the bright design, the bracelets will suit any everyday children's clothing. But it’s better not to wear them with elegant dresses and formal suits.
 Today, many different types of leather bracelets are sold. There are models for men, women, and unisex. Some jewelry is fastened with a button, others are tightened with a cord. Colored beads and beads are used as decoration; pieces of leather of different quality and color are selected. Finishing elements can be woven into the bracelet or attached afterwards.
There are many options for creating beautiful bracelets:
- hemlines;
- in boho style from beads;
- with various stones;
- with metal inserts and etc.
How to make a leather bracelet with your own hands for beginners?
Pieces of high-quality leather, even small ones, can serve as material for making several bracelets. It takes a little material, the main thing is the quality, color, texture and imagination of the creator.


Important! Leather for a woven bracelet that will be worn for a long time should be of medium density - up to 1 mm. You need to check that its reverse side does not paint your hand.
Materials and tools
 In addition to leather, you need to prepare finishing materials, fittings and tools:
- Buttons for the fastener and a device for its installation.
- The waxed thread will be the basis for stringing the beads.
- Thread or leather laces are useful for making fasteners other than button fasteners.
- You can cut the stripes and motifs of the bracelet with a very sharp knife. It’s good if you have a high-quality disk one, but any other one will do for leather crafts. The main thing is that it is very sharp.
- It is important to use a special backing as a basis for cutting, but it will not quickly dull the knives for cutting leather.
Reference! Some leather elements will need to be glued. Glue is used like Moment for leather or simple shoe glue.
5 stripe bracelet
One of the easiest options to make is a bracelet woven from leather strips.
The materials used are the simplest:
- a strip of leather equal in length to the circumference of the arm, in width - the number of strips multiplied by 0.5 cm;
- sharp knife for cutting leather;
- beads and beads for decorating a wicker bracelet.

All production can be divided into several stages:
- If the leather is rough and thick, a three-stripe weave would be the best option. For thinner skin, you can cut five or six strips.
- You need to weave according to the pattern. To weave a large number of strips of leather, you need training, after weaving a certain amount, experience will come, your hands will get used to accurately and always weave the components of the bracelet, the strips in the same way, and the appearance will be quite neat.
- A woven bracelet can become the basis for further decorating it with beads and seed beads. The design for decoration is selected as the author’s imagination dictates.
- A metal button can serve as a clasp.
Leather bracelet with carved pattern
Simple bracelet– leather of greater thickness, from 1.5 mm, is suitable for its manufacture.
Materials for production:
- a strip of leather equal in length to the circumference of the arm plus an allowance for the fastener, the width depends on the chosen design;
- paste for drawing, easily removed with machine oil.

Manufacturing is simple, but requires great care:
- apply a pattern to the skin;
- cut out motifs with a sharp knife;
- Install a metal button in the center of the fastener.

Depending on the design and quality of the leather, the bracelet can be single-layered or placed on a second layer of leather in a contrasting color.
Braiding metal rings
Your favorite thin metal bracelets can be the basis for a new wicker product.

For the manufacture of need to prepare:
- several metal bracelets - from 3 to 6 pieces;
- waxed leather cord, you can buy it in the accessories and applied materials department.

Manufacturing will require a little patience and time:
- put bracelets on the fingers of your left hand so that the distance between them remains unchanged during work;

- metal products must be braided one at a time, maintaining the same braid pattern;
- Secure the ends with glue.

All handmade jewelry carries the warmth of the hands and positive energy of the creator. You won't find a better gift for friends and acquaintances.
We will need:
- About 2 meters of leather cord (2 mm) (the length depends on how many times you want to wrap the bracelet around your wrist. 2 meters of lace will allow you to make about 4 turns of the bracelet),
- 1.5 meters of leather cord (1 mm),
- 6 meters of leather cord (1 mm),
- About 140 small beads with a hole large enough to thread a narrower (1mm) leather cord through,
- a beautiful button (optional).
Of course, you can use leather laces of other diameters, the main thing is that they can be threaded into beads.
So let's get started! The bracelet on the right (photo above) does not have a button and will be fastened with a loop at one end and a knot at the other.
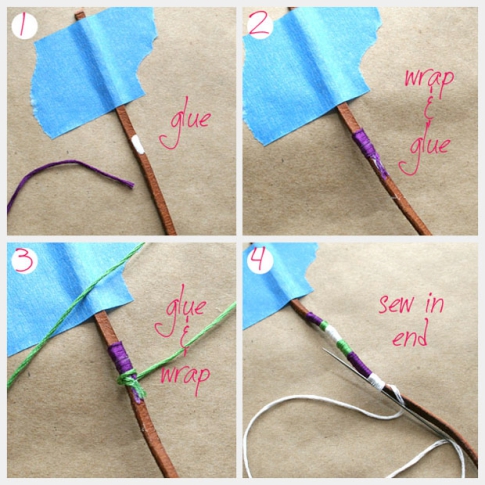
First, take a 2 meter long cord and fold it in half.
Now we take a lace 1.5 meters long and tie it in a knot around the loop as shown in picture 1.
Then we lean the short end of the lace (on the left in the picture) against the center, and tightly wrap the long end around the base of the bracelet in order to make a beautiful beginning.
It is very important to work carefully as the laces are very thin and can break. You can first practice strength on some other lace.
Now tie a knot as shown in picture 2.
Then we put all the beads on the long end of the cord (the one with a diameter of 1 mm) and tie a knot at the end so that the beads do not move out while working.
As for the short tip (the same cord with a diameter of 1 mm), it can be cut off or inserted into the first bead if the hole size allows.
So, let's move our first bead up.
Now we take a 6-meter cord and cut it into 2 identical parts (DO NOT CUT). For example, they can be wound into balls, as shown in picture 1 on the left.
We tie a knot (from a 6-meter cord) directly under the first bead.
Well, now you need to carefully follow the steps shown in pictures 4 to 14
At first there is a chance of doing something wrong, but don’t worry, you need to carefully undo what you’ve done and start again with the second bead. Or maybe everything will work out right away.
It is very important to alternate weaving “above” and on the next bead “under” the thin cord in the middle (which has beads). It is necessary to maintain alternation in order to secure the beads well and beautifully between two thicker cords (2 mm wide).
Well, do you see the alternation?
You can easily get the hang of it because this process looks more complicated than it actually is!
Don’t forget to periodically wrap the bracelet around your wrist to see its length.
To finish, place 1 end of the braided lace in the center (for example, the left one), and wrap the other end around all the other laces. Then we make a knot as at the beginning of the bracelet, shown in picture 4.
Now we take all the ends and tie them into a large knot. Pull it tight. Depending on the length you need, you can skip a little space and tie another knot and another, as shown in the last picture.
If you are using a button on the other end of the bracelet, the distance between the two knots will be the button loop.
OK it's all over Now! Your hand-woven leather bracelet is ready!
http://bellezza4u.ru/accessuari/item/61-kojanii_braslet_svoimi_rykami.html
It's time again to stretch our hands a little, exercise our imagination, tap into the creative spark within us and make something with our own hands. And not even something, but trendy leather bracelets. What's great about these bracelets is that you can wear them with anything, especially ethnic clothing. In addition, there are a huge variety of different shapes, colors and options, so you can always choose a leather bracelet to match your outfit. Well, it’s not even worth describing how good they look on the hand.
So, let's get down to the actual process of creating bracelets.
DIY wide leather bracelets
You will need:
. Leather straps (strips of leather with a clasp at the end)
. Ribbons
. Metal spikes
. Threads
. Super glue
You can simply glue a narrower piece of tape onto the bracelet and add some spikes.
Or you can attach spikes and entangle them with a bright thread (yellow, for example). You will get 2 wonderful bracelets.
A couple more options for the creative process “How to make leather bracelets”
You will need:
- leather laces - you can use thin leather ribbons
- floss threads
- glue
- scissors
- scotch
- needle
Step 1
Measure your wrist by wrapping the leather cord loosely around your wrist twice, then add an extra 10cm to tie it. Glue one end of the leather cord to the surface so that it does not move and, stepping back about 5 cm from the edge, drop a drop of glue onto the leather cord and attach your first color of floss to it.
Step 2
Continue winding the floss around the leather cord until you have a strip of the width you want, then cut off the rest of the thread, securing the end to the bracelet.
Step 3
Take a different color of thread and do the same procedure with it again. Continue doing steps 2 and 3 until you have done about 5cm of different colors.
Step 4
When you're done wrapping, take the needle and pass it under yours. If you want, you can add a small drop of glue to make sure your floss doesn't come off.
Step 5
Tie the end of the lace that is closest to the wrap around the other end of the lace. Make a simple knot. The knot should be strong, but the leather lace should pass freely back and forth and slide through it.
Advice: Before tying a leather lace, wet it a little and remember it to make it softer and easier to tie. This will also help make a strong knot.
Step 6
Leaving at least 10cm on the other side, repeat steps 1, 2, 3, and 4 again.
Step 7
When you have finished wrapping the other side of your bracelet, re-tie the loose end on the other side.
You will get wonderful multi-colored bracelets.
Well, now more complex options:
You will need everything you have on hand: leather laces and strips, beads, chains, glue, threads.
1. Bracelet with beads. Take 2 laces, place beads between them and attach the beads to the laces by passing threads through them and entangling the laces with these threads. In the photo: the first from the wrist.
2. Multi-strand bracelet with beads. Just grab some suede threads, a couple of end clasps, and seed beads with holes for your threads to fit through. String your beads and beads onto strings, tying the thread after each with a knot. Secure the fasteners at the ends.
3. Braided bracelet with beads. This is also an easy way. Just start braiding your hair with suede threads, adding beads here and there, secure the clasps at the ends, and you're done. This woven bracelet can also be made with a chain. Just add a thin chain instead of one of the threads and start braiding.
Don't stop your imagination. You can make your own options and variations. The main thing is that you don’t have to buy such wonderful bracelets in the store.
DIY leather bracelets (video)


